Wednesday, December 31, 2008

Sketches for Smaller Layouts

Most of these sketches, I designed for the 5.5" x 7" portrait layouts that fit in the clear stamp page protectors that I'm using for the 7 Gypsies Photo Carousel. A few of them will work quite well for the 4" x 6" photo pages that 7 Gypsies suggests for the photo carousel.

I didn't design these pages to be shared, I just did them for myself. There are references to products that I own, but others might not have heard of. I work in pencil, in the truck, sitting at the doctor's office, wherever and whenever. I didn't clean them up and make them look pretty. They are just sketches! So far, there are 36 different ideas.


Monday, December 29, 2008

Shelf or Rack?

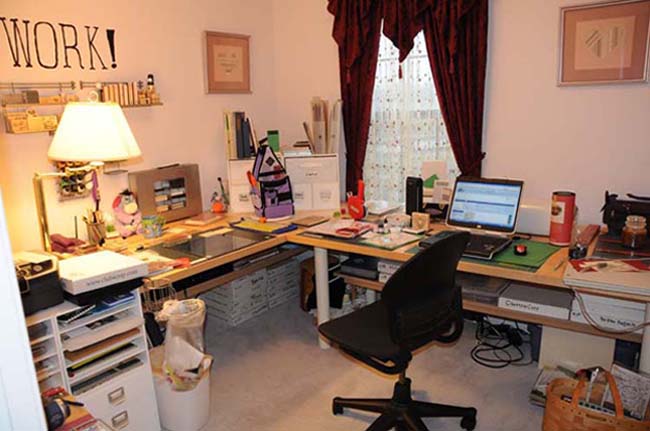
If you look at my studio space above, you will notice a Jetmax cube with shelves in it that's at my left hand. The contents of the shelves have been changed since I took that photo and the shelves held 'big, flat tools and work surfaces' like my glass mat, my stamping mat and my big Score-it board. Getting the big, flat tools and work surfaces out and putting them away was a PITA. No matter which one I wanted, it was on the bottom of the stack.

By turning the cube from noon to 3:00 and making it not a set of shelves with things stacked on them, but a rack where I can slide things out that are side by side, I made getting those things out and putting them away much easier.

I also did that with my paper, when I took my paper off those shelves and put it into storage bins from Cropper Hopper.

DOH! Isn't that what we do with books? Isn't how file cabinets work? We don't store things by stacking them up. Next, I want to tackle how I store my ribbons. There's got to be a better way than those loose spools...

Sunday, December 28, 2008

Sketches and Scraps

I haven't had a lot of time to crop, so I've been sneaking a few minutes here and there to do sketches for layouts that I can use later. It's working. When I've got time to sit down and crop, I'm working through the sketches and I'm getting a lot done more quickly.

I'm not keeping a lot of scraps these days. I have yet to think, "That scrap of yellow print that I threw away four months ago would have gone perfectly with this layout. Why didn't I keep it?" Nor do I dig through my scraps and find the perfect piece of anything to go with a layout that I'm needing 'just a little more' for. I don't miss the ones that I throw away and I don't use the ones that I keep. Ummm, why keep them?

Friday, December 26, 2008

Christmas Cropping


I realized that I could move the carousel downstairs and spend time with DH as we watched Christmas movies. I spent a good chunk of Christmas day cropping photos and putting the date the photo was taken on the back. We don't have many photos from February (DH had a Horrible Cold) and June. I don't know what happened then. Nothing camera worthy, that's for sure.

I have printed out almost one year's worth of photos and the carousel isn't half full. I didn't print out all the photos from any event, just one or two of my favorites from each. Those 4x6 pockets are going to be horribly difficult for me to fill. Mostly because the photographer in me doesn't want to crop a photo down small enough to fit on a layout that size.

Thursday, December 25, 2008

The Future is Now

I scrap so that some future generation can have some memories of things that happened years ago. I have just had it pointed out how things that you don't think are that important can become very important to someone years down the road. My BIL had made a video of my niece's elementary school graduation celebration. He was probably playing with one of his geek toys. It's in digital format. He found it recently and he's sending out copies.

This will be the only recording I've got of my parent's voices.

Monday, December 22, 2008

200+ Pages?!?!

The reason you are not seeing photos of completed carousels all over the place is quite simple. These are a BIG project. You aren't going to complete one in a short time. I have spent two pleasant evenings working on mine, and I have 0.5% of it complete. Perhaps. It is probably because I'm doing complete layouts for each page, with journaling and embellies. But I'm using my stash!

Come to think of it, I've seen only two photos of completed carousels; one was filled with a card collection and the other was a baby album made before the baby was born, with no photos. Hmmm..... But the baby album did give me a couple of ideas for pages that I'd like to include. I've got to track down chipboard, though.

Sunday, December 21, 2008

Carousel Information

I went out on the web looking for information on the 7 Gypsies Photo Carousel and couldn't find much, other than ads. However, I have information now! Thanks to a teaching friend of mine and my own experimentation, I now know that:

The idea is to fill the carousel to the point that the center metal portion is not visible when you part the pages to look at a pair of them.

Filling the carousel will take anywhere from 75 to over 100 page protectors, depending on how thick your layouts are. That would be twice that number in finished pages or 150 to over 200 layouts. It can hold a lot of stuff!

A partly filled carousel is tippy and off balance. You can easily add pages, but moving them around isn't always easy. There are ridges to keep the pages from slipping on the clips as you spin. Squishing pages together to add a clump can be tricky.

The larger page protectors are designed to hold the 7 Gypsies clear stamp sheets, but they will work on the photo carousel and hold a 5.5" x 7" layout. That's portrait dimensions, not landscape.

Using layout ideas for 8.5 x 11 pages works well for these pages. The proportions aren't the same, so you can't simply scale down. Just use the general idea.

I have been printing my photos 2-up on a 5" x 7" piece of photo paper and they are a good size for a layout using the larger page protectors.

It is a very good and useful thing to have ribbons, tabs and other decorative pieces stick beyond the page protectors. It becomes very difficult to find anything if you don't. You get lost going around and around.

Since I'm using the clear stamp pages and not the 4 x 6 photo pages, most of the 7 Gypsies 97% finished items, like the calendar pages with tabs or their pre-cut chipboard, are too small. I need to cut my own out of manila folders or chipboard.

I need to allow at least 15" x 15" of flat area to display my finished carousel, and to look impressive it needs more like 20" x 20". It will occupy most of my square coffee table. It will not fit on the average bookshelf, not even with part of pages extending beyond the shelf. If I were using only the 4 x 6 pages, the finished carousel would be much smaller, needing only 12" x 12" of space at a minimum.

Thursday, December 18, 2008

The Latest Project

I got one of the 7 Gypsies Photo Carousels. I think it will be a great addition to our family room, and be something on the coffee table that is not clutter. But I'm struggling with designing layouts for the different sized pages and with figuring out how many pages it is going to take to fill it. I've got one of the special shaped hole punches for it, so I can create my own pages. There are pocket pages, there are calendar pages, there are all sorts of pages I could buy, but I'm trying not to shop like crazy for this thing. I want to create the pages for myself out of the paper that I already have.

Wednesday, December 17, 2008

Disney Video!

Everyone should know how much I love Disney. Well, Disney loves me back.

Sunday, December 14, 2008

Taking Stock

I was thinking about how much I have done in the two years I've been doing scrapbooking. I started counting up finished albums. I've completed 18 albums and at least 6 mini books/albums. It could be more mini books. I don't remember them all.

But, if each album has 35-40 pages in it, I've completed at least 650 pages since I started scrapping. It doesn't feel like I've made that many, but I guess I have. And that isn't counting the digital layouts.

I had been feeling badly about the size of my stash. When I counted up inches of cardstock and patterned paper, I could complete an estimated 500 pages with the paper that I have in my studio right now. I had been thinking that I'd be scrapping for many years to come with the paper that I collected in a fairly short time.

I no longer feel nearly as bad about the size of my stash. I know that in one year, I could use up more than half of it. Let's see what happens in 2009.

Friday, December 12, 2008

It Is Later, Now

I have a few layouts that I always said I'd get back to later and then I never did. Everyone has some of these. Ones that need journaling, or additional embellishment. Just something that you weren't in the mood to deal with at that moment and you set them aside for later, when you felt like working on them.

I have decreed that it is 'later' right now.

Two down and a small stack left to go. When these are done, I have even used my 50% off coupons and gotten a new album to put layouts in. I'm tired of putting them into boxes to deal with later. I want them all done, now.

Sunday, December 7, 2008

Not Shopping

I was at my LSS yesterday and I wandered around a lot, looking at things. She's a Mrs. Grossman's outlet, so she carries a lot of stickers. I don't scrap with stickers very often. Anyway, I was looking for a particular set of stickers, a set of dates for a calendar year, that you can use when you are making your own calendars. She didn't have any. I left without getting anything.

I didn't buy anything at all? Yep. It's happening more and more. I'm working on using up my paper stash. I haven't printed out many photos recently to put onto the paper that I have. I have plenty of supplies to create paper layouts and I don't feel like buying any more. Nothing really strikes me as being something that I must have.

I went on-line and found the stickers. I don't want to pay shipping for a single sheet of stickers. I've got a lot of number stamps. I guess I'll use those on the calendar, instead.

Saturday, December 6, 2008

It Isn't A Sketch

Though I can almost understand why she might think so. A lady at last night's crop looked through my Page Maps deck of ideas, from Becky's book and was thrilled. Not so thrilled that she could put them back in order, but still, thrilled. She'll probably toddle out and get a set of her own. Then she looked at a completed digital layout and asked what would I do with it. I talked about printing them out and having books created. She still thought that the completed layout was a sketch for something that I would then re-create in paper. No. Why create in digital at a quality I can print out in and then do all the work a second time in paper?

Some folks simply do not understand that the digital world is a real world. While it is not objects you can touch, it is information. Information about products you can purchase, for example. You see information in to form of pictures and words about objects. You send information about your credit card. Based on the information you have sent, the company can then take action, get your money and send you the product you purchased.

Digital scrapping is the same. It is visual information in the form of layouts. You look at them. You enjoy what you look at. Even though you are not turning pages, you are still looking at an album.

Thursday, December 4, 2008

Stamping on Watercolor Paper

I got a 10.5" x 14.5" sampler pad of Strathmore watercolor paper. It contains two different types of 140 lb. cold press paper, two different types of 140 lb. rough paper, one 140 lb. hot press paper, and one 80 lb. cold press paper. I got two sheets of each 140 lb. paper and three sheets of the 80 lb. paper. So far, I've tried the hot press paper and the 80 lb. paper.

The hot press paper is my favorite watercolor paper for stamping. The watercolor paper available at the average craft store is cold press. If you go to the artist supply shops, you can find hot press paper. I strongly suggest that you do so! It's wonderful stuff. It is smooth, so your stamps come out better. With 140 lb paper, I don't have a lot of trouble with bleeding, either. Whatever technique I use to add color seems to work better with the hot press and I've tried Copics, watercolor pencils and markers.

The 80 lb cold press paper has every problem I've ever heard about for stamping on watercolor paper. It was rougher, so some of the details of a delicate stamp didn't show well. It also bled very easily, so a bold stamp with a good amount of ink would have blurry edges. Adding color to this paper is harder. I had bleeding with watercolor pencils, Copics and with markers. I felt like I didn't know what I was doing anymore. Often, it looked like I'd tried too hard to erase and had worn out the paper, when I was just doing a light circular blending stroke with my brush that would be fine on a more robust paper. This paper was a fail. I've still got two sheets of this paper left and I'll cut one up for samples and probably throw the remaining sheet out. I hate it that much.

I don't hold out a lot of hopes for the rough paper, but I'll give it a shot. The cold press paper is the same as the other cold press paper I've used in the past. I don't expect it to be a learning experience.

Light weight paper in cold press is nasty. Do not bother trying to save money by getting lighter weight watercolor paper. You might save pennies, but it will cost you results.

Wednesday, December 3, 2008

Why I'm not Posting Pics

I do most of my digital layouts with elements and paper from Ztampf! I have read her TOU (Terms of Use) and unless I reduce the ppi by a lot more than I am usually willing to, I may not post things using her paper and elements on the web. I'm debating this with myself. I've got my standards, but she has her TOU. It is me that has to do the adjustments.

I'm also not doing really nifty, interesting layouts. I'm kinda slapping photos onto a background, putting the minimum embellies on the page and doing a bit of journaling. The pages are done, but they aren't pretty. That's why I want to challenge myself to do a bit more than the basics on my pages and use those layout ideas that I have so many of.

Tuesday, December 2, 2008

Maps and Ideas

I regularly go to the Page Maps website that I've got a link to in the sidebar and grab the once a month selection of layout ideas. I don't use them nearly often enough, but I'm trying to make myself use them more. I can do a better job with my digital pages if I use layout ideas to get a jump start. The layout ideas are free and they really do help a lot when I'm stuck, or tired of the same old layouts. I need to use them more than I do. Perhaps I'll challenge myself...

Monday, December 1, 2008

Half Full, or Half Empty?

Last night, as I was chatting with a scrapping friend about going digital, she asked about how large the digital files were. The answer was "Huge, and that's why I have the external hard drive." She wanted to know how large the drive was. I opened MyComputer and realized that my Huge external hard drive is more than half full! I haven't even had it for a year. All I store on it is photos and digital scrapping files.

While I still have a large chunk of space available, I'm now thinking about what I want to do to when this drive is full. Yikes!

Option one- get a larger external hard drive.
Option two- off-load photos and/or finished pages by burning them to a DVD.
Option three- be more selective about which photos I save.

For now, I will delete photos (especially since I've gone to shooting in RAW as well as .jpg) and that will be enough. I'm saving the bad ones, and I shouldn't.

No matter what I do, it is time for me to run a backup, as one month has come to an end. I have stuff I don't want to lose. It's also time for me to make sure that I have labeled my backup DVDs so I could find the files that I need. Ugh, but necessary.

Sunday, November 30, 2008

Not Shopping

With the economy doing the nosedive trick, I've cut back on my own shopping. Not for groceries and such, but I'm not shopping for scrapping things. I didn't realize how much I'd cut back until I went to the scrapbook store in the area with my MIL. She got some ribbon to wrap a package and I got nothing at all. I had money in my wallet set aside for 'fun stuff' and I didn't spend any of it.

The more I don't buy, the easier it is for me to not buy. I'm still creating pages, but since I went to digital scrapping, I re-use my digital supplies again and again, without having to purchase more to restock my stash. I've still got a lot of paper to use up and I am still doing many paper layouts. The things that I'm willing to spend money on are tools that I can use for hybrid scrapping.

Monday, November 17, 2008

Product Review

About those downloads.... I am in general very happy with them. I've realized that Miki Ferkul creates sets of frames with ribbon wrapping them. I don't care for the ribbon wrap, it just isn't my style. But she doesn't include frames with no ribbon and it's a royal pain to try to cut and paste and merge and healing brush and whatnot to try to create plain frames. I do like the way she limits her bling. I'm NOT about the bling, so being able to limit what I use is good. If I wanted more bling, she has accents that are bling-a-plenty. While I won't get a lot more of her kits, I'm happy with the ones that I do have. If I find myself in need of 'girly' kits, I know just where I'll go.

I also got some accessories that are going to have to wait until I have Harley Davidson photos to go with them. Bud and I have been parenting and not riding very much.

The free 'Welcome Home' kit contains a heaping helping of accessories and paper, but it isn't really in colors and styles that interest me. It's a lot more 'country' than I will ever be. Remember when some women were decorating their kitchens with ducks? Yeah, it reminds me of that, but there's not a duck in sight. It's rustic, rural, homey, and not at all they way I live or scrap. I might use some of the bits, I probably won't. I'm glad I got the kit for free.

Legally, I can't sell it, or share it, but if I give it to a friend and delete it from my own computer, I'm OK. I should NOT use any part of it before I give it away, to be technically and completely legal. I don't think that will be a problem. The problem might be finding one of my friends that has that style of working. We are all pretty urban.

Saturday, November 8, 2008

All Over but the Shoutng

The USMC Graduation album is done! Except for the memorabilia page and a little bit of journaling, it is finito. Yay? I don't know quite what to work on next. I'm puttering around with a mini album I started a while ago. I need to finish the front and back covers. Then what? The decision of what to work on next is as overwhelming as the mountain of tasks I've set for myself.

Even with blasting through this album quite quickly, I am still falling behind. My photos to scrap stack is growing faster than my finished pages pile. And I have been rather productive this month. We had graduation, life and a trip to Disney. Next month will be just as busy. Or rather this month, as I'm catching up on October's events in November and we have Turkey Day, a trip to visit Will in NC, and a tool box recovery coming up in November. Over Christmas, we shall draw a polite curtain.

Friday, November 7, 2008

USMC Planning and Progress

I'm doing better than I thought I'd be at creating the album for Will's graduation from boot camp. My photo sorting went well and I've got the entire album planned. Yesterday, I pulled paper from my stash (I'm trying to use it up) and selected what I'll use for most of the rest of the album. When I counted up, I realized that I'm more than halfway done with the album. Yay! The pre-planning is really helping. I'm not losing momentum.

I do not understand why some scrappers choose paper that matches what folks are wearing when they create a layout. The people in the photos fade right into the background and you can't find them. If you choose a color of paper that is opposite on the color wheel to what is being worn, the person pops out and can be found. Will is wearing a tan shirt for all of the photos, and I can't use paper that is brown or tan. He just fades into the background. I've pulled green and blue paper. He'd pop best if I were to use a purple, but I can't do that to him.

Monday, November 3, 2008

Backing up Files

As it is close to the beginning of the month, I am taking a few moments to make sure that my back up system is in order. My process is pretty simple. Download files. Move files from laptop to EHD, leaving a copy on the laptop. When I have enough files, I burn them to a DVD and delete them from the laptop and the EHD to save space. Finished and in progress layouts are stored on my small EHD. When I feel the need, I copy them to my second EHD. The goal is to have two copies of a file, but not more than two.

The most important steps are based on a question I ask myself before I shut my computer down for the night. "If I could not re-start this computer tomorrow morning, would I be upset?" If the answer is yes, then I make a backup. If the answer is no, I just shut it down.

Sunday, November 2, 2008

Downloading More Kits

I headed out to Scrapbook Elements for the Digital Scrapbooking Day Sale and with a little fidgeting, managed to reach the necessary minimum purchase for the big freebie. I needed to purchase $20.00 worth of stuff and I spent $20.63. Then I spent 30 minutes downloading kits, backgrounds, alphabets, torn edges, and borders. I haven't had time to do anything with the stuff I downloaded, so I can't comment yet on if it's nice. I got a Miki Ferkul kit and items from at least four other designers.

I didn't have time to play with my new digital stuff because we went out to West Virginia to the 20 acres we have there. We loaded up the truck with firewood so we could enjoy the fireplace this winter. Last year, we cut up a few downed trees and left the fireplace length logs piled up in several places. This year, we went back, split the wood we'd cut and hauled it off to burn. Do we own a log splitter? Yes, it's called 'Bud', and it is quite effective.


Sunday, October 19, 2008

The Excitement in my Life


This is Will, my stepson, and me. We drove down to South Carolina on Wednesday. Thursday, we went to Parris Island for Family Day and Friday for the graduation. We had a nice lunch with Will and then drove back up to VA on Friday. His mother had plans for him and she had not thought about including us in those plans. Will is going to see us next weekend, when we go to Disney. Oorah!

I'm in my studio, printing photos. I was out of photo paper and had planned to get more, but with the trip, hadn't made it out to Costco.

I had thought that with an adult lifestyle, meaning no young children in the house, I wouldn't have so many photos that I couldn't keep up with my scrapbooking. Hah! What with trips to Disney, Marine Corps graduations and life in general, I've got more than enough photos to keep me busy.

Monday, October 13, 2008

S*U*C*C*E*S*S

That's the way you spell success! The three day crop was nowhere near a fail. I did a fail at planning what to bring. I just couldn't decide and threw a bunch of things into several bags and headed out the door. When I got to the crop, I had no adhesive gun. But I did have my laptop. I ended up doing all three days as a digital crop and I do NOT regret it!

I took most of the bags of stuff home the first night. I didn't want to haul them back and forth, so I didn't. I took even more extra stuff home the second day. By the time the third day came to a close, I really didn't have a lot to drag out to the truck. Yay!

Sunday morning, I got up and downloaded a few more files, so I could finish off layouts that I'd started and not had the elements to finish. I don't try to work fast at a crop, so getting 14 pages done was just fine with me. I probably could have gotten more pages done if I had really buckled down, but I wasn't in the mood to buckle down and go into hyperfocus. I wanted to be able to enjoy working on pages and talking with folks.

Will I go digital for other crops? You bet! I love the idea of not having a lot of stuff to carry into the building. I don't really like trying to pack up half of my crop space and take it along. Digital works.

Thursday, October 9, 2008

Found It!

Sometimes, I swear, I need to wait about two hours before I post anything. Yep, that's about how long it took me to find a digital scrapping tutorial page with actual information on it beyond 'How to Re-color an Element.' It is the Digital Scrapbook Place Tutorial Page. I found information on a couple of things that I wanted to learn and a few more that I didn't realize I needed to learn. The tutorials are even interlinked, so if one references something that is covered in another tutorial, you can hop right over and get caught up.

No, it isn't the ultimate resource for digital scrapbookers. I don't think that exists. But it is pretty darned good.

What I Need to Know

There is a convention happening in Salt Lake City this weekend for digital scrappers. I wanted to go at first, then I looked at the schedule of classes. The things that I want to learn are not going to be covered. I don't need to learn how to use a sketch or how to create a color set. I don't need to learn how to organize my files, how to get published in a magazine or how to photograph everyday events.

I want to learn how to wrinkle or curl a ribbon, in some way that doesn't require a plug-in or a template that I must purchase and download. I want to learn how to use my rulers and grids more effectively. I'd like to know how to mask more efficiently. I want to learn how to create a path that does not use a lasso or magic wand. There are probably a lot of other things that I'd like to learn how to do, but I don't even know about them right now. I'm such a beginner that i don't know what I need to learn. I do know what I have already learned and what I keep seeing over and over again.

There are lots and lots of free tutorials out there. The majority of them cover the same things. Re-coloring an element. Combining two pieces of paper to make a third. Changing the color of an element. How to use templates. How to color an element to match your paper. How to install a brush. How to re-color multiple elements. And so on. If I'm looking for a tutorial on how to get text to line up on a curved path, I've got to go to a Photoshop guru and look at a video. The digital scrapbooking sites won't get into things like that for free.

Now I get why the digital scrapbooking gurus have their followings. There aren't any digital scrappers who have free tutorials beyond the basics. But those tutorials are out there. They are on the Photoshop sites.

Tuesday, October 7, 2008

Current Project Excitement

I'm currently working on a digital calendar. I'm using Ztampf! elements and papers for it. I don't have enough of any other designer to complete 24 different layouts in pairs. It is a BLAST! I'm making a date page and a photo page for each month, trying to use a similar theme and style for each month. I'm having a lot of fun putting the papers together, adding the embellishments and creating layouts that are going to look spectacular when I get them printed out.

I'm going to make myself take paper projects to the crop this weekend and I might even work on them. When I get tired of working on paper projects, I'm going to put the paper away and pull out the pixels. The one thing that I'm going to miss at the crop would be my second monitor. That's such a sweet setup. Otherwise, all I need is my laptop, my EHD and my mouse. And a source of power. Which means I'll have to pack an extension cord and a surge suppressor. Hah. It all will fit in a single, cute basket that I already own. No huge tote, no lugging bags and boxes and bins. One basket.

Monday, October 6, 2008

Hold Everything!!!

I was able to contact Miki and she immediately corrected the issue with the wrapping wires and sent me a corrected copy!

We have an addition to the favorite designer list!!! She doesn't have a website of her own, but you can find her designs at Scrapbook-Elements under Miki Ferkul. They have a sort by designer option, so that's what I suggest you use to find all of her kits.

Close, but not Quite

I've been looking at the latest kits available for digital scrapping from many different designers and companies. This preview site shows quite a lot in an easy to scan through format. I thought I'd found a designer that I could add to my list of favorites, which is currently one designer long. Miki Ferkul of MicroFerk Designs looked promising. I purchased, downloaded, and unzipped her 'Rugged Wraps I' and 'Rugged Wraps II' kits.

Drat. When I went to put a wrapping of wires and clips onto one of my photos, the darned thing would not line up. The edges need to be lined up exactly with the layer below them. If they are overlapping, it will look like wires are coming through the item, not around the item. If they don't touch, the illusion of wrapping is lost. I zoomed in and realized that she'd created the wrap skewed. Miki didn't create her edges in a straight line perpendicular to the baseline of a layout. It is impossible to line up the entire wrap. One part or another is either hanging out in space or poking through the layer below. The entire wrap won't line up.

I'll have to tweak the wrap file to get the edges to line up correctly. That is annoying and I would rather not have to do it. Once I get them lined up straight, I'll save them that way so I don't have to do it a second time. But having to correct something that I think should be precise and already correct keeps Miki out of my favorites list. It's only three or four pixels wrong. But there are times when three or four pixels are important and this is one of them.

Sunday, October 5, 2008

Hybrid Projects

When I was working on my hybrid project of a tissue box cover, I realized a couple of things. If you want a digital file to print out at a specific size, you must trick your printer into doing that for you. The average photo printer will take a file and either shrink or stretch it to make it fit into a standard size output. It might also cut off part of the photo if it is too wide or too tall once it has been stretched or shrunk to size.

Even if you have set your printer not to cut off bits of the photo, it will usually do the stretching or shrinking part, to give you the 'best' photo it can. Just setting my printer to produce photos with a white border around the edge will not do what I want. The printer will still shrink or stretch my files so the edges are all exactly the same.

In order to trick my printer into giving me the correct sized graphic, I create a new document that is a standard photo size, such as 5" x 7". Then I put my odd sized graphic into the new document. When I save it as a new .jpg file, there will be a white border filling in to make the whole image 5" x 7". I just have to trim the white part off after I print it to get a graphic the size that I need for my hybrid project.

The other thing is that Photoshop keeps the parts of the layers that you don't see. If I am working with an graphic that is 4.5" x 6.7" and I drag a 12" x 12" piece of paper into that graphic, that paper layer is still 12" x 12". I can't see it, but the extra paper is there. If I cut a 4.5" x 6.7" piece out of the 12" x 12" paper and use that, I don't have extra paper that I can't see. If I let a ribbon hang over the edge, that ribbon will still be there, too. If I don't crop when I'm done with all of my editing, that extra stuff will stay in my image where I can't see it. I've got to merge all my layers and crop the graphic down to the size that I want. (The other option is to crop each layer. That's way too much work.)

In summary, crop your merged or flattened graphic in Photoshop to be exactly the size that you want it to be. Then save your cropped graphic into a new standard photo sized document to create a graphic on a white background. When you print, you'll get a standard sized photo that you can cut with a scissors or paper trimmer to be the size that you want for your hybrid project.

Saturday, October 4, 2008

Sorting Digital Files

There are many possible ways to keep digital scrapping files sorted. I start by using the file system in my operating system, which is Windows XP. I've got a folder under 'My Documents' that I named 'Digiscrapping.' Inside that, I have it broken down by company. Under each company, I keep kits separate. Kits are divided into folders for paper, borders, ribbons, charms, tags and so on.

But I don't actually use Windows XP to find files when I'm working. I use Bridge. Bridge is included in Photoshop, but not Photoshop Elements. In Bridge, every file is tagged, or given descriptive words that apply to the file. Bridge won't do this automatically, you have to do a lot of pointing and clicking. The first tag I put on a file is the name of the designer. Then I add tags for paper, label, charm, border, color or whatever. Some files have many tags, some only have one or two. Because of the way Bridge can be used to sort by tag, I can go into multiple folders at once and get all of my ribbons. I can even tell it what color ribbons I want.

What I've found is that most computer users have some system of sorting and organizing files that works for them. Of the many systems that I've seen, the ones that work the best have clear and specific labels and they are internally consistent. If a complete stranger had to go through your computer to find a particular file, and they could do it without resorting to a general search, your file system is organized enough.

Friday, October 3, 2008

Ztampf!

About two weeks ago, Ztampf!, one of my favorite digiscrapping designers had a sale to celebrate her third year in business. You searched the site to find coupons and would try to use them before other folks found them. I'd found a 20% off coupon, but I wasn't sure if it would still be good. I saved it for later and hoped. If it was meant to be, it would happen.

I just tried that coupon and it was meant to be! I am one very happy camper! I've just downloaded 33 zip files. I'll burn them to a CD to save them for a backup, copy them to my EHD for just in case and then I'll start unzipping and sorting new files! Wheeee!!!

Why do I love these files and this designer so much? Here are two examples. This is from a 'Fastcar' kit I got from ScrapGirls. The designer is Sarah Batdorf. I received it as a .png file, the only thing I've done is save it as a .jpg so I could easily upload it. If you put a straight edge up to your screen, or if you scroll a bit, you'll see that the black and white squares in the flag go straight across the shape. They do get smaller towards the right side of the flag, but that's not quite the right perspective.


Racing fans will also notice that the flag is the wrong shape. A checkered flag that waves when you win a race is not long and narrow, it's almost square. In fact, the NASCAR checkered flag is six squares by five. Did you also notice that this long, narrow ribbon of a flag is flying on a flagpole that could be used as a support pole to hold the grandstand up? It's a little big for the flag. If I were scrapping for a toddler and didn't know anything about racing, I'd like the kit. I wasn't very happy.

The other embellishments in the Fastcar kit were about the same quality, a few were even worse. I can't think about her idea of flames without cringing.


Embellishments from Lie Fhung, the designer of Ztampf! are much more detailed and accurate. Here is a charm from her Antiquest Add on Kit. I did nothing to it but save it as a .jpg to upload it. As you can see, it looks a lot more real. It looks three dimensional. It has highlights and shadows in the right places. It has texture. It does not look like something cut out of a scrap of printed paper and given a streak of shadow.

I've heard several folks say that Fhung's stuff is not their style. They find her kits intimidating, because they are so sophisticated and they are not used to that. They are afraid that they'll do something and the layout will not turn out well. I have the opposite experience. I can throw together anything at all from her kits and the layout will turn out well. As long as I don't range too far from the original kit and use elements from wildly disparate kits, I'm fine.

If you start with lousy parts to work with, you have to be a miracle worker to get something great looking out of it. It the parts are really good, you can be a poor artisan and create something that looks pretty good. I know I am not a miracle worker, so I try to avoid the lousy parts. I hope that I'm not a poor artisan.

Wednesday, October 1, 2008

An Inch of Cardstock


I read on organizedscrapbooks.com that an inch of cardstock is about 50 finished pages and that an inch of patterned paper is about 75 finished pages.

I measured my stash. I've got about 500 pages worth of paper. And that does not include my 8.5x11. I don't need to shop for paper for a while. I really don't.

Right now, I want to complete the projects that I've got stashed away. They are taking up space that I could be using for other things. Possibly things that I don't need, but still, those projects are taking up space.

And if I happen to use up a lot of cardstock while finishing those projects, so much the better.

Tuesday, September 30, 2008

I Must Admit it

I am not a card maker. I don't think I'll ever be. I like to stamp, I like to embellish, but I am not a card making kind of person. I struggle with cards and I have made some nice ones, but it's hit or miss with me. I write letters and notes, but making cards? Eh, not my thing.

Wow! What a relief to get that off my chest.

I've got a few sets of cards from Club Scrap that I'll finish up and then move away from card making. I have paper, I have envelopes, but I just don't see a lot of card making in my future. Aha! I don't see a lot of Club Scrap style card making in my future. I had more fun when I dug up my own designs and wasn't limited to the layouts provided in the card making kit from CS.

I don't think I do well with kits in general. Not for paper scrapbooking, anyway.

Monday, September 29, 2008

Mess Reduction


I hate working in a mess. I have trouble doing it in fact. But, gradually, my workspace had degenerated into horrible mess status. At least, for me it was a horrible mess. I spent a goodly portion of yesterday tearing it apart and rebuilding it into neatness. I still need to take care of one or two last odds and ends, but the cleaned up space looks like this. As you can see, I've got more paper holders than I used to, but I have about the same amount of paper. I stored my Club Scrap paper under the table in the pizza boxes that it came in. There was a lot of wasted space in those boxes! I still need to get storage for the 8.5x11 paper. But that's currently in a pile on my table, next to the drawers of embellies and inks.

As of 1:50 today, that's what my scrapping space looks like. I wonder how long it will stay that neat?

Sunday, September 28, 2008

Chemist's Daughter

My father was a chemist. Not in the UK sense of the word, which would be a pharmacist in the US. He was the 'mad scientist' kind of chemistry major chemist. Some of that must have rubbed off onto me as I was growing up.

If you use EZ Mount cushion for mounting rubber stamps, you are repeatedly warned not to use acetate to store the stamps. The acetate and the EZ Mount have a bad reaction over time and the EZ Mount will glue itself to the acetate and become ruined.

I use Avery sheet protectors to store my unmounted rubber stamps when I use Aileen's TIOAO and I didn't know if they were acetate or not. So I went to the Avery website and checked. They are polypropylene which, to the best of my knowledge, is not the same thing as acetate. My EZ Mount foam should be safe. I can use the same system for all of my unmounted rubber stamps.

If given a choice, I'd use TIOAO for all of my unmounted rubber. I use a pad under my paper when I stamp, so I don't need a cushion and without the EZ Mount, the stamps are a lot thinner and I can store more in the same space.

Saturday, September 27, 2008

A Case of the Ahas, Again

I was driving home after last night's crop and talking with my wonderful Hubby. I'd packed my crop tote they way I used to pack it, with a selection of embellies, some paper and a pile of photos that I wanted to scrap. I had a wonderful, productive time and I didn't touch a single piece of Club Scrap paper.

While the Club Scrap Assembly Line ScrapBooking system might be fast, it might be easy, it might get me a lot of finished pages in a very short time, it isn't the way I like to work. So, I won't use that system any more. I'll go back to the way that I like to scrap, which might be slow, it might be more difficult and it might take me a long time to get a lot of pages done, but I love the way my pages turn out.

Wonderful Hubby doesn't care for the ALSB pages, either. So. Instead of finishing up the kits I've got stashed away using the ALSB system, I'm going to pull the paper out and file it by rainbow color and use the paper up that way. I've got a lovely stash and if I need colors that go together, I'll have them. The paper is excellent quality and I do not think I wasted my money on it, I was just wasting effort trying to make the ALSB system work for me when it doesn't. Not as well as my own style works for me.

Wednesday, September 24, 2008

Thanks, I'll Find My Own

A lady I know (only through on-line contact) who does Photoshop stuff for digital scrapping suggested that I get a Vizros plug in for Photoshop so I could curl ribbons and pages. It sells for about $20.

A book I got from the library suggested that I get AV Bros Page Curl Pro to curl ribbons and the corners of pages. It sells for about $50.

I wasn't sure where I wanted to place my bet. They both have free downloads I could use to test the functioning. I went to the Adobe site and got a link to a website that had reviews of the plug ins. The one suggested by the book received 4 out of 5. The one from the lady got 3 out of 5.

Page Curl Pro costs twice as much. It gets better reviews. An extensive manual is included in the free downloads. The website is in multiple languages, indicating an international audience. I'll download their demo/trial version first.

Tuesday, September 23, 2008

A Different Answer

A lady wanted to know what to do with the patterned paper that she didn't like when she'd buy one of the stacks. The majority of the responses were, 'Give it to my kids to play with.' And the rest were about evenly divided between, 'donate it' 'trade it' and 'save it' as well as 'use it up in teeny little pieces where you don't notice how ugly it is.'

I was the only person who said, "Stop buying the stacks."

What do you know! The original person responded and said that she was going to stop buying the stacks because there was so much waste and she didn't have kids.

There are times when the best way to deal with waste is to stop buying in wasteful ways.

Monday, September 22, 2008

Cover Art


All of the digital paper and embellishments came from lie fhung, of ZTAMPF! Can you tell she is my current favorite digital designer? I used her Balinesia, Phrench Phoebe, and Structure kits with the occasional element from elsewhere.

The digital part of the tissue box cover is done. These are going to be the sides of the box. I created all of my layouts at 4.375 inches wide and 5.25 inches high. Photo shop rounded my .375 to .38 for 3/8 of an inch. To get them to print out at that size, I then put my layouts on a 5"x7" transparent background and saved them as 300 ppi .jpgs. That extra step is important. If I'd skipped it, my photo printer would have cut the image smaller to get the correct ratio of width to length and then printed them at 5x7. Because I had white space surrounding the image inside the file, they printed out with a white border around them that I can easily cut away to get images exactly the size I want.

For my next trick, I will work on cutting chipboard to size for the sides and top and figuring out the best way to attach the photos without ruining them. I've had poor results with ModPodge; it left the surface tacky and things stuck to it. Lamination will not work. I don't want a clear edge around each photo.

Sunday, September 21, 2008

Latest Addition

The most recent successful addition to my scraproom is a box of tissues. Not a huge box, one of the 'boutique' sized boxes. I didn't know how much I'd use them until I put them on my table. I will need to replace that box with a full one sooner than I thought.

Being a penny pinching crafter, I take the time to cut sheets of paper towel into quarters and put them in a stack, instead of tearing sheets off a roll. It doesn't take long because I use a big rotary trimmer and go through six layers at a time. The squares work better than the stamp scrubber pads I've tried to keep my stamps spanking clean.

An alternative to cutting up tissues and using smaller squares is toilet paper. Nope. My brain just shut down and refused to function. That is where I draw the line. Tissues. Tissues are good. Perhaps I'll create a cover for the box out of chipboard and patterned paper.

Saturday, September 20, 2008

New Convert


All of the elements and the paper for this layout are from lie fhung, of ZTAMPF!

I talk a lot about digital scrapping, but I was always only dinking around with it. I didn't have the complete set up that I wanted. I wanted the right software running on the right hardware and a nice set of digital files to play with.

Method, motive, and opportunity collided last night. The ZTAMPF! sale provided a lot of files. I finally have a full version of CS3 and Bridge on my laptop and the laptop itself is quite robust. I went to a local crop and took only the laptop, not a crop tote full of paper, trimmer, glues, inks, stamps, tools, and so on. I got four layouts completed and I worked on a fifth layout, but had trouble with the kit.

The kit I had hoped would be much nicer had a case of FAIL. The embellishments are appropriate for a toddler on a tricycle, not a NASCAR fan. Sigh. There was a checkered flag, but the person who created it didn't know how to correctly twist fabric, so the waves in the flag aren't quite right. And the flag was the wrong shape. It was a pennant, long and narrow, with points on the edge. The checkered flag that is waved at the end of a NASCAR race is 5 squares by 6. The whole kit was just a bit 'off' and I was not happy to have spent money on it. It was the only NASCAR/driving kit that I could find.

Friday, September 19, 2008

A Case of the Ahas!

I was trying to create an 'explosion' of embellishments and layers similar to the one on the home page of Ztampf! and I was having an awful time. In my head, things should be cascading off the edge of the paper. On my screen, it didn't look right.

Aha! Instead of working on a page that is 12"x12", I need to open a new file that is 14"x14" instead. That way, when I put 12x12 paper on it, there will actually be an edge for the layers to fall over. I kept looking at that sample and wondering what I wanted to do next on my attempt to imitate it and not coming up with the next step. I'd boxed myself into too small of a space. And it's virtual space at that.

I always feel a little silly after an Aha! moment. It's so obvious in retrospect, but before I had it, I really was stuck.

Thursday, September 18, 2008

Layout Guides

The local library provided me with a couple of reference texts. I solved the layer issue.

I've been thinking about layout guides like Page Maps. Most of the multi-photo layouts assume that you are going to crop or print most of your photos smaller than 4x6. For the 'average snapshot' about 1/3 to 1/2 of the photo can be cropped away because it is boring background. The multi-photo layouts for this type of photo will work very well.

I try not to take 'average snapshots.' Cropping them down to 2x2 or even 4x4 isn't usually possible. I'd rather not print them smaller, because I want people to see the photos. I can't use most of the multiphoto layouts available. I create most of my pages with three or four photos. That leaves me with room for a few embellishments, journaling and a title.

I'm a photographer and writer who scrapbooks, not an embellishment and paper user who takes pictures. For me, scrapbooking isn't about the embellishments and the paper, it's about the photos and the journaling.

Wednesday, September 17, 2008

Horrible Directions!!!

Agghh! I've gotten a set of directions on how to use a layered template along with my template. The directions are horrible. They are detailed, broken into small steps and there are too many variables that are left undefined.

For example, I must select the layer that I want to replace. But I don't know which layer I want to replace. Do I want to replace the top layer, the fold layer, the shadow layer, a layer on the template or a layer in my graphic? The variable is 'the layer' and it's defined as being 'the one I want to replace.' I don't usually replace layers. I add, edit, remove, or merge layers.

I have the feeling that I'm adding and then merging layers. That would give an end result of a 'replacement' but it isn't a replacement. It's a merge. To replace, one deletes the bad one and adds the good one. According to the directions, I never delete anything, but I do merge things. OK. I'll bang on this for a while and then, when I've figured out how these templates work, I'll write myself a better set of directions. I'm not going to go through this twice.

Tuesday, September 16, 2008

Three Days!

I have signed up for a three day crop in October. I'll be sitting with a great bunch of people and it should be a blast, but I haven't ever done a three day crop. The longest crops I've been to were 12 hour crops. I'm expecting to be tired at the end of it, but I don't want to run out of things to work on or tools to work with. I also don't want to be one of those ladies who shows up with the entire contents of their scraproom, packed into multiple totes.

I'm going to use my Club Scrap kits that I need to assemble. My hope is to be able to use my tool tote and regular rolling tote for the usual amount of stuff and head out to my truck every so often to swap out finished pages for the next kit(s). I have six months worth of monthly kits that I can work on and I know that is going to take me more than three days. Especially if I work on the projects that go with the kits as well.

I'm also thinking about how to best use the four feet of table space that I will get. The trick is that I might not get a deep space, just a wide one. If the table isn't deep, I'll want to set up a shelf, to add some storage space on the top of the table.

All this planning and it's just a crop! I will have fun, it will be fine.

Monday, September 15, 2008

Why Digital?

I used to paper scrap in Recollections, which was all of three miles from my house. They closed. I have a nice studio, but I miss having an entire store to poke through when I needed an embellie, a stamp, some ink or anything at all. To duplicate that would require a stash of a size I'm not willing to have.

When I work in digital, I can shop as I work using the Internet. I download what I need and I can use it again and again. I can change colors and sizes, too. It is cheaper to digiscrap. Even adding in the cost of the computer, it's cheaper than buying the supplies and tools for paper scrapping. Not only did I have to buy all the stuff, I had to buy things to store it and to carry it back and forth to crops.

I like manipulating paper and creating physical objects. I'll probably never give up paper cropping. But I can see myself moving to more and more digital cropping. Especially as I use up the small stash I had from shopping at Recollections.

Sunday, September 14, 2008

Where do I Put It?


I had a coupon for 50% off one item at Michaels, so I finally broke down and got a Cuttlebug. Why had I been delaying? I didn't own any of the dies, as I jumped on the Cricut bandwagon early in my scrapping career. I also wasn't quite sure where I was going to store it. I still don't know, but I own the thing. I also own a couple of the embossing folders. They were on sale at 40% off at AC Moore. I'm about to head out of the house and check out the Michael's sale that just started this week. Cricut cartridges are $39.99 each. I want to see if they have the new Cars or Tinkerbell ones. If they don't, I'll just pick up a cuttlebug embossing folder at 50% off and head for home.

I've already got storage for my cartridges.

Friday, September 12, 2008

The Parts of a Computer

I recently found out that there are a lot of digiscrappers out there who don't have any idea about the parts of the machine they are dependent on. Here is a brief description that might help people learn what is which and why.

The first and most important part is the CPU or Central Processing Unit. This is the brains of your computer and it determines how quickly it can respond to any command. It's a chip, or set of chips and the larger the numbers, the better. My little rocket of a laptop has two 2.15MHz chips in it. A modest computer these days would have a single 1.5MHz chip. MHz stands for megahertz. The CPU is how smart and fast the computer is at doing things. If the computer has a wimpy CPU, it can still do things, but it's going to take longer. It can juggle, but only a few things and slowly.

Next there is RAM. That's Random Access Memory, and it also has a great deal to do with how quickly a computer can respond to a command. RAM is where applications actually run and where files are opened. If there isn't much RAM, the computer has to juggle the things it's doing, stopping one thing, working a bit on another, then pausing that and going back to the first task. That means that nothing gets done very quickly and if there are too many things being juggled, everything stops with a crash. The CPU has to tell the RAM what to do and how to juggle. The RAM can't juggle on its own.

Then there is the hard drive, which is simply storage space for the operating system, like Vista, or XP, files, and programs.

If you imagine that a hard drive is a bookcase full of books that are the files and programs, the RAM is your hands. You can't read a book that is sitting on a bookcase, wedged in between other books. You have to take the book off the shelf and hold it as you open it. You are also going to use your hands to turn the pages, to write any changes down, and to close the book and put it back on the shelf. If you have many books out and open, you have to juggle them. When you shut down your computer, the RAM will go blank. There is nothing stored in RAM when your computer is turned off. The hands are empty and idle.

Then there is the video card. If you have a video card that is robust, with on board RAM, it would be as if your glasses had an extra pair of hands attached to them to turn the pages of your books for you. Some of the better video cards are smart enough to tell themselves how to juggle, freeing up the CPU and the main RAM for other jobs.

Did you notice something? Hard drives don't have much to do with how quickly your computer responds. But if you put so much stuff on the hard drive that there isn't any space left, your computer will slow down. Have you ever tried to find a book on an overcrowded bookcase, with things wedged in and no space left for even one more magazine? That's what is happening in your computer. If you leave 20% of your hard drive free, the bookcase that is your hard drive won't be too crowded to use.

What's a mother board? Everything plugs into the mother board. It's the home of all the parts that make up the computer. The CPU plugs into the mother board, the RAM plugs into the motherboard. The hard drive, the video card, they all plug into the mother board. Your monitor plugs into your video card, so the monitor is connected. Your network card plugs into the mother board so you can connect to the Internet. The mother board lets each of the parts communicate with the rest of the parts and pulls the parts into a whole, single computer.

Thursday, September 11, 2008

Back in the Groove

I hadn't actually done any pages for a while and that was bothering me. I'd been working on note cards, organization, and a busted water heater, but I had not completed any layouts. I went to my sorted photos, pulled out a set and put them to paper. It isn't that Great Getting Up Time yet, so I can't haul out the camera and photograph the two pager yet. I'll post it when I do.

In the meantime, I've pulled out another set of photos and, with only a brief pause to label my paper holders, I found paper that I want to use for a one page layout. I still have to select embellishments, but it's a step in the right direction.

Keeping my photos sorted is a huge advantage. As I get them printed, I put them into sets; usually no more than 6-8 in a set, and tuck them into Cropper Hopper photo organizers. When I want to scrap something, I just grab a set and get started. Stacy even wrote a book on sorting your photos called, "The Big Picture" on how to sort out your photos and get some work done. It's really easy for me to sort recent photos into event sets, but older photos, not so much. I don't worry about it.

I have been working with the same CH photo organizer for quite some time now. I finish a set, I add a set. It never gets empty, it doesn't get full. I kind of like that. It means I'm keeping up with events and not falling horribly behind. We won't look too closely at the number of organizers that are full and untouched. Noooo. Those can stay right there on that shelf.

Saturday, September 6, 2008

Punches!


I've been slowly getting punches in the Marvy Uchida set and those beasties are large and annoying to store. The only reasonable solution is to put them into a shoe bag over the door. So that's exactly what I did. Thank goodness for Walmart's laundry and storage section. There are a number of different sizes and styles to choose from. I could have hoped for shorter pockets, but that wouldn't work if folks wanted to actually store shoes in them. I don't know anyone who uses these for shoes, though. I left empty pockets on purpose. I don't own those punches yet, but they are on the list.

Wednesday, September 3, 2008

Ink a Dink, a Pad With Ink

I've been working my way slowly through a lot of brands of ink pads, seeking a favorite. I will work with an ink for a while, learning its properties and the way it behaves, then I move on to a different ink.

I've tried dye inks, I've tried pigment inks, hybrids, permanent, water soluble and non. I prefer pigment inks to dye inks and water soluble to non. Therefore, hybrid inks don't trip my trigger. Chalk inks I like, but the dark colors stain my stamps and I'm a clean freak. Some pigment inks come with a very juicy inkpad and I don't like to use them until they have dried up a bit. Some have a very soft inkpad and I can't control how much ink I apply. Some inkpads are too dry and/or dry out very quickly. I have re-inkers, but I'd rather not have to haul them out each and every time I use the ink. Some inkpads, like the Ranger Distress inks have a small inkpad and inking a larger stamp can be a PITA. I've found that many of my Adirondak pads aren't level and I have to make sure that I'm pressing firmly enough to flatten them to get a stamp evenly inked. Many pigment inks take a very long time to dry.

Versamark pigment ink has a firmer inkpad, is a pigment ink and it's water soluble. It also dries quickly. I really like using it. The pad I can find most easily is a standard small size. I've also got Archival Ink in jet black and sepia in the large pads. That's another ink I rather like. These are the ink pads with the monk using a quill on the front of the pad. Yeah, that one. The pad for both brands is firm, level, and not too juicy but will still ink up a stamp without requiring that you bang it against the ink pad for a while.

I used to see videos of people tapping an ink pad on a stamp, or just seeming to press the stamp to the ink gently and poof! there would be this perfect image. I was always fighting with my ink pads to get them to behave well. I tried the Versamark and the Archival ink pads. Go ahead, point a camera at me. My stamp pads now behave.

To Peek, or not to Peek?

When I get the first of each months shipments from Club Scrap, I have a choice to peek and see what it is going to look like, or I can wait and be surprised. When I first got my membership, I peeked each month, I just had to. I was eager to see what was available and I couldn't understand folks who didn't peek. Recently, I haven't been peeking. I discovered that it is much more fun to wait and be surprised when I open the box.

I think waiting and being surprised is an 'acquired taste' which would be a euphemism for something you do when forced to and grow to like. I had a crazy month and no time to peek, and opening the box was such fun, I realized that peeking wasn't all that it was cracked up to be.

Saturday, August 30, 2008

Digital Scrapping Reference

I created a reference for my personal use that has instructions taken from several websites and rewritten so I can understand and find them all in one document. I was at a crop and ended up teaching a lady something about Photoshop other than adjusting photos. We blended a couple of pages together in different ways, played with inking edges using inner glow and she suddenly felt like she could do something with Photoshop that she could really use. She's got Elements, but since her husband teaches, she could probably scrape up a copy of CS3 at the educator's discount price.

All of the information I showed her, I got from on-line, free sources. Most of it was from Scrap Girls and a little was from a digiscrapping newsletter that I download when I remember. I also pointed her toward a couple of podcasts that I get and watch in small doses.

She taught me something in return. I know more about digital scrapbooking than I think I do and I can do some interesting things with my photos with very little effort. I knew digital scrapbooking wasn't that difficult, but I was stuck in the thought process that I must learn many different techniques before I could do anything at all and that simply is not true.

Armed with my own reference and a few books on Photoshop for photographers that I own, I'm going to try doing a digital crop instead of a paper one next week at Girl's Night Out. I'm kind of looking forward to just carrying a laptop, an extension cord, a couple of CDs and perhaps my external hard drive to a crop. If I'm feeling extravagant, I'll include my mouse rug and USB mouse. That's a lot less than a bulging crop tote and a tool bag.

Wednesday, August 27, 2008

Aha!

Trying to work when you are in a bad mood really points out what you don't like in your studio. I don't like my paper stored on horizontal shelves. It doesn't work for me, I can't find what I need unless I pull everything out and shuffle through it. I like the Cropper Hopper vertical storage systems. I need to get more of those and use them instead of the vertical storage.

I can use the vertical storage for other things. I can't turn the storage on its side and put the Cropper Hopper bits inside them. They don't fit, I checked long ago. Or do they? The small ones fit. The large ones do not. I use a lot of the small ones. Hmmm...

I have a reason to be tearing up my scrapping space now, instead of just a fit of bad temper.

Tuesday, August 26, 2008

Shopping Lists

I have this odd list of things that I keep on a shopping list for crafting stuff. For example, I need Post-it notes, so I can do a bit of masking with the Rosie's Roadshow stamps that I just got. That doesn't usually land on my shopping list. I want to get another box of invitation sized envelopes. I'm using them up more quickly than usual as I send daily notes to my stepson in boot camp. Heaven forbid that I run out! I had to get some 6"x9" envelopes, too.

Ink for two different printers, a storage system for those oddly shaped Color Box Chalk Ink pads with the curved ends and domed tops. (What were they thinking?!) There are all sorts of things on that shopping list. But none of them are things that I need to run out and get tomorrow. I'll manage without them until I run across them somewhere and they fit into the budget.

I really do have a crafting budget. You might not think that I do, but I have one. So far this month, I am not under budget, but I knew I wouldn't be. I rarely am. I need new clothes too. Because I have a choice, I skipped clothes and got stamps.

Monday, August 18, 2008

Crop Expectations

I asked different scrappers what they expected at a crop from the folks running the crop. The answers varied and I expected them to. Most of the more experienced croppers didn't want a lot of intervention or support at a crop unless the purpose of the crop was to teach a new technique. The less experienced croppers and some of the more experienced ones wanted the employees working at the crop to be easily available, wanted to get checked on, and not have to go seeking assistance, each and every time they ran into a problem. Nobody wanted to feel like they were being hovered over, they just wanted to feel like someone was at the least, doing a prairie dog every now and again. It didn't matter how much the crop cost, if they paid to sit in, everyone wanted to feel like someone was paying attention to them at some point during the crop.

Without fail, every single hostess/employee said they did not expect to get any personal cropping done (though guests said it would be OK if the employee/hostess did some cropping) and they felt that it was their responsibility to keep track of what folks were working on, if they were having trouble, or were at a point where praise was appropriate. And that was at both private crops with friends and crops run for profit or for charity.

It might be my opinion, but it is an opinion shared by many.

Sunday, August 17, 2008

Swarming and Teaching

A swarm is a group of Cricut owners gathering to use their machines and to learn more about using them. There was a swarm at the LSS and I ran the thing. Well, sort of. They advertised it, they got folks signed up for it and I showed up to teach things during the swarm. I started by asking the ladies what they wanted to learn. They wanted to learn how to use the layered cartridges and they wanted to use the pens. So that's what we focused on. I repeated stuff about layers as I cut a Minnie Mouse until they were just about to get bored, but the pizza came. They drifted away to cut their own projects. The repetition had made it sink in and they could do something with layers on their own.

I also shared a few tricks I know about general cropping skills. I even taught the owner of the store something!

I realized that the lady who usually runs the crops hasn't realized that she needs to answer questions that have not been asked. Many times folks are using some technique because it is the only way that they know, not because they think it is the best way. If you show them a different way and teach them how to use that way, they have options and feel more skilled. A good teacher will work the room, moving around, checking on the students and making sure that they are successful in what they are trying to do. They will stop them in the middle of using a clumsy technique, teach them a different technique and help them be successful with the new skill. If the new technique requires that they purchase something that the shop sells, so what? It's good for everyone involved.

Saturday, August 16, 2008

Watercolor Pencils

Thanks to a podcast on Scrap Time, I got a lot better at managing my watercolor shading. Two tips: with water brushes it is difficult to control how dry the brush gets. Work from the white/pale, towards the color in a circular movement and you get good blending.

But then I was looking at my set of 36 watercolor pencils and thinking that I needed a better range of reds. The question was, how to move from a set of 36 to a set of 72 without having an extra 36 pencils? Order them individually. Dick Blick will allow you to do that, so I did. Shipping is a bear, but not absolutely horrible, when you consider that I could not find individual pencils anywhere local. The only problem is going to be that I don't have a case that will hold 72 pencils. I have a case that will hold 36. Drat.

Monday, August 11, 2008

Disney Parade Stuff


It took me forever to update my blog, because I've been slogging away at these two pages for far too long. There are eighteen photos on these two pages. The two flip files have nine each. It wasn't printing the photos that took forever. It wasn't the flip files that took forever, nor was it finding the right orange striped paper, or dealing with a poorly cut sticker sheet or shopping for rick-rack, or running out of 1/4" redline tape. It was each of those steps added on to the last step that made this page so time consuming.

It is almost done. Why almost? I still have to cut eight correctly spaced slots in my page protectors so the photos in the flip files will stick out and you can turn the pages and look at all eighteen photos without having to take the pages out of the album.

Do I like these pages? I like them a lot. They are taken from the Recollections Disney Scrapbook in a Day class that I have the directions for. I didn't design this page myself! Some of my favorite parade photos are on these pages. I put the particular Minnie photo on the front, because it cracks me up.

Beauty queens on parade floats are told to wave using an 'elbow, elbow, wrist, wrist, pearls' pattern. Minnie is in the 'pearls' step in that photo.

Sunday, August 3, 2008

Scraproom Progress

I went to Loewe's yesterday and got a storage cabinet. It took three trips, because some of the hardware was missing or damaged, but I ended up with the right hardware, and plenty of it at no cost other than two more trips to Loewe's. The cabinet is 70 inches tall, 36 inches wide and can hold things that are 20 inches deep. There are shelves and a center divider inside. I currently have it filled with things that came off the bookcase that I'm painting, so I didn't take a photo of the interior. It's a fake pine covering.

I decided on a cabinet instead of a shelving unit because I don't like to have my stuff out in the open. I think things look cluttered that way and I'd rather have my stuff hidden behind doors that I can close. The cabinet is already placed in the room where it will stay. I measured from the corner, so when my big tables move downstairs, they will fit.

On the floor, you can see three shelves that I'm painting white. That's a part of my sewing storage and will end up in the opposite corner of the room. I have a white sewing table already and I wanted the bookcase to match it. I like white furniture for my craft space, what can I say?

The craft space re-do is going slowly. I'm thinking a lot about each purchase and addition before I make it. I want to have most of my placement of objects planned out in advance, and not higgeldy-piggeldy, put things in locations that don't work for me. My scrapping space will be a large L, with the short section to my right and behind me. When I sit in the corner of the L and face the window, I want to be able to easily reach a lot of my supplies without straining for them.

Saturday, August 2, 2008

Inhibitions

I cannot create in a mess. I cannot create in a mess. I really, truly cannot create in a mess.

I'd been bemoaning my lack of productivity recently and then I couldn't find postage stamps. Meaning to mail a letter, not rubber stamps. I started digging through my things, straightening as I went along, because that would also help me know where I'd looked and were I hadn't. I ended up doing a significant amount of tidying up in my scrapping/stamping space. I found the stamps, in the place where I usually keep them, but some tall cards had gotten tucked in front.

The end result was that I had a much neater and cleaner space in which to work than I'd had in quite some time. I was able to complete two small projects and start again on a more complicated project. I feel productive again.

Monday, July 28, 2008

Digital Scrapping Organization Progress

I downloaded the trial version of CS3, which included Bridge, a file organization application. I have spent most of today fighting with tagging a portion of the digital scrapbooking files that I have already collected. There were a couple of hiccups, but things were going well, until I tried to do a filter and get to the file that I wanted. Nope. Filter options only add more files each time you list a variable. Instead of getting only the blue paper, I got everything that was blue and every thing that was paper. Pout.

I finally tried a search, not a filter. Instead of additive results, I got additive criteria. I got only the blue paper. When I added in the texture, I got only one piece of paper as a result. I'm good to go!

Sunday, July 27, 2008

Scrap Time! Podcasts

Christine, who lives in Canada, has a regular podcast called "Scrap Time" and I find it incredibly useful. Christine covers techniques, tools, kits, products, ideas and anything and everything stamping and scrapping related. When she compared white pens and showed samples, I realized that there really were some decent ones out there. When she tried one label making tool and it didn't work, she showed what it did and I won't waste money on it. She's both a scrapbooker and a cardmaker. If you have iTunes on your computer, it is well worth the effort and the time to download her podcasts and watch them. She demonstrates as she goes along, and you can see what she is doing, as well as hear her talk about it.

If you go to her website, on the right hand side, there are links to subscribe to her podcst and to download the podcasts that won't show up when you subscribe to her podcast. She will need to update those links soon, because iTunes only keeps the most recent 100, and she's gotten to where her current and her older podcasts have a gap of a few missing podcasts.

Saturday, July 26, 2008

Cricut


After I did the stint at GASC for the Cricut Expression and the Design studio software, I thought that was the end of it. Nope! A local shop has asked me to run Cricut classes for them. They don't have a teacher for the Cricut that they like and they really liked my demos. I was having fun (or so they thought) and that is important in a good teacher.

I'll probably run a few classes for them and see what happens. Their last teacher stuck with the basics and did not impress them. Some folks need the basics, the trick is to cover them and then add something extra.

Tuesday, July 22, 2008

Slang Translation

I want some faster glass. This is photography slang, for I want a lens that has a wider range of f-stop capability. Huh? What's that got to do with anything?

F-stop is how you adjust how much light can possibly enter the lens at one time. Think of it as a tourniquet that when cranked down, stops the bleeding and when let loose, allows the blood to flow. The problem is, I haven't got the ability to completely loosen the tourniquet and it's cutting off circulation that I need.

Thanks, Dad. You did this to me. When I was first starting to take pictures, my father got me a 35mm camera and one lens. It was a fast lens. The tourniquet could be almost taken off and thrown away. I could take pictures in poor light, because the lens didn't cut down the flow.

I've got an incredibly good camera, and a not so good lens. The lens is slow. I keep trying to loosen the tourniquet, but I can't and I can't capture photos in poor light because of the lens. There are other settings that I could adjust to cover this issue. But it's not really the best answer, it's a work-around. I'm limited to using only a portion of the capability of this incredibly good camera, because the camera has to compensate for a lousy lens.

Monday, July 21, 2008

Packing for a Crop

For the average 6 hour crop at a store with folks that I know, I take one medium sized tote and one toolbag. I found that packing every single thing that I might possibly use meant that I spent more time and effort packing and hauling and unpacking and re-packing and dragging and schlepping than I would spend cropping. I am too lazy to do that.

I like to use Cropper Hopper page planning pouches. I'll put in sketches, the photos I want to use and my paper. If I want to use my Cricut to make embellishments for the page, I often pre-cut them and put them in with the rest of the paper and embellies. I'll cut lengths of ribbon and select metal embellishments like frames and brads. They all fit into those pouches. I use them when I'm cropping at home, too. They keep me organized.

To select which tools and supplies I'll need, I made myself a Master List of what I need/like to have when I'm doing different tasks. The Master List is broken down into sections like, 'Stamping or Stenciling', and 'Embossing'. If I've planned a page with embossing, I make sure I pack all the things I listed under 'Embossing'. Using this system, I can pack for a crop in under 15 minutes, and I rarely forget things.

If you find yourself hauling multiple totes full of paper and tools and embellishments to a crop, you might want to stop and think about how you work at crops. It isn't supposed to be a duplicate of your scrap space at home.

Friday, July 18, 2008

Chip and Dale


This LO isn't quite done yet. I need to journal a little for it and there's whitespace saved for that. I decided to use the autograph cards as the title for this page, mostly because using a title would make it far too busy. I'll journal in green, as the page really is mostly green and dark green.

Thursday, July 17, 2008

Growing and Learning

This is the Junior kit for July of 2008 from Club Scrap. It just arrived at my door and I tore open the box as if it were food for a starving person. In a way, it is food for my starving artist's soul. Only I'm not starving, as the photo of my workspace at the top of my blog shows. I'm pretty well fed. Club Scrap is helping feed me, and here we are back at the beginning of my metaphorical loop. Break, exit.

I could write a lengthy sales pitch for Club Scrap, but I won't. It's a good value for the money. I use it and I like it. If my meager description inspires you to join, please list me as the referring person. I'll get freebies. ;) If you check them out and it isn't for you, I made no promises. 'Nuff said.

I have found that I don't learn much about crafting when I go to places that target the 'average crafter' as their audience. There is too much focus on answering beginner questions. An informative lecture on why I need and how to use a paper trimmer? I'll skip that. I'd much rather join in on a discussion of the characteristics of pigment ink compared to hybrid ink. I want to read about a technique that I've never heard of before. I want to learn and grow.

That said, I don't think Club Scrap is for the 'average crafter'. If I was average when I joined, I'm not now. They make sure that I know something to do with all the supplies they send out each month. If I'm not using them up, or planning to use them up on some incredibly beautiful project, I wouldn't keep buying them. The more I know how to use things, the more things I'm willing to buy.

Tuesday, July 15, 2008

Calendar Project


As promised, here are the photos of the calendar that I'd been working on.


I didn't photograph each and every month, they didn't all turn out the way I wanted them to, but this should give a general idea of what I design things to look like.

The paper and ribbons are from My Minds Eye and the calendar cards are from Creative Cafe. The ink is Adirondak Currant and the stamps are from Fancy Pants, Club Scrap and Impression Obsession. There are rub-ons from Prima Marketing and Basic Grey. The floss is an overdyed from Needle Necesseties. The rings are from 7Gypsies.

Monday, July 14, 2008

Traveling to Crops

People don't believe me when I say that I go to the occasional cropping event by motorcycle. I had packed my Tonic cutter for an event and I decided to take a picture of it. I put the camera in the saddle bag and went off to crop. I had a great day and got a lot done.

How do I manage to fit everything into saddlebags? I don't always use 12x12 paper. I'm editing photos, but I'll post about the project I was most recently working on soon. It's a 4" x 4" calendar. Cute! Portable! When I work on 12 x 12 layouts, I do a lot of pre-selection and put my paper and embellies into Cropper Hopper page planners. I'm not a fast scrapper, so getting three two page layouts completed in a six hour crop is very good for me. I don't need to carry lots of those planners.

I also have been doing more digital scrapbooking. For a laptop crop, I take laptop, extension cord and surge protector. That's all that I need. If I'm feeling like I want to be super prepared, I'll take a USB mouse and a mousepad.

Wednesday, July 9, 2008

About Stamps...

I was answering a question on a forum about why clear stamps were giving one lady a blurry, blobby, blotchy image, instead of the crisp, clear image that she wanted. I ended up giving out this information. I expanded it a bit for my blog, because forum posts need to be shorter.

Many clear stamps do not contain a great deal of detail. Rubber stamps can have much more detail than clear stamps. A rubber stamp has more potential for a crisp image with details and depth. An example of this would be shading or textures. A rubber stamp can replicate a texture, a clear stamp can't.

You might need to 'condition' or 'season' your clear stamps. Try rubbing the stamp with an eraser, to clean off the last of the goo they used to coat the mold when they made the stamp. That will allow the stamp to hold your ink better. I will sometimes use Staz-On stamp cleaner on a brand new stamp, to clean off that goo. To keep my cleaning pad free of goo that might transfer back to the next stamp I'm trying to clean, I use a paper towel instead of my cleaning pad. Some folks will use fine grit sandpaper to remove the goo, or rub stamps on the palm of their hand to apply a bit of oil. Staz-On cleaner contains oil and I have dry skin. I'd only use the sandpaper if nothing else worked, due to the risk of destroying a stamp.

I also find that the surface I stamp on for clear stamps needs to be firm, and I can control the pressure I'm using much better. On either style of stamp, too much cushioning or too much pressure will give you a less crisp image.

Don't forget that the surface quality of the paper you are stamping on makes a huge difference. You will get your best stamping results with a smooth, tightly grained paper. Paper with a great deal of texture, or a more absorbent surface can give you a poor result. The ink can bleed and become blurry when using an absorbent paper. Textured paper will not let the surface of the stamp touch the paper in all areas. If you are using absorbent paper, use less ink and choose one that dries quickly. On textured paper, you will want to work with the padding under your paper and the amount of pressure you use when stamping to find the best combination. Plan to do several test stamps.

Last, double check that you aren't using too much ink. On a clear stamp, some inks kind of bead up, and it looks like you have a lot less ink on the stamp than you really do, so you tap it on the ink pad again and make things worse. Too much ink will give you a blurry, blobby, mushy-edged image, regardless of paper, pressure or padding. I'll stamp off before I re-ink, so I start each time with a pretty clean stamp.

Hmmm... I like that 'paper, pressure, padding' phrase. I'll have to figure out a way to create some kind of teaching sentence that uses it.