
I had a slight problem with the new embroidery machine. It gave me an error message. I knew there was an easy fix for it, but couldn't recall exactly what it was. No panic. I looked for an instructional video on line and had to push a few buttons on the screen and slowly turn a knob.
POOF!
The Avance was right back to work.
While I was looking for the video, there was a subtext running through my head. A similar error on Mama Bernina, and she'd be in the shop for a week or two and it would cost a minimum of $100. My worst case fear was that I'd have to load the Avance into my truck and drive it to Tampa.
I'd heard really good things about these machines. I'm inclined to believe them now.
Showing posts with label sewing. Show all posts
Showing posts with label sewing. Show all posts
Thursday, January 29, 2015
Monday, October 20, 2014
A Sigh of Annoyance
Mama B is back in the shop. She just wasn't behaving as well as I thought she should. There were too many problems with the thread getting caught in the bobbin case. She didn't do that when I first got her. So, back she went. I'm tired of her going back into the shop. I am very frustrated at having to deal with issues when she isn't completely fixed. Mama ain't happy, I'm not happy.
Wednesday, October 8, 2014
Today's New Thing
Each day, I learn another thing about Mama Bernina. Today, I learned that using up whatever I have left in my studio is not a good idea. I was using several different brands of bobbin thread. One of them acted badly when I tried to use it and I had no idea what was wrong. Fortunately, it was not a large spool and I was able to toss out what I had left of it. I ran around in circles and pulled out my hair before I figured out it was the bobbin thread.
Today what I learned is to use standard materials and always use the same stuff when you are learning. Do not try six different things when you don't know what you are doing. You have no idea what the results are going to be and even worse, you don't know why you got those results, either! If it turns out great or turns out crappy, you don't know why. You haven't learned anything useful because you can't do it again, or do it differently on purpose the next time.
Today what I learned is to use standard materials and always use the same stuff when you are learning. Do not try six different things when you don't know what you are doing. You have no idea what the results are going to be and even worse, you don't know why you got those results, either! If it turns out great or turns out crappy, you don't know why. You haven't learned anything useful because you can't do it again, or do it differently on purpose the next time.
Tuesday, October 7, 2014
Trimming for Applique
I have one favorite tip that I use for creating cleaner edges when doing machine applique in the hoop. I use a lint brush. Not one of the ones with adhesive, one that has velvet with a nap on it.
After I attach and trim, I brush in all directions.
Here's what a piece looks like after trimming and before the lint brush.

And here's what it looks like after I go over it with the lint brush.
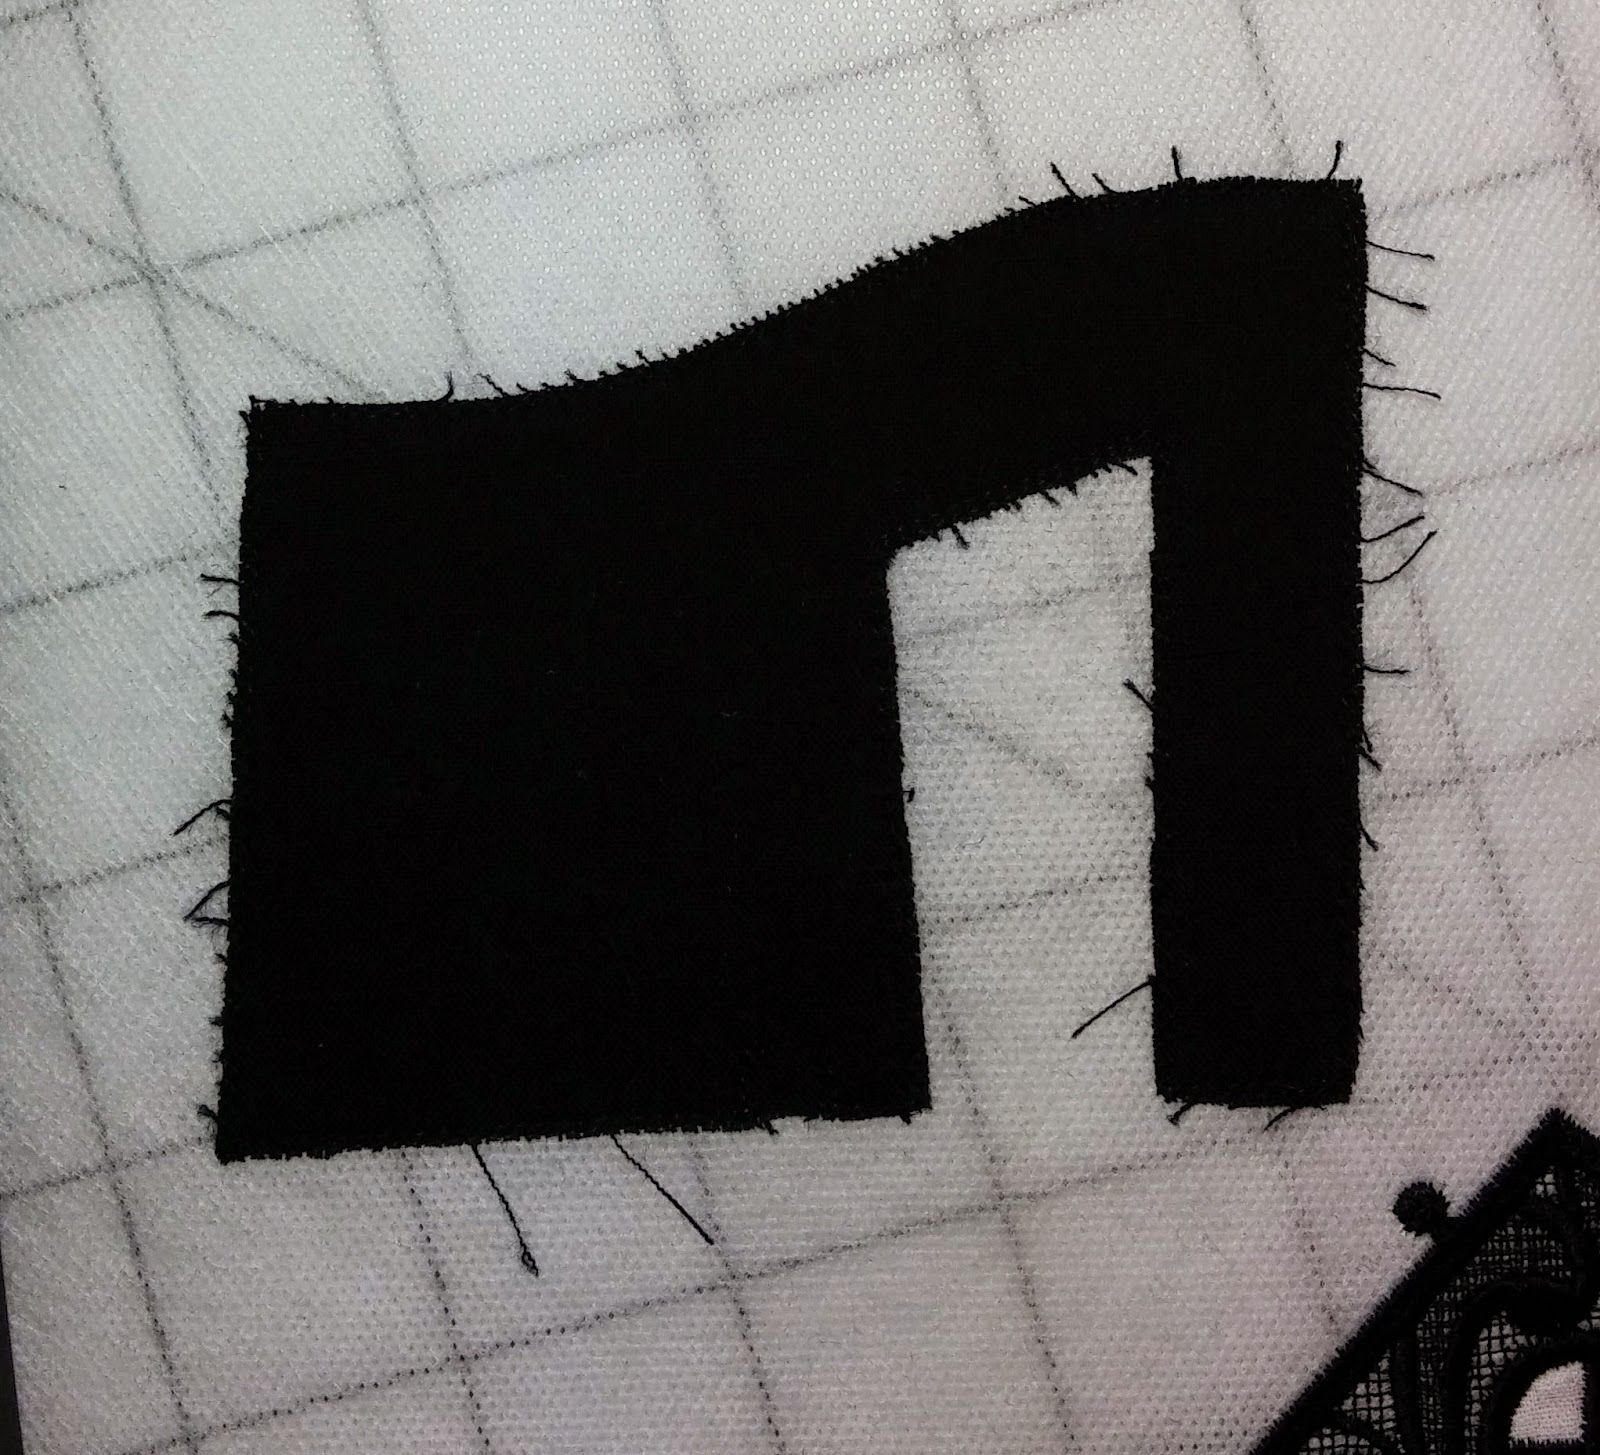
I can easily trim those threads now that I can see them.
I keep brushing and trimming until there are no more threads that stick out to be trimmed off. Even then, I'll still have the occasional thread that pokes out where I don't want it. For those, I suggest a permanent marker.
After I attach and trim, I brush in all directions.
Here's what a piece looks like after trimming and before the lint brush.
And here's what it looks like after I go over it with the lint brush.
I can easily trim those threads now that I can see them.
I keep brushing and trimming until there are no more threads that stick out to be trimmed off. Even then, I'll still have the occasional thread that pokes out where I don't want it. For those, I suggest a permanent marker.
Friday, September 12, 2014
Repair Woes for my Bernina 830LE
I was having trouble with multiple false alarms for my top thread sensor. I turned it off, but then, my touchscreen would lock up. The problem got bad enough that I dropped the machine off for service. That was on Sunday, the 31st of August. The owner of the shop wrote up the service ticket and she understands that I only get to sew on the weekends. Wonderful Hubby picked up my machine on Friday, September 5th.
FAIL!!! Not only was I still getting false alarms, There was a serious top thread tension issue. I got the worst thread 'nests' I've ever seen. Not only did the knotted clump of thread manage to pull the project out of the hoop, the thread nest also pulled the throat plate off the free arm. The bobbin stopped moving entirely, as well. In short, the thread clump pulled my machine apart.
So, on Saturday, September 6, before 10:00 in the morning, my machine was back in the shop for the second time in a single week. I'm not usually prone to italics, but I am that upset about it.
When I dropped off the machine the second time, the owner of the shop was again present. She passed me off to her employees. I didn't get to speak to her about paying for four hours of labor, only to discover that the problem had not been fixed and new issues had been created that were worse. There is a chance that not only is the top tension off, the timing of the machine is wrong. Bad timing is often a death knell for a machine.
The mechanic has been on vacation this week and has not touched my machine. I was expecting it to be finished by today. Heck, I really had expected it to be finished last week!
OTOH, if the mechanic has screwed up the timing, the worst case scenario means the machine will have to be shipped to Chicago to be repaired. If Chicago can't repair it, I'm going to demand that the shop owner buy me a replacement. My 830 is a Limited Edition of a numbered series. I'd accept a used machine as a replacement because I got mine used. But I'm not paying for the shipping or the additional repairs, no matter what. I didn't break it, the mechanic did.
Sunday, August 24, 2014
Embroidery Class Two
The second class on how to do machine embroidery got more into the interface. I had a question on a function button that wasn't mentioned in the manual. But, it still boiled down to the instructor had many different types of machines to cover and could not go into detail for my machine. The students also had a very wide range of skill levels.
I made a mistake with endless embroidery and tried something too fancy. I duplicated the pattern, so the machine thought two repeats were what I really wanted. I only wanted one repeat at a time, but what did I know?
 The two "arrows" are the marks, similar to a tailor's tack, that the machine will baste in. They show you where to align the hoop in the machine. I hooped the fabric using the center crease as my center line. The machine started at the left, stitched two repeats and then put in the tailor's tacks. I took the fabric out of the hoop, moved the hoop and then lined up my stitching for the next repeat using the tailor's tacks. My problem was that all the motifs started at the right side and stitched over to the left. I couldn't tell where I was really going to be using the handwheel and testing the needle position. I just had to trust. It isn't perfect, but it isn't bad either.
But! I did get more actual embroidery completed during this class. I learned how to use a basting box for alignment checks. I learned where to adjust to use Puffy Foam (details to follow in a different post), I learned that Floriani thread and my 830 might not get along. I got a sample of embroidery stabilizer that I'd never seen before. I also got my sample book of fabrics and stabilizers used for embroidery up to date. It wasn't a wasted class.
I made a mistake with endless embroidery and tried something too fancy. I duplicated the pattern, so the machine thought two repeats were what I really wanted. I only wanted one repeat at a time, but what did I know?
But! I did get more actual embroidery completed during this class. I learned how to use a basting box for alignment checks. I learned where to adjust to use Puffy Foam (details to follow in a different post), I learned that Floriani thread and my 830 might not get along. I got a sample of embroidery stabilizer that I'd never seen before. I also got my sample book of fabrics and stabilizers used for embroidery up to date. It wasn't a wasted class.
Saturday, August 16, 2014
Machine Embroidery Class
The class for embroidery has been divided into two parts. If one class covered everything, the students would be completely overloaded. At the first class, I practiced and got better at doing things I already knew how to do.
I learned about the screens:
I got more comfortable flipping back and forth between screens. I learned that it is worth while to use the zoom function on the screen. I learned the technical names for the buttons and that helps me remember what each button does.
I learned about hooping my fabric:
505 spray adhesive will hold my stabilizer and fabric together before I put them into the hoop. Too much spray will gum up my needle. 505 is fast and I can reposition my fabric, if I need to. The funky gray doo-dads are handles for the template that fits inside the hoop. I don't need to pick at the edge to pick up the template any more, I've got handles! Me like handles!

I still have two things that I'd like to have the instructor help me get firmly under control.
First, I'm not successful when I need to navigate to a specific location in the design. My move slowly function does not work. The enter the location by stitch number does not work. I can only make large jumps. That's not right.
Second, I want to learn how to do endless embroidery. That's where I put marker stitches in when I complete a design, re hoop the fabric, and use the marker stitches to line up the next repetition. The result is a design that looks like I didn't stop and start a zillion times, but embroidered it all in one go.
I learned about the screens:
I got more comfortable flipping back and forth between screens. I learned that it is worth while to use the zoom function on the screen. I learned the technical names for the buttons and that helps me remember what each button does.
I learned about hooping my fabric:
505 spray adhesive will hold my stabilizer and fabric together before I put them into the hoop. Too much spray will gum up my needle. 505 is fast and I can reposition my fabric, if I need to. The funky gray doo-dads are handles for the template that fits inside the hoop. I don't need to pick at the edge to pick up the template any more, I've got handles! Me like handles!
I still have two things that I'd like to have the instructor help me get firmly under control.
First, I'm not successful when I need to navigate to a specific location in the design. My move slowly function does not work. The enter the location by stitch number does not work. I can only make large jumps. That's not right.
Second, I want to learn how to do endless embroidery. That's where I put marker stitches in when I complete a design, re hoop the fabric, and use the marker stitches to line up the next repetition. The result is a design that looks like I didn't stop and start a zillion times, but embroidered it all in one go.
Sunday, August 10, 2014
The Backlash Spring
Aha! I adore YouTube in small doses. I was looking for information on Endless Embroidery and I found an incredible video from Bernina Tampa on how to manage that spring in the bobbin case that gave me so much trouble.
The trick isn't just to pop it into place. I'd been lucky with that. When I removed it to photograph the darned thing, I found that I also had to press the spring into place all around the edge of the spring. I used the tip of my Purple Thang and it worked perfectly. It still didn't take lots of pressure. About what I'd use when writing with a pencil was good. The test is to pull on the thread and feel that the tension is steady and doesn't get tight and then loose again or that it isn't horribly tight and doesn't get loose at all. If the spring is really out of place, you can't load the bobbin into the case in the first place.
If you look through the videos that are listed off to the right, you can find quite a few videos on Bernina mechanical and digital functions. I am NOT suggesting that you follow the directions and attempt to become your own Bernina tech. But knowing what's going on inside your machine never hurts.
I continue to learn, a little bit at a time, about this machine. Later today, I'm off to another class on Embroidery with Big Mama B. Details to follow!
Thursday, July 24, 2014
Clatter!
When I took Mama B in for my second class on using it, I compared the sound of my machine to the sound of other machines in the class. I wasn't happy. Mama B sounded like she was clattering along, and the other machines just purred. The instructor also stated that she felt my machine needed oil. I oiled Mama B, but she still clattered along.
Home after class, I found a You Tube video on how to clean and oil my machine. Sara sounds like she's had a bit too much coffee, but the directions are good. I cleaned Mama B carefully and applied a drop of oil. Then I did a lot of boring straight sewing, and I oiled her frequently. Gradually, the clatter went away and Mama B began purring.
The 830's need regular oiling- only one drop at a time- but frequently. As instructed, I only use the official Bernina oil. The applicator doesn't leak, and for that alone, I would prefer it. As far as cost, I could care less. The oil came with the machine. By the time I use it up, I might have a new machine. A little goes a long way.

The 830's need regular oiling- only one drop at a time- but frequently. As instructed, I only use the official Bernina oil. The applicator doesn't leak, and for that alone, I would prefer it. As far as cost, I could care less. The oil came with the machine. By the time I use it up, I might have a new machine. A little goes a long way.
Wednesday, July 23, 2014
Mama B and the Bobbin
I broke a needle while trying out Big Mama B's embroidery. While cleaning the
bobbin area of metal fragments, I popped out the spring that helps to
keep the bobbin in place. When I replaced it, I didn't do it right and
the bobbin thread tension was far too tight.
Much frustration ensued. I knew it was something to do with how the bobbin was spinning, or not spinning, and I kept cleaning non-existent metal fragments out, removing, and replacing the bobbin. Sometimes, the spring would pop out again, I'd put it back, and the problem would not go away.
 This is the (slightly dusty) spring. It is not in the bobbin case where it should be.
 In this picture, the tip of the stylus is touching the spring. The spring is in place and works correctly.
It all ended when I finally popped the spring into the correct place by accident, as I was cleaning. Thank goodness, I was paying attention and noticed that my finger nudged it 'just so' and it popped into place. I then removed and replaced it a couple times more, to learn exactly what it was that I'd done. It must be lined up correctly, pointing in the right direction, and it doesn't take a lot of pressure to put it in place. It really just pops right in if you know the trick. Tension problem solved!
FWIW, checking how the bobbin is threaded in an 830 is, how shall I say it? Annoying. That's it, I'll call it annoying. After lots and lots of practice, several you-tube videos, one-on-one training from a Bernina tech, and a minor hissy fit I got it down to a mirror in one hand and the thread in the other. Why Bernina didn't attach a mirror to the inside of the door, I'll never know.

Much frustration ensued. I knew it was something to do with how the bobbin was spinning, or not spinning, and I kept cleaning non-existent metal fragments out, removing, and replacing the bobbin. Sometimes, the spring would pop out again, I'd put it back, and the problem would not go away.
It all ended when I finally popped the spring into the correct place by accident, as I was cleaning. Thank goodness, I was paying attention and noticed that my finger nudged it 'just so' and it popped into place. I then removed and replaced it a couple times more, to learn exactly what it was that I'd done. It must be lined up correctly, pointing in the right direction, and it doesn't take a lot of pressure to put it in place. It really just pops right in if you know the trick. Tension problem solved!
FWIW, checking how the bobbin is threaded in an 830 is, how shall I say it? Annoying. That's it, I'll call it annoying. After lots and lots of practice, several you-tube videos, one-on-one training from a Bernina tech, and a minor hissy fit I got it down to a mirror in one hand and the thread in the other. Why Bernina didn't attach a mirror to the inside of the door, I'll never know.
The arrow is pointing to the white thread from the bobbin. It's coming out from under the spring that applies the right tension that is to the right of the thread. Even getting down on the floor under the machine, there is no view of the bobbin. Trust me on that, OK? If you have exceptional hearing and/or sensitive fingertips, you can hear and/or feel the thread pop into place. Then the mirror is not needed.
Monday, July 21, 2014
I Refuse!
I'm reading through the directions for my Mariner's Compass quilt. I'm going to add stripes of color to accent some of the shapes. In order to do this, I just cut off a strip from the finished pieces and replace what I cut off with a strip of the accent fabric. In theory, it makes a great deal of sense.
In practice, it wastes even more fabric. Did you catch the word 'finished' in the above paragraph? Why am I finishing a section, only to hack a chunk of it off? My plan is to make the section smaller in the first place, and then add my accent fabric. This will reduce the wasted fabric to a seam allowance, not several inches.
My mother didn't raise a fool.
Wednesday, July 9, 2014
How A Musing
The muse has returned (she never really left) and I've been working on finishing up the sashing on Bud's quilt. I've only got two more rows to do. I'll probably be done with the sashing tomorrow. Then I need to decide on what I'm going to do for the borders. The ideal pattern will be a 3" by 4" repeat with a specific corner design. Not feathers, as they are not masculine, according to the spousal unit.
Yesterday, I took a class on making my sewing machine do some of the fun things that it can do. I learned how to calibrate the buttonhole foot after doing a software update. On the 830, I can change things that require a visit to the repair shop for other machines. On the more expensive machines, the owners can do more and on the lesser models, tech intervention is required. I like having more control over my machine.
Monday, I started reverse engineering a pattern for a liner to go into a tote bag. It will have pockets and will button to the handles, so things don't get lost in the bottom of the tote. This is the kind of thing that could be printed up as a pattern and sold. If I were so inclined, which I am not. I simply enjoy creating things like that.
Friday, June 20, 2014
Speed Piecing
Quality takes time. I mentioned to one of the instructors that I know that I don't actually care for any 'speed piecing' techniques. She agreed that she didn't care for them either. I gave myself a mental high five. When it gets right down to it, most of the speed techniques are either a variation of chain sewing, or they are a stack and whack technique for cutting a whole lot of fabric just a bit crooked in one pass.
Chain sewing is supposed to save time and thread. I use up about 3-4" of thread each time I stop and start a seam. 4" of thread out of an 875 yard spool? That I got on sale for 40% off? Even the best quality cotton thread degrades when stored and should not be kept for years and years. I use it or toss it out. Save time? I'm not running my sewing machine any faster. In theory, I'm saving time by not stopping to clip threads. They don't clip themselves. I just spend time after I sew, clipping threads.
And 'stack and whack' cutting? I've never done it. The name alone made me shudder and stay away. What part of 'whack' leads anyone to think about accuracy? 'Nuff said.
There is the final, Zen consideration. If I like to sew and enjoy spending my time sewing, why would I want to seek out ways to spend less time sewing?
Saturday, June 14, 2014
Why doesn't my quilt hang straight?
We've all seen them. We may have even made one or two. A lovely quilt or wall hanging that won't hang straight. Perhaps it has waves, or a corner that curls. But it does not hang straight and square. On a bed, it will never be noticed. On a wall, it is a slight annoyance that you, the maker of the quilt, just can't ignore. Sometimes, the problem isn't there at first, but after the quilt has been hanging for a while, it shows up.
What happened? Often, pieces of fabric were not cut on the straight grain of the fabric. Usually, it is the sashing or the border that causes the problem. To prevent this, the strips of fabric can't just be the correct width, they have to be on grain.
What is 'on grain?' It means that one single thread is the edge thread all along the cut edge. And the seam line should not wobble around, either. If the seam starts between the fifteenth and the sixteenth thread, it should stay there. In reality, this kind of accuracy is not reasonable to strive for and ripping out seams that wobble slightly is not required. But seams and cut edges that meander will cause those waves. And the more the meandering, the worse the waves will be.
Fabric just wants to hang there. It is lazy. The threads that run vertically don't want to tango from side to side, they want to hang like the string on a plumb line. The horizontal threads don't want to ski over moguls, they just want to lie flat. If they cause the quilt to hang in waves, they don't care. The threads want to be vertical or flat. The quilt can just bend around them.
Another reason quilts don't hang straight is that fabric stretches differently along the width and the length. Length of fabric is along the selvedge. Fabric has no stretch along the length. Width is from selvedge across to the other selvedge. Fabric will stretch a bit along the width. Some strips cut along the width, mixed with strips cut along the length will cause waves as the quilt hangs.
Sunday, May 25, 2014
Where is the Reward?
The Mariner's Compass quilt that I'm making is going well. I'm being reminded of why I enjoy sewing.
The method of cutting fabric that is taught in this pattern wastes fabric, but saves time. I cut yards of fabric into strips, then cut the strips into shapes, then trim away fabric from the shapes. The strips are larger than the shapes, so I cut fabric away to create my shapes. And the shapes are larger than they need to be. Why? Because when you are working quickly, you can't be accurate.
If I enjoy what I'm doing, I don't want to rush through it. Saving time means that I don't spend as much time doing the things that I like. I'm finished quickly. I don't want things done in a hurry. I'm not being rewarded by the finished item alone. I'm also rewarded by the task itself. For me, working quickly takes away some of my reward.
If you love what you are doing, you don't need patience, you need more time to do it.
Monday, May 5, 2014
Paper Piecing
I'm using a technique where you sew your fabric to a piece of paper with the pattern printed on it. You don't need to cut the pieces of fabric accurately, you trim off extra fabric after you sew each piece in place. In fact, you don't want to cut your pieces accurately, as it makes it harder to deal with an already fussy task. A little room for error is a good thing.
However, I'm wasting a heck of a lot of fabric. Not only am I cutting pieces with a 1/4" seam allowance, I'm also cutting them with at least a 3/8" extra allowance on top of that. Sigh. The frugal heart of me is offended. The technique calls for some fabric waste. I understand that. But I can't get comfortable with the amount of fabric I'm going through completing this pattern according to the directions. At least I'm getting this figured out on a set of pieces that are small. The actual amount of fabric that I'm wasting is not that great. By the time I get to the larger sections, I'll have figured out a better way to cut my fabric before I sew.
In addition, there is a slight chance that I should ignore the exact line on the paper and sew to one side or the other of it. See, fabric doesn't fold knife sharp. The bulge of fabric that rolls around the seam can cause the precision of my sewing to be just enough off that it will show up when I least want it to.
There is also a potential problem that the fabric won't be perfectly flat when I'm sewing it to the paper. When I remove the paper, I'll have created something that will be too large and won't match up with the other pieces that I've created. I don't think William is going to care. All he really wants is a quilt that he can sleep under that is large enough that his feet don't stick out. He won't care that it isn't perfect. Really, he won't.
Bud, my mechanic spouse, doesn't understand why I dance around a project, looking at this and that, poking at it, measuring pieces, testing things, and not leaping to get started right away. I'm not dealing with an industry that has exacting requirements based on crash test reports, recall notices, and government safety standards. I'm dealing with folks who majored in Home Ec in college. If they even went that hard core technical. If not Home Ec, then they are Art majors. Engineering, beta testing, and quality control? Not so much.
Saturday, May 3, 2014
Suzy's Sack
I got a pattern to make an adorable little bag. I didn't get it from the shop I linked to, but it was exactly the same pattern and price.
The directions are HORRIBLE!
The pictures are not clear and the words that go with them are even worse. At first, I thought it was me having a problem with the directions. I looked up the pattern on the web and every person who has blogged about it has commented that the directions need help.
I sent an e-mail to the designer of the pattern at her website. That was early last week. I haven't heard a peep yet.
Sigh. I suppose the only thing to do is to try to put the bag together and guess at the correct things to do. I'll only be wasting my time and my fabric.
Thursday, April 24, 2014
Not Retreating, Not Progressing
Each week, I pack up stuff to haul with me out to Central Florida for the work week. I take projects to work on in the evenings. I try to limit the projects so I don't haul lots of stuff back and forth. This week, I brought fabric and my pattern. I forgot the box full of scissors, thread, and needles for my sewing machine. I couldn't sew as I'd planned. I have been watching videos instead. This is a poor substitute. As much as I love Avatar and Frozen, I'd much rather be watching these movies while completing my sewing projects at the same time.
I couldn't even prepare to sew because our washing machine broke. I couldn't pre-wash my fabric. I could have pre-washed it using the laundromat at the trailer park where I'm staying, but I didn't have enough quarters to both wash fabric and my work clothing. Now that I've collected enough quarters, I'll be heading home to a repaired washing machine tomorrow. Tonight, I'll pack up untouched fabric to take back home with me.
I feel a bit like the Red Queen. I'm running as fast as I can, just to stay in the same place.
Saturday, April 19, 2014
Settling In
The job is OK. I am earning what I get paid. People are getting better and some are even going home. I drive about 4 hours, one way.
The travel trailer doesn't support the 830. The table isn't sturdy enough and I don't wish to leave the 830 for the weekends. Do I think anyone would mess with my stuff on the weekends? Not really. The idea of hauling my new sewing machine back and forth every weekend is not appealing. It's enough that I haul my dirty laundry home. I am working with the 165E during the week and the 830 on the weekends.
I have discovered that Best Press is worth the effort and the price. I used it on fabric, and then folded the fabric and set it aside for a few days. I barely had to touch the fabric with my iron before I had perfectly pressed fabric to use. The effort I'd put in to prepare the fabric for use was worth it. I looked around. Best Press might be cheaper on Amazon, but only if I don't have to pay for shipping.
I was able to test King Tut thread for machine quilting. The thread is very fat and full. A small needle gave me skipped stitches. I put in a size 100 needle. Once I did that, I was successful. However, the change made me aware that I could not use the King Tut thread to quilt the same quilt I was using Aurifil thread on. The change in the threads would look odd. I'd get one type of look for the geese and a very different one for the sashing. I did not want that. How did I make the King Tut thread work? I used it to make a fabric bowl. It came out well.
I am waiting for the Add a Quarter ruler that I ordered to come in. Once it arrives, I'll be able to get started on the Mariner's Compass quilt. Until then, I'm kind of just cutting fabric and trying not to panic.
Sunday, March 30, 2014
Traveling Crafter
I took a traveling OT job and have booked a hotel room for the first week of my 13 week contract. I left my new 830 sewing machine at home. I brought my old machine and a small amount of stuff to work on. Now, think of a budget vacation hotel room. Where does the sewing machine go? There's no ironing board. No desk. The coffee table is small, round, and knee high.
I drive a full sized truck. I could have brought half my sewing room. I was unwilling to turn myself into a beast of burden, loading and unloading equipment. Bud and I discussed this and decided on a solution. We bought a 25' travel trailer. Because it was the end of the quarter, we got a significant discount on the price. We take delivery April 5. We'll spend the weekend pulling my SCAdian camping gear out of the attic and stocking our trailer. For the next three months, I'll live in the trailer during the week and at home on the weekends.
Instead of paying $350/week for a room that doesn't meet my needs, we will rent a campsite for $250/month. I can cook my own food, sleep on my own pillows, and have space to work on my projects. In the long run, I expect to save anywhere from 50 to 75% of what I would have spent on hotels and eating out. I could have found a campsite for less than $250, but I don't wish to live in a trailer park right next door to a major highway.
FWIW, I am almost within sight of Legoland Florida. I'll probably have to drive past it on my way to work.
Subscribe to:
Posts (Atom)


