
Monday, October 20, 2014
A Sigh of Annoyance
Mama B is back in the shop. She just wasn't behaving as well as I thought she should. There were too many problems with the thread getting caught in the bobbin case. She didn't do that when I first got her. So, back she went. I'm tired of her going back into the shop. I am very frustrated at having to deal with issues when she isn't completely fixed. Mama ain't happy, I'm not happy.
Wednesday, October 8, 2014
Today's New Thing
Each day, I learn another thing about Mama Bernina. Today, I learned that using up whatever I have left in my studio is not a good idea. I was using several different brands of bobbin thread. One of them acted badly when I tried to use it and I had no idea what was wrong. Fortunately, it was not a large spool and I was able to toss out what I had left of it. I ran around in circles and pulled out my hair before I figured out it was the bobbin thread.
Today what I learned is to use standard materials and always use the same stuff when you are learning. Do not try six different things when you don't know what you are doing. You have no idea what the results are going to be and even worse, you don't know why you got those results, either! If it turns out great or turns out crappy, you don't know why. You haven't learned anything useful because you can't do it again, or do it differently on purpose the next time.
Today what I learned is to use standard materials and always use the same stuff when you are learning. Do not try six different things when you don't know what you are doing. You have no idea what the results are going to be and even worse, you don't know why you got those results, either! If it turns out great or turns out crappy, you don't know why. You haven't learned anything useful because you can't do it again, or do it differently on purpose the next time.
Tuesday, October 7, 2014
Trimming for Applique
I have one favorite tip that I use for creating cleaner edges when doing machine applique in the hoop. I use a lint brush. Not one of the ones with adhesive, one that has velvet with a nap on it.
After I attach and trim, I brush in all directions.
Here's what a piece looks like after trimming and before the lint brush.

And here's what it looks like after I go over it with the lint brush.
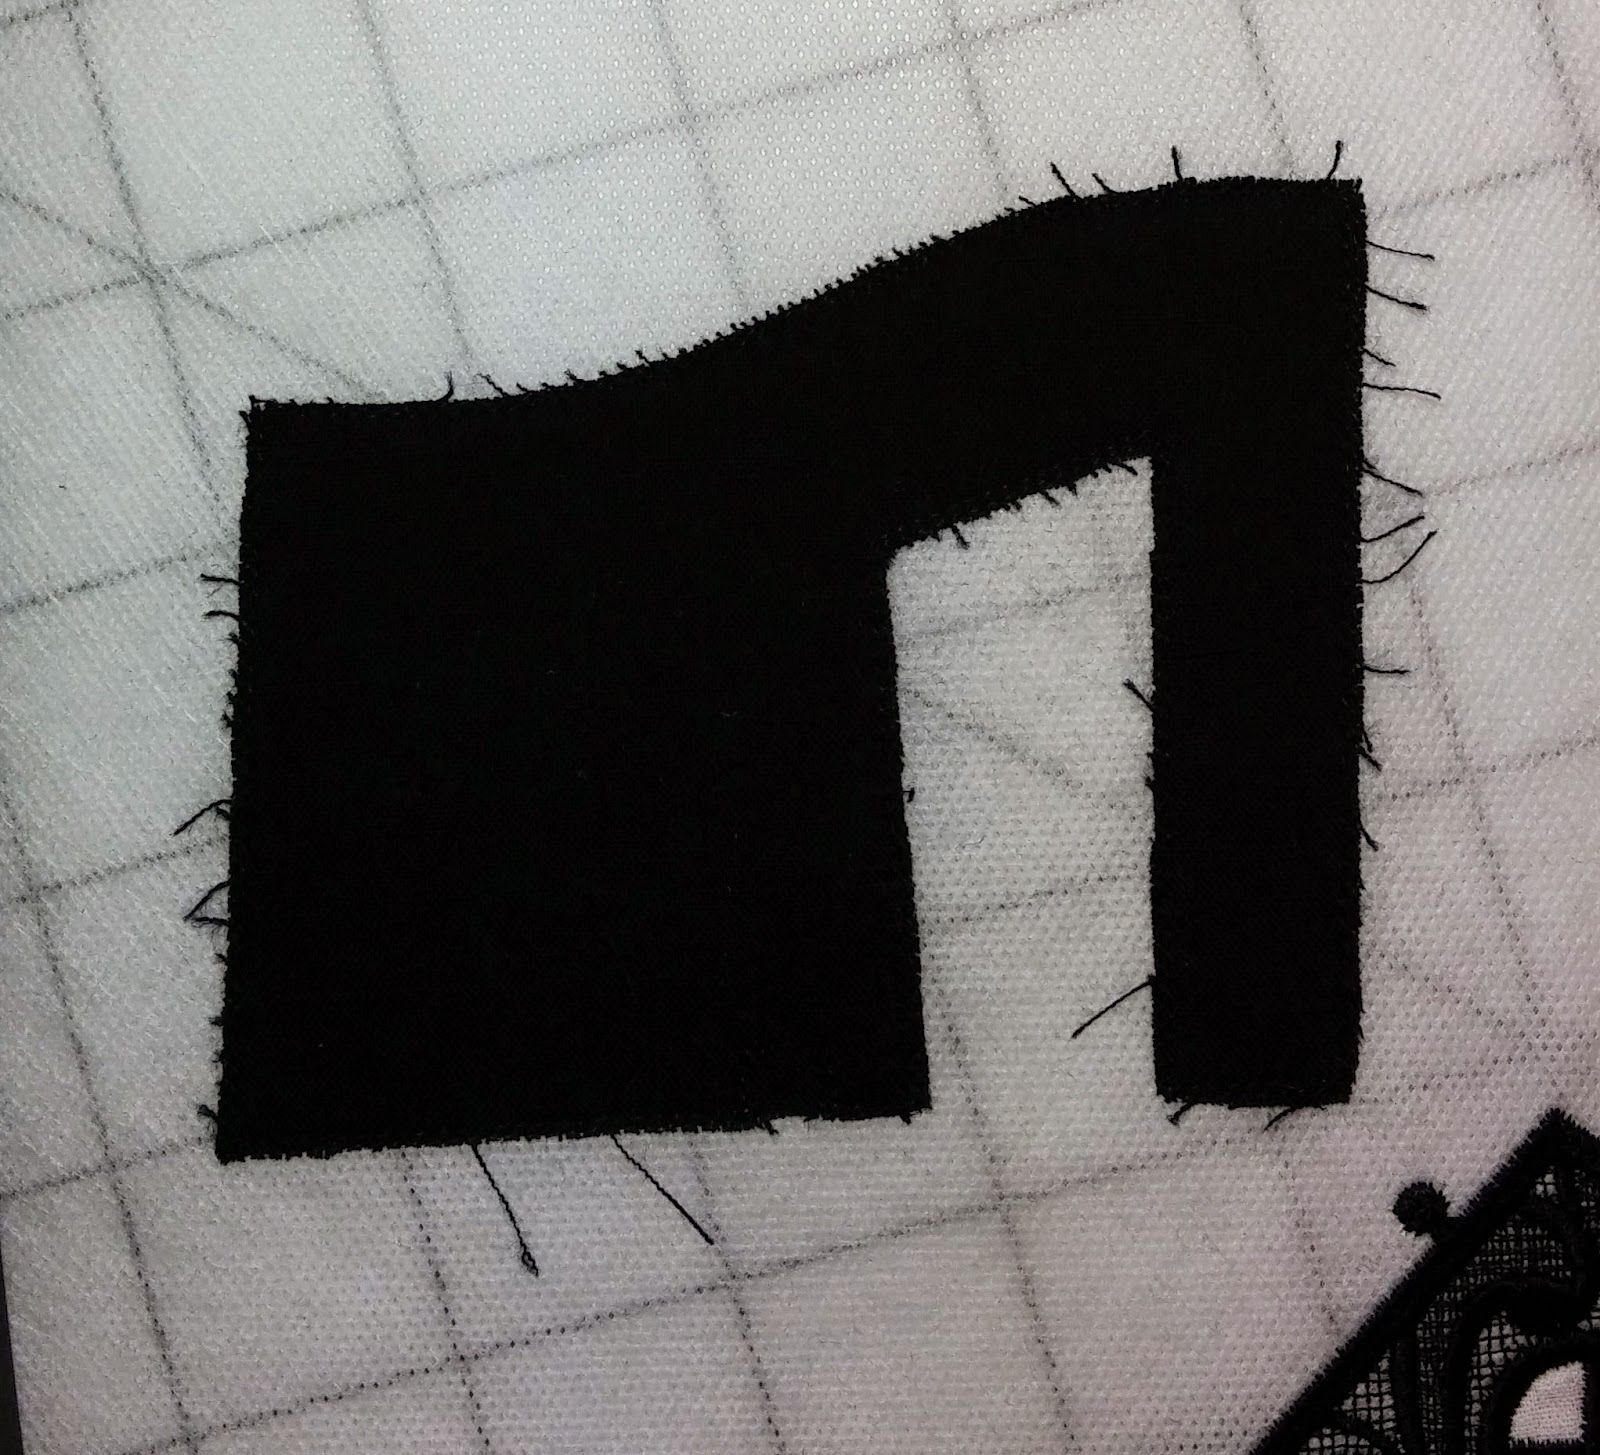
I can easily trim those threads now that I can see them.
I keep brushing and trimming until there are no more threads that stick out to be trimmed off. Even then, I'll still have the occasional thread that pokes out where I don't want it. For those, I suggest a permanent marker.
After I attach and trim, I brush in all directions.
Here's what a piece looks like after trimming and before the lint brush.
And here's what it looks like after I go over it with the lint brush.
I can easily trim those threads now that I can see them.
I keep brushing and trimming until there are no more threads that stick out to be trimmed off. Even then, I'll still have the occasional thread that pokes out where I don't want it. For those, I suggest a permanent marker.
Sunday, September 28, 2014
Up and Running!
Mama Bernina is back in her usual spot and has been running steadily since I got her back and got home from the quilt show. At first, she was clattering a bit, but I threw oil at her and she quieted down. Project comments later.
While Mama was in the shop, I went through my embroidery designs, both in digital and physical form. In digital form, I have a master directory that contains ALL of my digital versions. The key is that there is only ONE master directory. I copy only the version of the designs that I will use into my master directory, into a folder with a descriptive name. "Collection #12513" tells me nothing. "Halloween Couture" tells me a lot more. Into that folder, I also copy the digital version of the directions, if there were any included.
When I buy a CD of designs, I put the printed directions and the CD together into a plastic organizer sheet that goes into a 3 ring notebook. I don't keep the bulky plastic cases that the CDs come in.
My stuff is easy for me to find, and the system isn't complicated and time consuming to use. Win!
Friday, September 12, 2014
Repair Woes for my Bernina 830LE
I was having trouble with multiple false alarms for my top thread sensor. I turned it off, but then, my touchscreen would lock up. The problem got bad enough that I dropped the machine off for service. That was on Sunday, the 31st of August. The owner of the shop wrote up the service ticket and she understands that I only get to sew on the weekends. Wonderful Hubby picked up my machine on Friday, September 5th.
FAIL!!! Not only was I still getting false alarms, There was a serious top thread tension issue. I got the worst thread 'nests' I've ever seen. Not only did the knotted clump of thread manage to pull the project out of the hoop, the thread nest also pulled the throat plate off the free arm. The bobbin stopped moving entirely, as well. In short, the thread clump pulled my machine apart.
So, on Saturday, September 6, before 10:00 in the morning, my machine was back in the shop for the second time in a single week. I'm not usually prone to italics, but I am that upset about it.
When I dropped off the machine the second time, the owner of the shop was again present. She passed me off to her employees. I didn't get to speak to her about paying for four hours of labor, only to discover that the problem had not been fixed and new issues had been created that were worse. There is a chance that not only is the top tension off, the timing of the machine is wrong. Bad timing is often a death knell for a machine.
The mechanic has been on vacation this week and has not touched my machine. I was expecting it to be finished by today. Heck, I really had expected it to be finished last week!
OTOH, if the mechanic has screwed up the timing, the worst case scenario means the machine will have to be shipped to Chicago to be repaired. If Chicago can't repair it, I'm going to demand that the shop owner buy me a replacement. My 830 is a Limited Edition of a numbered series. I'd accept a used machine as a replacement because I got mine used. But I'm not paying for the shipping or the additional repairs, no matter what. I didn't break it, the mechanic did.
Sunday, August 24, 2014
Embroidery Class Two
The second class on how to do machine embroidery got more into the interface. I had a question on a function button that wasn't mentioned in the manual. But, it still boiled down to the instructor had many different types of machines to cover and could not go into detail for my machine. The students also had a very wide range of skill levels.
I made a mistake with endless embroidery and tried something too fancy. I duplicated the pattern, so the machine thought two repeats were what I really wanted. I only wanted one repeat at a time, but what did I know?
 The two "arrows" are the marks, similar to a tailor's tack, that the machine will baste in. They show you where to align the hoop in the machine. I hooped the fabric using the center crease as my center line. The machine started at the left, stitched two repeats and then put in the tailor's tacks. I took the fabric out of the hoop, moved the hoop and then lined up my stitching for the next repeat using the tailor's tacks. My problem was that all the motifs started at the right side and stitched over to the left. I couldn't tell where I was really going to be using the handwheel and testing the needle position. I just had to trust. It isn't perfect, but it isn't bad either.
But! I did get more actual embroidery completed during this class. I learned how to use a basting box for alignment checks. I learned where to adjust to use Puffy Foam (details to follow in a different post), I learned that Floriani thread and my 830 might not get along. I got a sample of embroidery stabilizer that I'd never seen before. I also got my sample book of fabrics and stabilizers used for embroidery up to date. It wasn't a wasted class.
I made a mistake with endless embroidery and tried something too fancy. I duplicated the pattern, so the machine thought two repeats were what I really wanted. I only wanted one repeat at a time, but what did I know?
But! I did get more actual embroidery completed during this class. I learned how to use a basting box for alignment checks. I learned where to adjust to use Puffy Foam (details to follow in a different post), I learned that Floriani thread and my 830 might not get along. I got a sample of embroidery stabilizer that I'd never seen before. I also got my sample book of fabrics and stabilizers used for embroidery up to date. It wasn't a wasted class.
Saturday, August 16, 2014
Machine Embroidery Class
The class for embroidery has been divided into two parts. If one class covered everything, the students would be completely overloaded. At the first class, I practiced and got better at doing things I already knew how to do.
I learned about the screens:
I got more comfortable flipping back and forth between screens. I learned that it is worth while to use the zoom function on the screen. I learned the technical names for the buttons and that helps me remember what each button does.
I learned about hooping my fabric:
505 spray adhesive will hold my stabilizer and fabric together before I put them into the hoop. Too much spray will gum up my needle. 505 is fast and I can reposition my fabric, if I need to. The funky gray doo-dads are handles for the template that fits inside the hoop. I don't need to pick at the edge to pick up the template any more, I've got handles! Me like handles!

I still have two things that I'd like to have the instructor help me get firmly under control.
First, I'm not successful when I need to navigate to a specific location in the design. My move slowly function does not work. The enter the location by stitch number does not work. I can only make large jumps. That's not right.
Second, I want to learn how to do endless embroidery. That's where I put marker stitches in when I complete a design, re hoop the fabric, and use the marker stitches to line up the next repetition. The result is a design that looks like I didn't stop and start a zillion times, but embroidered it all in one go.
I learned about the screens:
I got more comfortable flipping back and forth between screens. I learned that it is worth while to use the zoom function on the screen. I learned the technical names for the buttons and that helps me remember what each button does.
I learned about hooping my fabric:
505 spray adhesive will hold my stabilizer and fabric together before I put them into the hoop. Too much spray will gum up my needle. 505 is fast and I can reposition my fabric, if I need to. The funky gray doo-dads are handles for the template that fits inside the hoop. I don't need to pick at the edge to pick up the template any more, I've got handles! Me like handles!
I still have two things that I'd like to have the instructor help me get firmly under control.
First, I'm not successful when I need to navigate to a specific location in the design. My move slowly function does not work. The enter the location by stitch number does not work. I can only make large jumps. That's not right.
Second, I want to learn how to do endless embroidery. That's where I put marker stitches in when I complete a design, re hoop the fabric, and use the marker stitches to line up the next repetition. The result is a design that looks like I didn't stop and start a zillion times, but embroidered it all in one go.
Sunday, August 10, 2014
The Backlash Spring
Aha! I adore YouTube in small doses. I was looking for information on Endless Embroidery and I found an incredible video from Bernina Tampa on how to manage that spring in the bobbin case that gave me so much trouble.
The trick isn't just to pop it into place. I'd been lucky with that. When I removed it to photograph the darned thing, I found that I also had to press the spring into place all around the edge of the spring. I used the tip of my Purple Thang and it worked perfectly. It still didn't take lots of pressure. About what I'd use when writing with a pencil was good. The test is to pull on the thread and feel that the tension is steady and doesn't get tight and then loose again or that it isn't horribly tight and doesn't get loose at all. If the spring is really out of place, you can't load the bobbin into the case in the first place.
If you look through the videos that are listed off to the right, you can find quite a few videos on Bernina mechanical and digital functions. I am NOT suggesting that you follow the directions and attempt to become your own Bernina tech. But knowing what's going on inside your machine never hurts.
I continue to learn, a little bit at a time, about this machine. Later today, I'm off to another class on Embroidery with Big Mama B. Details to follow!
Wednesday, July 30, 2014
Sewing Room Candid
A challenge was posted on a Yahoo Group for 800 sewing machines. Spend no more than one hour cleaning up, then take a picture of your sewing room and post it. I took a picture, with zero time spent cleaning up. The fabric on the ironing board was pressed last night, before I quit for the day.
This is what my sewing room looked like.

This would be my 'before' picture, but I don't need to clean up and take an 'after.' I can't work in a mess. The longer I work in a space, the more I clean it up. It just happens.
This is what my sewing room looked like.
This would be my 'before' picture, but I don't need to clean up and take an 'after.' I can't work in a mess. The longer I work in a space, the more I clean it up. It just happens.
Saturday, July 26, 2014
Mama Bernina's Table
For many years, I've used a table with a lift that allowed me to raise and lower my sewing machine. The lift is too small for Big Mama Bernina. Not only that, but it was a bother to switch from sewing to embroidery and back again. My 165e could do embroidery, but I rarely did. I am going to keep Big Mama B on top of the table and not use the lift. I can easily switch from sewing to embroidery and back. I want to embroider more.
There will be no new table for Mama B. I'm not going to pay extra for in-home delivery of a piece of furniture, nor am I going to fight with eight pages of directions and a bent piece of metal described as a wrench to assemble sawdust wrapped in vinyl claiming to be oak or cherry wood finish.
Certain decisions are freeing.
Thursday, July 24, 2014
Clatter!
When I took Mama B in for my second class on using it, I compared the sound of my machine to the sound of other machines in the class. I wasn't happy. Mama B sounded like she was clattering along, and the other machines just purred. The instructor also stated that she felt my machine needed oil. I oiled Mama B, but she still clattered along.
Home after class, I found a You Tube video on how to clean and oil my machine. Sara sounds like she's had a bit too much coffee, but the directions are good. I cleaned Mama B carefully and applied a drop of oil. Then I did a lot of boring straight sewing, and I oiled her frequently. Gradually, the clatter went away and Mama B began purring.
The 830's need regular oiling- only one drop at a time- but frequently. As instructed, I only use the official Bernina oil. The applicator doesn't leak, and for that alone, I would prefer it. As far as cost, I could care less. The oil came with the machine. By the time I use it up, I might have a new machine. A little goes a long way.

The 830's need regular oiling- only one drop at a time- but frequently. As instructed, I only use the official Bernina oil. The applicator doesn't leak, and for that alone, I would prefer it. As far as cost, I could care less. The oil came with the machine. By the time I use it up, I might have a new machine. A little goes a long way.
Wednesday, July 23, 2014
Mama B and the Bobbin
I broke a needle while trying out Big Mama B's embroidery. While cleaning the
bobbin area of metal fragments, I popped out the spring that helps to
keep the bobbin in place. When I replaced it, I didn't do it right and
the bobbin thread tension was far too tight.
Much frustration ensued. I knew it was something to do with how the bobbin was spinning, or not spinning, and I kept cleaning non-existent metal fragments out, removing, and replacing the bobbin. Sometimes, the spring would pop out again, I'd put it back, and the problem would not go away.
 This is the (slightly dusty) spring. It is not in the bobbin case where it should be.
 In this picture, the tip of the stylus is touching the spring. The spring is in place and works correctly.
It all ended when I finally popped the spring into the correct place by accident, as I was cleaning. Thank goodness, I was paying attention and noticed that my finger nudged it 'just so' and it popped into place. I then removed and replaced it a couple times more, to learn exactly what it was that I'd done. It must be lined up correctly, pointing in the right direction, and it doesn't take a lot of pressure to put it in place. It really just pops right in if you know the trick. Tension problem solved!
FWIW, checking how the bobbin is threaded in an 830 is, how shall I say it? Annoying. That's it, I'll call it annoying. After lots and lots of practice, several you-tube videos, one-on-one training from a Bernina tech, and a minor hissy fit I got it down to a mirror in one hand and the thread in the other. Why Bernina didn't attach a mirror to the inside of the door, I'll never know.

Much frustration ensued. I knew it was something to do with how the bobbin was spinning, or not spinning, and I kept cleaning non-existent metal fragments out, removing, and replacing the bobbin. Sometimes, the spring would pop out again, I'd put it back, and the problem would not go away.
It all ended when I finally popped the spring into the correct place by accident, as I was cleaning. Thank goodness, I was paying attention and noticed that my finger nudged it 'just so' and it popped into place. I then removed and replaced it a couple times more, to learn exactly what it was that I'd done. It must be lined up correctly, pointing in the right direction, and it doesn't take a lot of pressure to put it in place. It really just pops right in if you know the trick. Tension problem solved!
FWIW, checking how the bobbin is threaded in an 830 is, how shall I say it? Annoying. That's it, I'll call it annoying. After lots and lots of practice, several you-tube videos, one-on-one training from a Bernina tech, and a minor hissy fit I got it down to a mirror in one hand and the thread in the other. Why Bernina didn't attach a mirror to the inside of the door, I'll never know.
The arrow is pointing to the white thread from the bobbin. It's coming out from under the spring that applies the right tension that is to the right of the thread. Even getting down on the floor under the machine, there is no view of the bobbin. Trust me on that, OK? If you have exceptional hearing and/or sensitive fingertips, you can hear and/or feel the thread pop into place. Then the mirror is not needed.
Tuesday, July 22, 2014
Big Mama Bernina
That's what I named my Bernina 830LE. I even programmed it into the start up screen.
When I brought Big Mama home, I put her on top of my sewing table. I raised my sewing chair to the highest position and it worked. But I prefer to have my sewing machines recessed in the table, to give me a huge, flat working surface. (My son and his girlfriend gave me the "Frozen" poster. It makes us smile, and that is a very valuable thing.)
 When I took off the embroidery attachment and tried to lower Mama B into the table, I
discovered that she is so heavy, the lift won't support her.
She slid right down, out of sight. Rather like the wicked witch melting
in 'The Wizard of Oz'. So, Mama B stayed up top. I wanted to sew, not solve engineering issues.
When I took off the embroidery attachment and tried to lower Mama B into the table, I
discovered that she is so heavy, the lift won't support her.
She slid right down, out of sight. Rather like the wicked witch melting
in 'The Wizard of Oz'. So, Mama B stayed up top. I wanted to sew, not solve engineering issues.
Using the slide on table, I was able to get a lot of progress made on the free motion quilting project I had going. I tried the BSR (Bernina Stitch Regulator), but it blocks my view while sewing in one direction. Sigh. If I can't see where I'm going, I can't get there.

I went to my tried and true #15 foot. I have used that foot for other quilts and I'm familiar with it. I use the sides of the foot to help me make lines that are evenly spaced.

I know, it doesn't look like there's a lot of difference compared to the BSR foot, but it makes a difference to me.
When I brought Big Mama home, I put her on top of my sewing table. I raised my sewing chair to the highest position and it worked. But I prefer to have my sewing machines recessed in the table, to give me a huge, flat working surface. (My son and his girlfriend gave me the "Frozen" poster. It makes us smile, and that is a very valuable thing.)
Using the slide on table, I was able to get a lot of progress made on the free motion quilting project I had going. I tried the BSR (Bernina Stitch Regulator), but it blocks my view while sewing in one direction. Sigh. If I can't see where I'm going, I can't get there.
I went to my tried and true #15 foot. I have used that foot for other quilts and I'm familiar with it. I use the sides of the foot to help me make lines that are evenly spaced.
I know, it doesn't look like there's a lot of difference compared to the BSR foot, but it makes a difference to me.
Monday, July 21, 2014
I Refuse!
I'm reading through the directions for my Mariner's Compass quilt. I'm going to add stripes of color to accent some of the shapes. In order to do this, I just cut off a strip from the finished pieces and replace what I cut off with a strip of the accent fabric. In theory, it makes a great deal of sense.
In practice, it wastes even more fabric. Did you catch the word 'finished' in the above paragraph? Why am I finishing a section, only to hack a chunk of it off? My plan is to make the section smaller in the first place, and then add my accent fabric. This will reduce the wasted fabric to a seam allowance, not several inches.
My mother didn't raise a fool.
Wednesday, July 9, 2014
How A Musing
The muse has returned (she never really left) and I've been working on finishing up the sashing on Bud's quilt. I've only got two more rows to do. I'll probably be done with the sashing tomorrow. Then I need to decide on what I'm going to do for the borders. The ideal pattern will be a 3" by 4" repeat with a specific corner design. Not feathers, as they are not masculine, according to the spousal unit.
Yesterday, I took a class on making my sewing machine do some of the fun things that it can do. I learned how to calibrate the buttonhole foot after doing a software update. On the 830, I can change things that require a visit to the repair shop for other machines. On the more expensive machines, the owners can do more and on the lesser models, tech intervention is required. I like having more control over my machine.
Monday, I started reverse engineering a pattern for a liner to go into a tote bag. It will have pockets and will button to the handles, so things don't get lost in the bottom of the tote. This is the kind of thing that could be printed up as a pattern and sold. If I were so inclined, which I am not. I simply enjoy creating things like that.
Saturday, July 5, 2014
Now What?
After setting out on a contract, they hired my replacement after I'd worked there for 6.5 days. Just lucky, I guess. Anyway, I'm back at home, waiting for the offers to come pouring in again. My resume is out there, but it's a holiday weekend.
My Bernina is idle for the moment. I spent time working on Bud's quilt, I've set William's quilt aside for a while, and Ashley's tote bag is finished. I'm not in the mood to trace off the pattern for Josh's pajamas. My current list of projects does not include things for me. I did throw a small snit and embroidered a set of 6 napkins for the house. Not specifically for me, but nobody else in the house seems to take notice of things like that.
I've been creating order in my studio, since I don't feel like creating things. Eventually, I'll feel like creating things again. I'm not off on a quest to track down my muse. My muse isn't hiding, lost, or fled. I suppose she's on holiday weekend, too.
Friday, June 20, 2014
Speed Piecing
Quality takes time. I mentioned to one of the instructors that I know that I don't actually care for any 'speed piecing' techniques. She agreed that she didn't care for them either. I gave myself a mental high five. When it gets right down to it, most of the speed techniques are either a variation of chain sewing, or they are a stack and whack technique for cutting a whole lot of fabric just a bit crooked in one pass.
Chain sewing is supposed to save time and thread. I use up about 3-4" of thread each time I stop and start a seam. 4" of thread out of an 875 yard spool? That I got on sale for 40% off? Even the best quality cotton thread degrades when stored and should not be kept for years and years. I use it or toss it out. Save time? I'm not running my sewing machine any faster. In theory, I'm saving time by not stopping to clip threads. They don't clip themselves. I just spend time after I sew, clipping threads.
And 'stack and whack' cutting? I've never done it. The name alone made me shudder and stay away. What part of 'whack' leads anyone to think about accuracy? 'Nuff said.
There is the final, Zen consideration. If I like to sew and enjoy spending my time sewing, why would I want to seek out ways to spend less time sewing?
Saturday, June 14, 2014
Why doesn't my quilt hang straight?
We've all seen them. We may have even made one or two. A lovely quilt or wall hanging that won't hang straight. Perhaps it has waves, or a corner that curls. But it does not hang straight and square. On a bed, it will never be noticed. On a wall, it is a slight annoyance that you, the maker of the quilt, just can't ignore. Sometimes, the problem isn't there at first, but after the quilt has been hanging for a while, it shows up.
What happened? Often, pieces of fabric were not cut on the straight grain of the fabric. Usually, it is the sashing or the border that causes the problem. To prevent this, the strips of fabric can't just be the correct width, they have to be on grain.
What is 'on grain?' It means that one single thread is the edge thread all along the cut edge. And the seam line should not wobble around, either. If the seam starts between the fifteenth and the sixteenth thread, it should stay there. In reality, this kind of accuracy is not reasonable to strive for and ripping out seams that wobble slightly is not required. But seams and cut edges that meander will cause those waves. And the more the meandering, the worse the waves will be.
Fabric just wants to hang there. It is lazy. The threads that run vertically don't want to tango from side to side, they want to hang like the string on a plumb line. The horizontal threads don't want to ski over moguls, they just want to lie flat. If they cause the quilt to hang in waves, they don't care. The threads want to be vertical or flat. The quilt can just bend around them.
Another reason quilts don't hang straight is that fabric stretches differently along the width and the length. Length of fabric is along the selvedge. Fabric has no stretch along the length. Width is from selvedge across to the other selvedge. Fabric will stretch a bit along the width. Some strips cut along the width, mixed with strips cut along the length will cause waves as the quilt hangs.
Saturday, June 7, 2014
Do me a favor...
I came up with a solution to your problem. It will work for me. If it doesn't work for you, then I won't have to do any work to put my solution in place. I'm good with that. After all, it isn't my problem in the first place.
Sunday, May 25, 2014
Where is the Reward?
The Mariner's Compass quilt that I'm making is going well. I'm being reminded of why I enjoy sewing.
The method of cutting fabric that is taught in this pattern wastes fabric, but saves time. I cut yards of fabric into strips, then cut the strips into shapes, then trim away fabric from the shapes. The strips are larger than the shapes, so I cut fabric away to create my shapes. And the shapes are larger than they need to be. Why? Because when you are working quickly, you can't be accurate.
If I enjoy what I'm doing, I don't want to rush through it. Saving time means that I don't spend as much time doing the things that I like. I'm finished quickly. I don't want things done in a hurry. I'm not being rewarded by the finished item alone. I'm also rewarded by the task itself. For me, working quickly takes away some of my reward.
If you love what you are doing, you don't need patience, you need more time to do it.
Saturday, May 24, 2014
Why Do My Knees Hurt?
One of the ladies that I work with at this nursing home regularly asks the physical therapist, "Why do my knees hurt?" Every time she tries to stand her knees hurt. She does not walk functional distances. Bed to bathroom? Beyond her. She can barely make it from her bed to her wheelchair. Her physical therapists dread her standing in therapy because her own body weight could snap her bones. Still, she tries to stand and it makes her knees hurt.
She is over 350 pounds and has been that large for years. Think of three people trying to sit together in a single chair. That would be her, all by herself. She overflows the largest wheelchairs that we have and the first chair failed under the load. She's complaining about the second one being harder to push. It's more durable and the chair is heavy and difficult to push when empty. But it won't dump her on the floor.
If she is not able to walk, she will never go home again. Probably not even to visit for an afternoon. The government standard for a grab bar placed on a bathroom wall is that it withstand 250 pounds of downwards force. She can rip a grab bar out of a wall by trying to use it to keep herself standing. Grab bars cannot be installed in a mobile home. The walls are too flimsy. Even exterior walls.
It is a matter of weeks before her managed care insurance decides that she has not made sufficient progress to remain in rehab. At that point, she is looking at spending the rest of her life in a nursing home. I believe she's in her 60's.
Saturday, May 17, 2014
Another Generation or So
It only took one generation of 'fat acceptance' for a significant percentage of us to become morbidly obese. I saw this coming when I was a child and the first fat acceptance crusaders started getting press. Lots of press. The more I think about it the more I realize that they would not fail to get press. Who pays for the news shows to go on the air? Lots and lots of companies who sell food.
Right now, I'm working at a nursing home out in central Florida. We have a door to our rehab gym that is 42 inches wide. None of our residents are in a wheelchair that won't fit through that door. However, there are several residents that are in wheelchairs that are too narrow for them. They need to sit in chairs that are wider, up to 46 inches wide.
Think about that for a minute. Over a yard across. Well over a yard, not some piddling inch or two.
These are people who require hydraulic lifts to get into and out of bed. When they are in bed, two staff members assist them in rolling over to have their diapers changed. Often, since staff is limited, they don't get changed very frequently. Twice a day? Perhaps three times. If these people need to be put into a special chair, they are out of luck. They don't make special chairs in ultra wide sizes. So they sit in chairs that don't fit, and they aren't cleaned frequently, and there is no choice. We are following every law about caring for these people. We are not neglectful. We are not negligent. If no other option is available, we have picked the best option out of what is available.
If they weighed two hundred pounds less, they might still be up and walking around. TWO HUNDRED pounds? Well, yes, these are people that are 5 foot 3 inches tall and over three hundred and fifty pounds. They have heart disease, diabetes, kidney failure, and are on dialysis. They haven't walked or even stood on their own in many years. They have bad knees, bad hips, and very weak arms and legs. They can feed themselves, though. In fact, the high point of their day is mealtime. Can we feed them less? We can try. If a person doesn't walk, doesn't stand, and doesn't move their own body to roll over, they don't burn up many calories. One slice of cake, one soda, even a couple of graham crackers will wipe out a weeks worth of low calorie meals.
That woman who crusaded for fat acceptance now lives in a nursing home. Her quality of life is as good as the staff can make it, but it isn't much. When you age with extra weight, you don't age well.
Monday, May 12, 2014
Can I Call You Stupid?
'Cause you are NOT my sweetheart, that's for sure! My 'handler' at the traveling company hasn't been paying attention. Each week, I send in a time sheet. It goes through her hands, listing each and every hour I work. It is now at the halfway point through my contract. She has only just now noticed that I am not getting 40 hours each week. I noticed that the first week.
Suddenly, There Is A Problem. I've been sending her my weekly time sheets. Now she wants me to tell her how many hours each week I've been really doing. Umm...Haven't I been sending her my time sheet? Every week on Monday? Signed by my site supervisor? On the form that she demanded that I use? In a format that she could read? Clearly stating how many hours each week I've been able to get?
This facility management does NOT allow overtime. There is a low caseload, there simply aren't people to treat. Therefore, the answer to her question about me making up time is, "No. It is not possible for me to work more than 40 hours in a work week. It will not be allowed." And furthermore, if she expects me to work six days a week, she's going to have to come up with a lot more money than my contract currently coughs up. Because I have a family and a life and requiring me to miss them is going to mean I need something in return. That something would be a great deal of cash.
Monday, May 5, 2014
Paper Piecing
I'm using a technique where you sew your fabric to a piece of paper with the pattern printed on it. You don't need to cut the pieces of fabric accurately, you trim off extra fabric after you sew each piece in place. In fact, you don't want to cut your pieces accurately, as it makes it harder to deal with an already fussy task. A little room for error is a good thing.
However, I'm wasting a heck of a lot of fabric. Not only am I cutting pieces with a 1/4" seam allowance, I'm also cutting them with at least a 3/8" extra allowance on top of that. Sigh. The frugal heart of me is offended. The technique calls for some fabric waste. I understand that. But I can't get comfortable with the amount of fabric I'm going through completing this pattern according to the directions. At least I'm getting this figured out on a set of pieces that are small. The actual amount of fabric that I'm wasting is not that great. By the time I get to the larger sections, I'll have figured out a better way to cut my fabric before I sew.
In addition, there is a slight chance that I should ignore the exact line on the paper and sew to one side or the other of it. See, fabric doesn't fold knife sharp. The bulge of fabric that rolls around the seam can cause the precision of my sewing to be just enough off that it will show up when I least want it to.
There is also a potential problem that the fabric won't be perfectly flat when I'm sewing it to the paper. When I remove the paper, I'll have created something that will be too large and won't match up with the other pieces that I've created. I don't think William is going to care. All he really wants is a quilt that he can sleep under that is large enough that his feet don't stick out. He won't care that it isn't perfect. Really, he won't.
Bud, my mechanic spouse, doesn't understand why I dance around a project, looking at this and that, poking at it, measuring pieces, testing things, and not leaping to get started right away. I'm not dealing with an industry that has exacting requirements based on crash test reports, recall notices, and government safety standards. I'm dealing with folks who majored in Home Ec in college. If they even went that hard core technical. If not Home Ec, then they are Art majors. Engineering, beta testing, and quality control? Not so much.
Sunday, May 4, 2014
Design and Hair
My sister went for dreadlocks, many years ago. I envy her. She has long, healthy hair, in what she calls, 'executive dreads.' They are fine, small and can be braided up, pulled back, left to hang loose, even flipped around as Cher used to do. They have gotten so long that she must regularly trim them or they would hang below her waist.
Someday, I'd love to have dreads like hers. I'm not even sure if my hair will dread at all. But the idea of the two of us as little old ladies with long dreads? I love it.
Someday, I'd love to have dreads like hers. I'm not even sure if my hair will dread at all. But the idea of the two of us as little old ladies with long dreads? I love it.
Saturday, May 3, 2014
Suzy's Sack
I got a pattern to make an adorable little bag. I didn't get it from the shop I linked to, but it was exactly the same pattern and price.
The directions are HORRIBLE!
The pictures are not clear and the words that go with them are even worse. At first, I thought it was me having a problem with the directions. I looked up the pattern on the web and every person who has blogged about it has commented that the directions need help.
I sent an e-mail to the designer of the pattern at her website. That was early last week. I haven't heard a peep yet.
Sigh. I suppose the only thing to do is to try to put the bag together and guess at the correct things to do. I'll only be wasting my time and my fabric.
Tuesday, April 29, 2014
Anything Free
Is worth what you pay for it. I now know why the internet access around here is free. When it rains, there is VERY slow access. Things are freezing, failing to load, and it is very annoying to try to do something that should be pretty simple. If I could get access on a slow but consistent basis, I could deal. But it isn't consistent.
Grrr...
Grrr...
Saturday, April 26, 2014
Less Stress!
This job has some problems, but it doesn't have half the stress of the old one. Some of my job requirements are stricter, but there is a LOT less BS wrapped around the tasks of my day and it is easier to get my job done. Once we get a few issues resolved that were left over from the previous therapist (a walking, talking fruit loop), it will be even better.
Am I the only person dealing with less stress? Nope! Bud has left Fleet Pride and will be moving to a job where he will have a lot less stress. Some of our neighbors have left their high stress jobs and moved to less stressful positions, too! Life all around is improving.
And now, I'm off to use up some crafting coupons and meet up with a friend for a pedicure. Can you spell 'contentment'? How about 'smug'?
Thursday, April 24, 2014
Not Retreating, Not Progressing
Each week, I pack up stuff to haul with me out to Central Florida for the work week. I take projects to work on in the evenings. I try to limit the projects so I don't haul lots of stuff back and forth. This week, I brought fabric and my pattern. I forgot the box full of scissors, thread, and needles for my sewing machine. I couldn't sew as I'd planned. I have been watching videos instead. This is a poor substitute. As much as I love Avatar and Frozen, I'd much rather be watching these movies while completing my sewing projects at the same time.
I couldn't even prepare to sew because our washing machine broke. I couldn't pre-wash my fabric. I could have pre-washed it using the laundromat at the trailer park where I'm staying, but I didn't have enough quarters to both wash fabric and my work clothing. Now that I've collected enough quarters, I'll be heading home to a repaired washing machine tomorrow. Tonight, I'll pack up untouched fabric to take back home with me.
I feel a bit like the Red Queen. I'm running as fast as I can, just to stay in the same place.
Saturday, April 19, 2014
Settling In
The job is OK. I am earning what I get paid. People are getting better and some are even going home. I drive about 4 hours, one way.
The travel trailer doesn't support the 830. The table isn't sturdy enough and I don't wish to leave the 830 for the weekends. Do I think anyone would mess with my stuff on the weekends? Not really. The idea of hauling my new sewing machine back and forth every weekend is not appealing. It's enough that I haul my dirty laundry home. I am working with the 165E during the week and the 830 on the weekends.
I have discovered that Best Press is worth the effort and the price. I used it on fabric, and then folded the fabric and set it aside for a few days. I barely had to touch the fabric with my iron before I had perfectly pressed fabric to use. The effort I'd put in to prepare the fabric for use was worth it. I looked around. Best Press might be cheaper on Amazon, but only if I don't have to pay for shipping.
I was able to test King Tut thread for machine quilting. The thread is very fat and full. A small needle gave me skipped stitches. I put in a size 100 needle. Once I did that, I was successful. However, the change made me aware that I could not use the King Tut thread to quilt the same quilt I was using Aurifil thread on. The change in the threads would look odd. I'd get one type of look for the geese and a very different one for the sashing. I did not want that. How did I make the King Tut thread work? I used it to make a fabric bowl. It came out well.
I am waiting for the Add a Quarter ruler that I ordered to come in. Once it arrives, I'll be able to get started on the Mariner's Compass quilt. Until then, I'm kind of just cutting fabric and trying not to panic.
Sunday, March 30, 2014
Traveling Crafter
I took a traveling OT job and have booked a hotel room for the first week of my 13 week contract. I left my new 830 sewing machine at home. I brought my old machine and a small amount of stuff to work on. Now, think of a budget vacation hotel room. Where does the sewing machine go? There's no ironing board. No desk. The coffee table is small, round, and knee high.
I drive a full sized truck. I could have brought half my sewing room. I was unwilling to turn myself into a beast of burden, loading and unloading equipment. Bud and I discussed this and decided on a solution. We bought a 25' travel trailer. Because it was the end of the quarter, we got a significant discount on the price. We take delivery April 5. We'll spend the weekend pulling my SCAdian camping gear out of the attic and stocking our trailer. For the next three months, I'll live in the trailer during the week and at home on the weekends.
Instead of paying $350/week for a room that doesn't meet my needs, we will rent a campsite for $250/month. I can cook my own food, sleep on my own pillows, and have space to work on my projects. In the long run, I expect to save anywhere from 50 to 75% of what I would have spent on hotels and eating out. I could have found a campsite for less than $250, but I don't wish to live in a trailer park right next door to a major highway.
FWIW, I am almost within sight of Legoland Florida. I'll probably have to drive past it on my way to work.
Saturday, March 29, 2014
Everything Close at Hand
So, I'm up, it's the middle of the night, and I am trying to solve a problem that was floating in my head before I fell asleep. I got up and went to my studio. I thought I'd located a possible solution on Pinterest, some weeks earlier. I have at hand an already prepared sample for testing so I sketch it out. I do a test. Not quite right. I reach for a paper punch to create a template. Punch! Nope, I need a 1/2 inch smaller punch. I've got it. Punch! I use it for sketching and I like the sketch. Test. Win! Then I get out the materials to create a more durable template. Punch! The edges are rough. I've reach for the right file to smooth the edges. 20 minutes after walking into my studio, the problem is solved.
Because I yam what I yam, the tools I used are already put away and the finished template is stored with the project.
I'm still awake. Now what?
Thursday, March 27, 2014
I Like It!
I had been using a standard sewing machine to do the Free Motion Quilting on Bud's Flying Geese quilt. I struggled to complete 7 to 10 units in a day of working. My hands hurt, I got tired, I felt I was fighting with the project. Then I bought the 830 and found myself with double the space to work in to the right of the needle.
A good portion of my difficulty with FMQ was difficulty with the space limitation. The overall quality has improved. I don't have nearly the fatigue and discomfort. There is still some, but I can complete a lot more before I need to take a rest break. Comparing my early efforts to my recent results shows significantly improved technique. Curves are smoother, stitch length is more consistent.
FMQ is a skill that requires practice. It also requires the right machine. I might be better able to produce a good result using a standard machine after using my 830, but I'd be annoyed at the constraint.
Tuesday, March 25, 2014
Adjustments and the Learning Curve
I was trying to switch from embroidery to decorative stitching. I forgot to swap out a piece of hardware and broke a needle. Not just broke, shattered into many pieces. Sigh. I wasn't able to get all of the bits of needle out of the bobbin area right away. I ended up pulling out the vacuum cleaner attachments after many attempts with the lint brush. I'd clean, try sewing, discover the tension was incorrect, then go back to cleaning. In all the testing, a metal fragment knocked the tension for the bobbin thread out of whack. It was too tight.
Gaahh. Normally, having the bobbin tension out of whack is a significant problem. It is not at all easy to adjust the tension on the bobbin. Well, on all of my other machines, it was difficult. However, on the 830, I was provided with a special tool and the bobbin case has a ratchet style tension adjustment. I moved the tension one notch/click and tested, moved it a second notch/click and tested and poof! The tension was again correct.
While many might say that the 830 tension is twitchy and difficult, I think that adjusting the bobbin tension on this machine is much easier than on any other machine I've owned.
On the other hand, I also have learned that I need to use the software on the 830 that will prevent the error that caused the broken needle in the first place. I neglected to tell the machine that I had changed hardware. If I had done that, the machine would have prevented me from stitching with hardware that didn't work with the decorative stitch I had chosen.
Wednesday, March 19, 2014
New Sewing Machine
OMG. I just bought an 830 sewing computer from our local shop. The machine is used. The lady who owned the shop was the first owner. I will be the second. It needs a cleaning before I take it home, but I won't have to pay for the cleaning. I will take it home tomorrow, I hope. In the meantime, I have the manual to read.
This makes machine number five. I am very excited about it and am looking forward to getting familiar with it. Instead of the 6" space between the needle and the body of the machine, there is 12" of space. I will have room to do my freehand quilting. There are USB ports on this machine. Bernina has entered the 21st century. There isn't FireWire. Oh well.
This makes machine number five. I am very excited about it and am looking forward to getting familiar with it. Instead of the 6" space between the needle and the body of the machine, there is 12" of space. I will have room to do my freehand quilting. There are USB ports on this machine. Bernina has entered the 21st century. There isn't FireWire. Oh well.
Saturday, March 15, 2014
Waste Fabric!
I was digging through the instructions for the Mariner's Compass quilt to figure out how many yards of fabric I needed to buy. I was dutifully reading through the directions, making notes and adding up inches when I looked at the actual layout of the pieces. Instead of looking at a tiny diagram, I took out the pattern and unfolded it.
Wow. I can tell the fabric manufacturers LOVE this woman. The layouts are for speed during construction, not efficient use of fabric. Not by a long shot. In some cases, I'll use her suggested amounts of fabric. In others, I'm going to take apart her pattern and put it back together in a much more fabric efficient way. There is no way I can allow myself to waste that much fabric. Not at $13.00 a yard for batik cotton. I'm not the kind of person who saves every scrap for use in some other project. I hate scrappy projects.
Wow. I can tell the fabric manufacturers LOVE this woman. The layouts are for speed during construction, not efficient use of fabric. Not by a long shot. In some cases, I'll use her suggested amounts of fabric. In others, I'm going to take apart her pattern and put it back together in a much more fabric efficient way. There is no way I can allow myself to waste that much fabric. Not at $13.00 a yard for batik cotton. I'm not the kind of person who saves every scrap for use in some other project. I hate scrappy projects.
Thursday, March 13, 2014
Marking and Quilting
I've been using the chalk pencil and the air erasable marker to mark small sections of my quilt before I start a session of machine quilting. The air erasable marker lasts for more than one session before it fades off into no marks at all. The chalk pencil will brush off as I work and I have several times had to refresh the marks right before I stitch an particular area. Annoying as that might be, I'd rather the marks be too transient than permanent.
There is a huge fatigue factor. I'm a beginner, and I'm more tense than I wish I were. I don't have the muscle memory yet, though I can tell it is improving. I work very slowly, so I spend more time tensed up per pattern repeat than when working faster. Do I want to speed up? Certainly! I'm just in no rush to do so. I'd rather practice accuracy slowly than disaster at high speed.
There is a huge fatigue factor. I'm a beginner, and I'm more tense than I wish I were. I don't have the muscle memory yet, though I can tell it is improving. I work very slowly, so I spend more time tensed up per pattern repeat than when working faster. Do I want to speed up? Certainly! I'm just in no rush to do so. I'd rather practice accuracy slowly than disaster at high speed.
- Repositioning my hands very frequently helps.
- Making sure that the quilt is not falling off the table helps.
- Planning ahead so I don't have to sew accurately 'backwards' helps.
- Working in short sessions with significant breaks between them helps.
Tuesday, March 11, 2014
Marking Tools for Quilting

Starting from the top:
- A BOHIN mechanical pencil with white chalk. It can be erased. Write lightly, or you might fray your fabric trying to erase. There are also other colors of chalk available, as well as refills for the erasers and replacement leads for the pencil. These are made in France. They are highly recommended. Preliminary testing is successful, it erases cleanly. White is good for dark fabrics.
- A blue, water erasable pen. NOT recommended. The ink tends to bleed into the batting of the quilt and then come back to haunt you later, when you would rather it didn't. I have not tested this, there are enough horror stories around to make me not want to try it.
- A purple, air/humidity erasable pen that IS recommended. If there isn't enough humidity in the air to make it vanish, a swab with a damp cloth or a spritz of water works well. I have tested this. It is true. Purple does not show up on dark fabrics.
- A FRIXION pen specifically for quilters, sewers and the like. It writes green and a warm iron makes it go away. I have tested this and it is correct. I'm told it can be erased. No eraser is attached to this pen, but there are erasers on the ones you can get from an office supply store. Green does not work on dark fabrics. And I don't ever want to try to iron a quilt with polyester fiberfil batting. The batting melts into something like flexible cardboard. If I were to use wool or cotton batting and light colored fabrics, I'd try this pen.
- The square, white thing on the bottom left is tailor's chalk of the old school. It isn't really chalk, it is wax. The lightest touch of a warm iron and it melts. It leaves marks like oil stains on many fabrics. This wax comes right out with dry cleaning. Wax is wonderful if you are working with wool. It's not right for a cotton quilt top.
- The arrow head shaped doo-dad is a chalk wheel, that will put a fine line of (in this case) yellow chalk. The chalk brushes off and doesn't stain. For marking a quilt, it's only good for a very short time. The marks brush off so easily that normal handling, folding, and such will remove the marks. It is also difficult to get this shaped wheel to accurately mark a set of tight curves. Straight lines are easy. Chalk wheels are also available with white or blue chalk. The blue can be hard to find.
The qualities that are desired in a marker are that the mark be visible, the tool is not sharp and prone to damage the fabric during marking (super fine point tips are not always a good idea), and the marks should be either self removing, or easy to remove. If you choose not to remove the marks, they should not be visible to the casual observer.
Monday, March 10, 2014
Decisions, Decisions...
I am now trying to decide on the quilting pattern that I want to use on Bud's Flying Geese quilt. The straight lines in the ditch are in. I have one pattern that I practiced a bit, but it is swirly. Today, in a quilt shop, I spotted a flying geese pattern that had a cute geometric pattern in it. Variegated thread, too. But, I must get an OK from Bud about the pattern. I also purchased an air erasable pen, that vanishes with humidity. This
is Florida. I won't be able to mark a lot in advance or it will be gone
by the time I get to it.
The Mariner's Compass pattern arrived and I opened all the zip-lock bags and checked that all the papers and pages were included. I've already downloaded and printed out the corrections. Did I mention that the package weighed in at over 2 pounds? Yeah. I added up all the suggested yardage bits and it will take 30.5 yards of fabric to complete the top. I haven't purchased so much as a single thread of fabric yet.
I shopped for tools that I'll need to complete the Mariner's Compass quilt. Now all I need as a particular type of ruler in the correct size. As I work on this quilt, I will put the pieces into a plastic under-bed storage box, to keep them together and in one location. If I decide to take my project on the road, it will be easier to transport.
Sunday, March 9, 2014
Preparation Includes Shopping, Right?
So, the thread arrived for the geese and I have put in the stitch in the ditch quilting to hold the quilt stable. No problem. I've found a pattern that I want to use for the lines of geese and have been testing it out on some scrap fabric. Not surprising that I like drawing the design out first. I get much better results that way. On scrap fabric, I don't care if the marks are permanent or not.
I have a water soluble pen, a nice, soft pencil, tailor's chalk, tailor's wax, marking pencils, transfer pencils, and I like none of them. I don't trust the water soluble pen not to leave traces, the marking pencils don't iron out, the wax irons out, but leaves a mark, the soft pencil erases incompletely, and the transfer pencils are supposed to be permanent.
Tailor's chalk isn't permanent enough. It brushes off too easily and I would have to constantly re-apply it, or only mark small sections at a time.
Sigh.
I'm now shopping for a happy medium.
The pattern for the Mariner's Compass should arrive tomorrow.
Friday, March 7, 2014
Next!
I'm already starting to work on the next major quilt project. It will be Judy Niemeyer's Mariner's Compass. I shopped around and ordered the pattern and the extension to the pattern, so I can make a queen sized quilt. I've printed out a line drawing and have colored in several options for the corner pattern colorways and have decided on a three shades of blue colorway for the corners. I'm thinking about making the ropes (circles) in autumn tones from rust to browns. All the teeth and points in the middle are still up in the air.
The Mariner's Compass is going to wait until after I've finished the quilting for the Flying Geese. While I'm (still!) waiting for the thread to arrive, I can play with planning for the next quilt. I've no other projects partway done, now have I? Snrff!
Why am I getting ready to start this project? If all goes as planned, I'll be taking on a traveling OT position and be stuck in some rented residence several hours drive away from home, family, and studio. If I take a sewing machine, I'll set up on the dining room table and have something to do in the evenings.
Thursday, March 6, 2014
Practice Makes Better
I am practicing free motion quilting. I'm putting in multiple short sessions each day. I was trying designs that were beyond my skills and getting frustrated. I went backwards down the skill ladder to the basics. Instead of trying to put together sets of small squiggles to create leaves, I just worked on squiggles in different sizes and directions.
The tutorial blogs are not useful for an absolute beginner. They assume a pre-existing skill set. The ease of each design is not correctly rated as a result of this assumption. There are some things that are difficult, like restitching on top of an already stitched line or precise angular changes of direction. Some designs are easier when larger, some are easier when smaller. All designs are easier with guide lines chalked on the surface fabric.
Today, I was practicing spirals. First, I practiced drawing them on paper. Then I drew them on my fabric and stitched over my guide lines. The most difficult part is changing directions smoothly from spiraling inwards to spiraling out. When I got it right, it felt easier than it was when I got it wrong. The positive reward for success was a reinforcement. After many failures, the frequency of success increased quickly.
Do I find it embarrassing that I have had to drop to such simple designs? Nope. I understand that if I can't do these, I won't be able to ever do a more complex design. Mastering the building blocks first will create a skill set that will allow me to manage the more difficult patterns later. The simple designs, well executed, will be effective on a quilt. They are certain to look better than a more complex design poorly executed.
Monday, March 3, 2014
Keeping House
As a newlywed, living in a 3 bedroom, 2.5 bath, 465 square foot house I would spend about 4 hours per day keeping the house going. I'd do laundry, ironing, vacuuming, sweeping, mopping, shopping, cooking, organization, filing, bill paying, and even some regular maintenance tasks. I didn't do any of that stuff on the weekends, but I would spend at least 4 hours, Monday through Friday, on keeping the house up. For a house that size, with no kids, it is a part time job.
You might wonder how I could have found four hours of things to work on. I ironed things back then when I did laundry. The grocery store was across the street and I would walk there and back on nice days. I washed floors by getting down on hands and knees and scrubbing them. They looked wonderful when I was done and I knew I was getting exercise. I didn't go to the gym back then. I didn't need to.
Up at 8, work until noon, and the rest of the day was mine. I'd do volunteer work with my mother, use my sewing room to get projects done, walk over to the library (it was in our back yard) and get reading material, or otherwise stay busy. 6:30 was time to have dinner on the table for the Hubster, then out and about if we felt like it, or home together for the evening.
Now, I'm home full time in a 3,450 square foot house with 4 bedrooms and 2.5 baths. Do I spend the same amount of time keeping up the house? Hah! I might spend an hour a day. Maybe. This will change. The more time I spend on domestic tasks, the happier I am hanging out at home. If home is a nice place, I enjoy being in it. Doesn't that make sense?
Sunday, March 2, 2014
Explorations
The software that must be used to run the Cricut Explore can not be installed on Windows 8.1 and Firefox. At first, the software was only available if you had purchased the machine. A few days ago, it became available via a download on the Cricut website. I can't 'try before I buy' because I can't install it!
As a money saving ploy, this is working well. I guess I have just saved myself on the order of $300+ just by not installing this software. Perhaps I should look for some other things I can decide not to buy?
As a money saving ploy, this is working well. I guess I have just saved myself on the order of $300+ just by not installing this software. Perhaps I should look for some other things I can decide not to buy?
Wednesday, February 26, 2014
Self Discovery
I was testing out a disappearing 9 patch pattern using some inexpensive fat quarters I'd picked up to play with. I kept having to force myself to make them after I grasped the concept. Anyway, I laid them out with the plan of putting them together with some solid color sashing into a quilted top for a floor pillow. I'd used a variety of colors and patterns for contrast, with a black center square to anchor them.
Oh, ugh. I hate the 'scrappy' look. Hate, hate, hate it. These test blocks are in the recycle bin. I don't want anything more to do with them. If I could put everything I don't like about quilts into a single set of blocks, this would be the set. The faster I get rid of them, the happier I'll be.
In terms of quilts, I prefer central designs, with some visual plan laid out. The matching set of identical blocks in rank and file does very little for me. If there is a second block making a specific pattern, or even better several different blocks creating an image, I'm all for it. Do I want an incredible Work of Art on the bed? Nope. Just something that doesn't give me nightmares when I look at it.
Monday, February 24, 2014
Block Of The Month
There is a quilt that is very popular for 'Block of the Month' clubs for 2014 in quilt shops nation wide. It is called the Asteria Quilt. For blogging purposes, I simply chose a shop that had an excellent image. I am not recommending that shop. I know nothing about them. Anyway, a local quilt shop is offering this quilt as a block of the month project. If I pay a starting fee of $25, and a monthly fee of $32.99 for the next nine months, for a total fee of $322.00, I will get the fabric, the cutting tool, and the patterns required to create this quilt top, and patterns for 8 additional blocks. And when I say quilt top, I mean just the pieced quilt top. I do not get backing, nor batting, nor is there any discount on having the quilt machine quilted. I have not priced machine quilting in my part of the world, but the average price would be well over $100 for a quilt of that size.
Do I like the pattern? Yes, I do, a lot. Do I think the price is outrageous? No. I have done my research and the math, and to arrive at the finished quilt top using fabrics of the type that have been suggested, the cost is not out of line.
Do I wish to spend nine months waiting for the pattern and bits of fabric to arrive? No. Not a bit of it. Not in the least. Not on your brass tintype! NO!
In the first, I don't want to create something in shades of blues. Our bedroom is in shades of green.
Second, I have time NOW. I am between jobs. When employed, I have much less time.
Third, I have no interest in spending an entire year creating something that will arrive in my hands in piecemeal fashion. I want to sew now. Who knows what I will feel like working on in six months. I'm like that. I don't think it is a negative thing. It's just me.
So, I did some searching and found the pattern for the Asteria quilt, from the designer, available to buy on-line. If I decide to do this quilt, that's the way it will happen. One month at a time? In colors that I don't particularly want? Nope.
Tuesday, February 18, 2014
Everything Works, if You Let It
I had some polyester satin to line a garment. I knew it was going to ravel and that I should take the pieces directly from my cutting table to the sewing machine, to finish the edges as quickly as possible. But I foolishly thought that if I simply did not touch the cut pieces, I'd be good for a while.
I cut the pieces using a rotary cutter, for the least possible jostling and movement. I removed the waste fabric, the pattern, and the pattern weights and left my lining pieces as little touched as possible on my cutting table. Glancing up from working on some other task, I watched as threads unraveled and fell from the edge of the piece to my cutting table without me even getting near them. No drafts, no movement. The threads were simply falling off with no outside interference.
I got those pieces to my sewing machine immediately, but still ended up having to re-cut some of them, as so much fabric had unraveled that they were no longer the correct size. Lesson learned.
Saturday, February 15, 2014
Not That Way Again
I followed directions like these on how to put together the flying geese for the quilt that I'm in the throes of. It wasn't this specific set of directions, but the whole assembly process is the same.
I will NEVER again use this process.
There is an overlap in the first phase of stitching that creates an incredibly lumpy seam allowance at the point of the big triangle. That lumpy seam allowance is pure torture to sew over accurately. Agony. Painful. Annoying to the Nth degree. Pinning carefully does NOT help.
And only now am I realizing this, as I created all of the pieces before I started sewing them together. And even then, I had to sew lots of them together before I could define the problem.
I've long said that there are prices to be paid for short cuts. Some of them are worth it, some are not.
Explore
The new digital cutting machine from Provo Craft is called the Explore. The Explore is available on the Home Shopping Network, but it is part of a bundle of stuff that I do not want. (It is sold out.) The Explore will be available in stores on March 15. Not getting the bundle of extra stuff that I'm not going to use will save me $50 or so. I should probably put my name on a waiting list to make sure that I can get my hands on one.
What are the features that make me want this machine? It can work with True Type fonts. I can also create using files with .svg, .jpg, .png, .bmp, .gif, and .dxf formats. Yay! Prior to this, the only way I could create my own graphics was by using software that wasn't really designed for that. With the ability to upload my own graphics, I can use any application to create them. A possible downside to the Explore is that the single graphics are pricy. 99 cents and up isn't cheap. The backwards compatibility in the Explore covers much of my hesitation about the price of those single graphics. I have an extensive library of graphics already.
The new software is called Design Space and it only works with the Explore. The Cricut blog states you must be connected to the internet to use Design Space and you must use Design Space to control your Explore. It also states that all the headache that I have already dealt with to link the graphics I have purchased to my on-line Cricut account was not wasted effort. Everything that is already linked to my account will be available when I use Design Space. Whew!
Monday, February 10, 2014
Racing to Finish?
Not. I'm having a good time working on this quilt slowly and steadily. I'm working in small sections. And I really do mean small. I trim my blocks down to be the correct size before I sew them together, so there are no wobbly edges. I'm sewing together groups of five geese blocks at 6.5" by 3.5" to create something that is 6.5" by 15.5". It is only four seams.
For those that are doing mental math and not coming up with the correct finished size, I am working with a .25" seam allowance. All the missing .5" sections are used up in the seams.
Because I don't need to sew a lot to hit my defined target for success, I am allowing myself to be picky and precise. I check and double check, and I pin my blocks together before I sew them. This is gaining me accurate results for what I am spending in time. It is not costing me in frustration for slow progress.
Accuracy is not always in skill; a great deal of it is in time, double checking each measurement, and not skipping steps for basic construction.
At the rate I'm currently putting this quilt together, it will be completed some time in June.
Thursday, February 6, 2014
Count the Hours
There are many projects that are heavily advertized as being 'Easy to Complete in a Single Weekend!' Substitute 'One Evening', or 'One Day' for 'a Single Weekend' and you have defined a group of projects that hold very little interest for me. I don't mind working on a project for months. I rather enjoy watching something take shape over time. I'm perfectly capable of spotting something on Pinterest and completing it within a few minutes out of items I've got gathering dust in my stash. But the idea of deliberately selecting a project because it will be done in a hurry? Not so much.
I was thinking about this as I was working on the quilt top I started last month. I got thrown for a loop due to a 1/8" error in measurement and a resulting 1/4" error in the pieces I was trying to assemble. I walked away from it for more than a week and have finally headed back after a few false starts at correcting the problem. I simply needed to get out my seam ripper, save the parts that were cut to the correct size, cut fresh pieces to replace the ones that were too small and sew them together. Instead of working one step at a time for all the pieces of the quilt, I am creating one section at a time. When it is done, it is on to the next set of pieces for the next section. Each section is complete and correct before I move on to the next.
FWIW, I ended up throwing out two seam rippers that were dull, badly shaped, or both. It is a sad fact that I know the qualities that make up a good seam ripper, but there you have it. Clover makes a good one.
Friday, January 31, 2014
Studio Space, Craft Room?
I finally realized why most craft spaces displayed on the web are not appealing to me.
I do more than one craft. I not only sew for making clothing, I do embroidery, knitting, photography, quilting, paper crafting, beadwork, and rubber stamping. Very few people want to have space set up that is good for several different things. They need storage and work space for only one type of activity.
How boring.
Tuesday, January 21, 2014
Cricut Flower Shoppe
I have this cart for my Cricut and I kept fighting with it. I'd look up instructions and get something to almost turn out, but I wasn't ever really happy.
I have had an epiphany! The flowers are put onto the cartridge display in pieces sorted into columns. If you start at the top of the column, you will have the center of the flower. Then, you simply cut each pattern down the column and you will have the middle and outer petals of the flower. Last, at the bottom of the column, you have leaves that match the flower.
For an initial test, cut everything at the same size. 2.75" is a good start. after you play with your flowers a bit, you'll find which pieces you want to cut smaller or larger. I like to cut the centers up to two times larger because I like they way they look.
To roll up the center of the flower, start at the outside of the spiral. Roll around a toothpick or needle to start. I use a paper piercer, because it has a nice handle on it. I don't roll around the paper piercer for long, only an inch or two. I remove it and keep rolling. The ruffled edge can do whatever it wants, but the goal is to keep the smooth edge even, to create a flat piece that will glue down to the tab that's left at the end. The angle of the spiral will cause the petals to fan themselves out. Then allow the spiral to spin loose to be just a smidge larger than the center tab. Don't worry that you aren't gluing down the entire spiral. It won't came apart if you glue enough of the first length that you rolled up to create the center.
Once the glue has dried, I bend the petals out with my fingers, one petal at a time. If I try to do too many or bend too far, they will rip or crush and the center of my flower looks a bit worse for the wear. I've found that warm, barely damp fingers also help. Cheap paper is frustrating to work with.
It is dark in my studio at the moment and a picture will be a fail. When I have sun, I'll add photos.
Saturday, January 18, 2014
My Studio
The image for this blog heading is my old studio in Virginia. My studio space in Florida doesn't photograph as well. I took over the living and dining room of this house and laid out my studio to have space for paper, computer, sewing, and embroidery. I ended up putting in a space for my grandson to work on his projects. Paper is the northeast corner, embroidery is the southeast corner, sewing is southwest, and reading/grandson space is the northwest corner. He gets the square coffee table and can sit on the floor.
 There are five bookcases. There are crates, boxes, and tubs. There is storage under the
paper crafting tables and under the cutting table. I have my
grandmother's sewing cabinet, my mother's sewing cabinet, and my grandfather's curio cabinet. Storage, as they say, is
non-trivial. There are also six tables for workspace, not counting the ironing board.
There are five bookcases. There are crates, boxes, and tubs. There is storage under the
paper crafting tables and under the cutting table. I have my
grandmother's sewing cabinet, my mother's sewing cabinet, and my grandfather's curio cabinet. Storage, as they say, is
non-trivial. There are also six tables for workspace, not counting the ironing board.
While ten people could not all work in here at once, there are ten separate work zones. Cutting, sewing, ironing, reading, kid, computer, embroidery, diecuts, paper and stamping/beading. I use lots of local lamps as the living room has no ceiling light. The dining room has the chandelier, that I got Bud to loop up high enough to walk under. Neither window gets a lot of direct sunlight. That's a Good Thing down here. Direct sunlight = hot.
I put up a folding screen to block access from the butler's pantry and a dog gate to block access from the front hall. There are toxic things in my studio that would kill Jack if she were to get her teeth into them. Jack would not still live Some of them are stored well within her reach. Even my grandson is not allowed in if I am not in here with him.
Even with this incredible workspace, before I quit working, I didn't feel like making stuff very often. Now, I'm getting back to work in a big way. Each day I either make significant progress on a project or I finish something off. With all that, I have only started my attack on three years of round tuits.
Wednesday, January 15, 2014
Computing
I did the update to Windows 8.1. Actually, I did it some time ago.
This caused problems with my Cricut, as the application that I
use to run it did not play in the same sandbox at all. I had a $200
Cricut shaped doorstop. But the folks at Provo Craft finally sent out an update and I
was back in business. Is 8.1 better than 8.0? Meh. A couple of things
that were nifty with a touch screen and a royal whirling pain in the
butt with a tablet or mouse got adjusted. The power button got moved,
but it still stumped my DSS when I challenged him to prove that he knew
his way around the OS.
I've been working with Lightroom 4 a bit. I'm not sure if I like it. I need to dig through Photoshop CS6 and get it fine tuned to the way I'd like it to behave. I'm not too worried about getting that done. I've been working with Photoshop since Photoshop 6. It isn't rocket science.
I've been working with Lightroom 4 a bit. I'm not sure if I like it. I need to dig through Photoshop CS6 and get it fine tuned to the way I'd like it to behave. I'm not too worried about getting that done. I've been working with Photoshop since Photoshop 6. It isn't rocket science.
Tuesday, January 14, 2014
Pinterest Fine Tuning
I looked up a set of directions to sew something on Pinterest. They were OK, but I had to sew two before I was happy with the construction. I have been sewing long enough to know that directions in commercial patterns aren't often the best way to construct the item. If I were a newbie at sewing, I'd probably have turned out a flop.
Pinterest is great if you already know how. If you are trying to learn, there are going to be a lot of failures.
FWIW, there is no place near Jacksonville where there are classes on bookbinding. Not that I'd trust. There is no miniature store, nor is there a camera place. No doll houses, no photographers. The locals think it is a big city. I know better.
Sunday, January 12, 2014
Metallic Rubber Bands
Huh. Metallic or 'pearlized' rubber bands don't have the ability to slide as easily as regular rubber bands do. This means they are not a good choice for patterns that are high tension, like the Small Basketweave. How do I know this? I tried to make a Small Basketweave with three different colors of metallic rubber bands. Before I finished, five rubber bands had broken. And further deponent sayeth not.
Thursday, January 9, 2014
Rainbow Looming
Neatness counts. And those diagrams that tell you what order to put rubber bands on in? Make a difference. Even when you think it will matter.
When there are five different rubber bands on a single pin, you need to be able to pull them off in the correct order. You need to be able to find which rubber band needs to be moved next. As soon as you pull on a wrong one, you'll find out what the definition of a problem is. I'm not going to mention how much of a difference this makes when you are digging down through three rubber bands that have been looped on top of those five as part of the process of looping your bands.
To prevent this, you need to pay attention to the order you put your rubber bands on your loom. If you are always changing the order slightly, you'll have problems. Do not put the left side on first for one pattern repeat and then the right side on first for the next pattern repeat. It's gonna get ugly.
Also, you need to keep them on the pin in that order and not allow them to roll and twist about.
Neatness counts. It really does.
Tuesday, January 7, 2014
Clean Workspace and PhDs
I just cleaned up a pile of oddments on my worktable of projects that I got started working on that did not work out on the first (or even second or third) try. Could I have kept working and turned them into a success? Sure. But they just weren't that important to me to put in that much effort, and therefore, they are now trash.
Am I upset? Not the least. I'm actually quite happy that my work area is a lot cleaner. The more I work in a location, the cleaner that location gets. Seeing my work tables clear off means that I'm using my work tables for actual work. If it isn't a project that I want to complete, it's gone.
I used to use UFO for UnFinished Object and WIP for Work In Progress. PhD, I recently learned, is for a Project half Done.
Snicker. I like the idea of working on my PhDs. Or should that be PshD?
Saving Mr. Banks is a very good movie, BTW. "It should be 'Let us go and fly a kite' but..." Grammar mavens will adore the corrections that P.L.Travers allows to slip past. FWIW, I have a copy of Mary Poppins that was printed in the early 1960's. Hardcover. The original copyright is from 1934. It is dedicated to "MY MOTHER 1875-1928"
Saturday, January 4, 2014
Rainbow Tips
Well! I have discovered that needing to buy a second loom is simply an early stage in the addiction. I now own six looms. Yes, that's correct, SIX. Since I own some knock-off looms, I am shopping for more of the Rainbow ones.
On to the tips.
When loom shopping, don't go anywhere near the knock offs, no matter how close to the original they might appear. It isn't worth the aggravation. (Trust me on this, been there, done that.)
Flipping the rubber bands into a figure eight is a bother. I just loop the rubber bands onto the pin that is farther away from me, then turn my hand over and loop them onto the closer pin and get my figure eight much faster.
To avoid bending or breaking hooks, remember to slide the rubber bands to the thicker part of the shaft when doing things that require pulling and tugging.
Rainbow Loom C clips are better than the S clips that are found in off-brand rubber band packs.
The more complex patterns that create wide, dense bracelets use up an astonishing number of rubber bands. Getting extra of black and white is a good idea.
Learn how to attach a button closure. It's worth a few failures.
Expect failures when learning a new pattern. Take your failures apart and try again.
Stretched out rubber bands from failures are fragile and break more easily.
Not all rubber bands from failures will be stretched out and fragile.
Subscribe to:
Posts (Atom)


