
Showing posts with label Bernina. Show all posts
Showing posts with label Bernina. Show all posts
Monday, October 20, 2014
A Sigh of Annoyance
Mama B is back in the shop. She just wasn't behaving as well as I thought she should. There were too many problems with the thread getting caught in the bobbin case. She didn't do that when I first got her. So, back she went. I'm tired of her going back into the shop. I am very frustrated at having to deal with issues when she isn't completely fixed. Mama ain't happy, I'm not happy.
Wednesday, October 8, 2014
Today's New Thing
Each day, I learn another thing about Mama Bernina. Today, I learned that using up whatever I have left in my studio is not a good idea. I was using several different brands of bobbin thread. One of them acted badly when I tried to use it and I had no idea what was wrong. Fortunately, it was not a large spool and I was able to toss out what I had left of it. I ran around in circles and pulled out my hair before I figured out it was the bobbin thread.
Today what I learned is to use standard materials and always use the same stuff when you are learning. Do not try six different things when you don't know what you are doing. You have no idea what the results are going to be and even worse, you don't know why you got those results, either! If it turns out great or turns out crappy, you don't know why. You haven't learned anything useful because you can't do it again, or do it differently on purpose the next time.
Today what I learned is to use standard materials and always use the same stuff when you are learning. Do not try six different things when you don't know what you are doing. You have no idea what the results are going to be and even worse, you don't know why you got those results, either! If it turns out great or turns out crappy, you don't know why. You haven't learned anything useful because you can't do it again, or do it differently on purpose the next time.
Tuesday, October 7, 2014
Trimming for Applique
I have one favorite tip that I use for creating cleaner edges when doing machine applique in the hoop. I use a lint brush. Not one of the ones with adhesive, one that has velvet with a nap on it.
After I attach and trim, I brush in all directions.
Here's what a piece looks like after trimming and before the lint brush.

And here's what it looks like after I go over it with the lint brush.
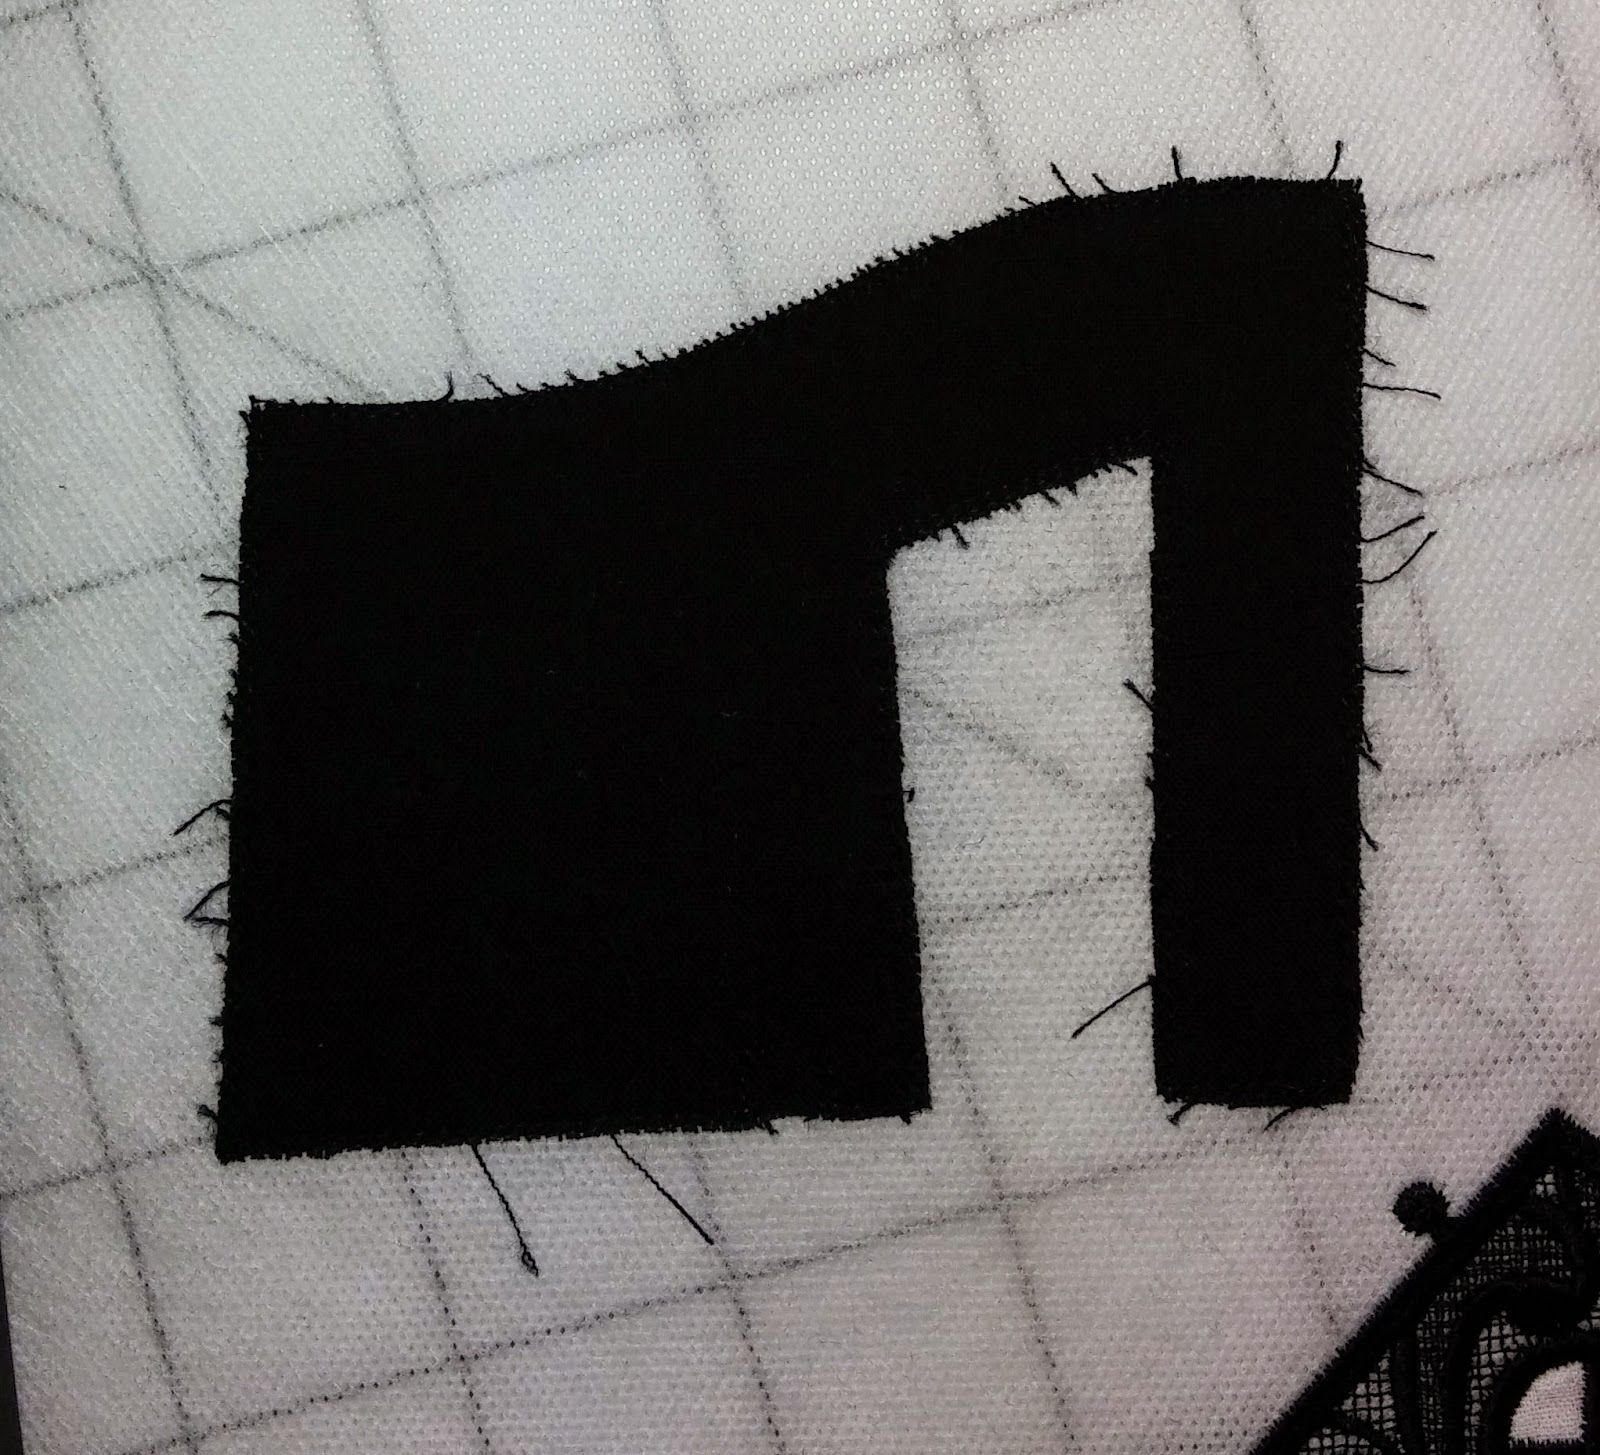
I can easily trim those threads now that I can see them.
I keep brushing and trimming until there are no more threads that stick out to be trimmed off. Even then, I'll still have the occasional thread that pokes out where I don't want it. For those, I suggest a permanent marker.
After I attach and trim, I brush in all directions.
Here's what a piece looks like after trimming and before the lint brush.
And here's what it looks like after I go over it with the lint brush.
I can easily trim those threads now that I can see them.
I keep brushing and trimming until there are no more threads that stick out to be trimmed off. Even then, I'll still have the occasional thread that pokes out where I don't want it. For those, I suggest a permanent marker.
Sunday, September 28, 2014
Up and Running!
Mama Bernina is back in her usual spot and has been running steadily since I got her back and got home from the quilt show. At first, she was clattering a bit, but I threw oil at her and she quieted down. Project comments later.
While Mama was in the shop, I went through my embroidery designs, both in digital and physical form. In digital form, I have a master directory that contains ALL of my digital versions. The key is that there is only ONE master directory. I copy only the version of the designs that I will use into my master directory, into a folder with a descriptive name. "Collection #12513" tells me nothing. "Halloween Couture" tells me a lot more. Into that folder, I also copy the digital version of the directions, if there were any included.
When I buy a CD of designs, I put the printed directions and the CD together into a plastic organizer sheet that goes into a 3 ring notebook. I don't keep the bulky plastic cases that the CDs come in.
My stuff is easy for me to find, and the system isn't complicated and time consuming to use. Win!
Friday, September 12, 2014
Repair Woes for my Bernina 830LE
I was having trouble with multiple false alarms for my top thread sensor. I turned it off, but then, my touchscreen would lock up. The problem got bad enough that I dropped the machine off for service. That was on Sunday, the 31st of August. The owner of the shop wrote up the service ticket and she understands that I only get to sew on the weekends. Wonderful Hubby picked up my machine on Friday, September 5th.
FAIL!!! Not only was I still getting false alarms, There was a serious top thread tension issue. I got the worst thread 'nests' I've ever seen. Not only did the knotted clump of thread manage to pull the project out of the hoop, the thread nest also pulled the throat plate off the free arm. The bobbin stopped moving entirely, as well. In short, the thread clump pulled my machine apart.
So, on Saturday, September 6, before 10:00 in the morning, my machine was back in the shop for the second time in a single week. I'm not usually prone to italics, but I am that upset about it.
When I dropped off the machine the second time, the owner of the shop was again present. She passed me off to her employees. I didn't get to speak to her about paying for four hours of labor, only to discover that the problem had not been fixed and new issues had been created that were worse. There is a chance that not only is the top tension off, the timing of the machine is wrong. Bad timing is often a death knell for a machine.
The mechanic has been on vacation this week and has not touched my machine. I was expecting it to be finished by today. Heck, I really had expected it to be finished last week!
OTOH, if the mechanic has screwed up the timing, the worst case scenario means the machine will have to be shipped to Chicago to be repaired. If Chicago can't repair it, I'm going to demand that the shop owner buy me a replacement. My 830 is a Limited Edition of a numbered series. I'd accept a used machine as a replacement because I got mine used. But I'm not paying for the shipping or the additional repairs, no matter what. I didn't break it, the mechanic did.
Sunday, August 24, 2014
Embroidery Class Two
The second class on how to do machine embroidery got more into the interface. I had a question on a function button that wasn't mentioned in the manual. But, it still boiled down to the instructor had many different types of machines to cover and could not go into detail for my machine. The students also had a very wide range of skill levels.
I made a mistake with endless embroidery and tried something too fancy. I duplicated the pattern, so the machine thought two repeats were what I really wanted. I only wanted one repeat at a time, but what did I know?
 The two "arrows" are the marks, similar to a tailor's tack, that the machine will baste in. They show you where to align the hoop in the machine. I hooped the fabric using the center crease as my center line. The machine started at the left, stitched two repeats and then put in the tailor's tacks. I took the fabric out of the hoop, moved the hoop and then lined up my stitching for the next repeat using the tailor's tacks. My problem was that all the motifs started at the right side and stitched over to the left. I couldn't tell where I was really going to be using the handwheel and testing the needle position. I just had to trust. It isn't perfect, but it isn't bad either.
But! I did get more actual embroidery completed during this class. I learned how to use a basting box for alignment checks. I learned where to adjust to use Puffy Foam (details to follow in a different post), I learned that Floriani thread and my 830 might not get along. I got a sample of embroidery stabilizer that I'd never seen before. I also got my sample book of fabrics and stabilizers used for embroidery up to date. It wasn't a wasted class.
I made a mistake with endless embroidery and tried something too fancy. I duplicated the pattern, so the machine thought two repeats were what I really wanted. I only wanted one repeat at a time, but what did I know?
But! I did get more actual embroidery completed during this class. I learned how to use a basting box for alignment checks. I learned where to adjust to use Puffy Foam (details to follow in a different post), I learned that Floriani thread and my 830 might not get along. I got a sample of embroidery stabilizer that I'd never seen before. I also got my sample book of fabrics and stabilizers used for embroidery up to date. It wasn't a wasted class.
Saturday, August 16, 2014
Machine Embroidery Class
The class for embroidery has been divided into two parts. If one class covered everything, the students would be completely overloaded. At the first class, I practiced and got better at doing things I already knew how to do.
I learned about the screens:
I got more comfortable flipping back and forth between screens. I learned that it is worth while to use the zoom function on the screen. I learned the technical names for the buttons and that helps me remember what each button does.
I learned about hooping my fabric:
505 spray adhesive will hold my stabilizer and fabric together before I put them into the hoop. Too much spray will gum up my needle. 505 is fast and I can reposition my fabric, if I need to. The funky gray doo-dads are handles for the template that fits inside the hoop. I don't need to pick at the edge to pick up the template any more, I've got handles! Me like handles!

I still have two things that I'd like to have the instructor help me get firmly under control.
First, I'm not successful when I need to navigate to a specific location in the design. My move slowly function does not work. The enter the location by stitch number does not work. I can only make large jumps. That's not right.
Second, I want to learn how to do endless embroidery. That's where I put marker stitches in when I complete a design, re hoop the fabric, and use the marker stitches to line up the next repetition. The result is a design that looks like I didn't stop and start a zillion times, but embroidered it all in one go.
I learned about the screens:
I got more comfortable flipping back and forth between screens. I learned that it is worth while to use the zoom function on the screen. I learned the technical names for the buttons and that helps me remember what each button does.
I learned about hooping my fabric:
505 spray adhesive will hold my stabilizer and fabric together before I put them into the hoop. Too much spray will gum up my needle. 505 is fast and I can reposition my fabric, if I need to. The funky gray doo-dads are handles for the template that fits inside the hoop. I don't need to pick at the edge to pick up the template any more, I've got handles! Me like handles!
I still have two things that I'd like to have the instructor help me get firmly under control.
First, I'm not successful when I need to navigate to a specific location in the design. My move slowly function does not work. The enter the location by stitch number does not work. I can only make large jumps. That's not right.
Second, I want to learn how to do endless embroidery. That's where I put marker stitches in when I complete a design, re hoop the fabric, and use the marker stitches to line up the next repetition. The result is a design that looks like I didn't stop and start a zillion times, but embroidered it all in one go.
Sunday, August 10, 2014
The Backlash Spring
Aha! I adore YouTube in small doses. I was looking for information on Endless Embroidery and I found an incredible video from Bernina Tampa on how to manage that spring in the bobbin case that gave me so much trouble.
The trick isn't just to pop it into place. I'd been lucky with that. When I removed it to photograph the darned thing, I found that I also had to press the spring into place all around the edge of the spring. I used the tip of my Purple Thang and it worked perfectly. It still didn't take lots of pressure. About what I'd use when writing with a pencil was good. The test is to pull on the thread and feel that the tension is steady and doesn't get tight and then loose again or that it isn't horribly tight and doesn't get loose at all. If the spring is really out of place, you can't load the bobbin into the case in the first place.
If you look through the videos that are listed off to the right, you can find quite a few videos on Bernina mechanical and digital functions. I am NOT suggesting that you follow the directions and attempt to become your own Bernina tech. But knowing what's going on inside your machine never hurts.
I continue to learn, a little bit at a time, about this machine. Later today, I'm off to another class on Embroidery with Big Mama B. Details to follow!
Wednesday, July 30, 2014
Sewing Room Candid
A challenge was posted on a Yahoo Group for 800 sewing machines. Spend no more than one hour cleaning up, then take a picture of your sewing room and post it. I took a picture, with zero time spent cleaning up. The fabric on the ironing board was pressed last night, before I quit for the day.
This is what my sewing room looked like.

This would be my 'before' picture, but I don't need to clean up and take an 'after.' I can't work in a mess. The longer I work in a space, the more I clean it up. It just happens.
This is what my sewing room looked like.
This would be my 'before' picture, but I don't need to clean up and take an 'after.' I can't work in a mess. The longer I work in a space, the more I clean it up. It just happens.
Saturday, July 26, 2014
Mama Bernina's Table
For many years, I've used a table with a lift that allowed me to raise and lower my sewing machine. The lift is too small for Big Mama Bernina. Not only that, but it was a bother to switch from sewing to embroidery and back again. My 165e could do embroidery, but I rarely did. I am going to keep Big Mama B on top of the table and not use the lift. I can easily switch from sewing to embroidery and back. I want to embroider more.
There will be no new table for Mama B. I'm not going to pay extra for in-home delivery of a piece of furniture, nor am I going to fight with eight pages of directions and a bent piece of metal described as a wrench to assemble sawdust wrapped in vinyl claiming to be oak or cherry wood finish.
Certain decisions are freeing.
Thursday, July 24, 2014
Clatter!
When I took Mama B in for my second class on using it, I compared the sound of my machine to the sound of other machines in the class. I wasn't happy. Mama B sounded like she was clattering along, and the other machines just purred. The instructor also stated that she felt my machine needed oil. I oiled Mama B, but she still clattered along.
Home after class, I found a You Tube video on how to clean and oil my machine. Sara sounds like she's had a bit too much coffee, but the directions are good. I cleaned Mama B carefully and applied a drop of oil. Then I did a lot of boring straight sewing, and I oiled her frequently. Gradually, the clatter went away and Mama B began purring.
The 830's need regular oiling- only one drop at a time- but frequently. As instructed, I only use the official Bernina oil. The applicator doesn't leak, and for that alone, I would prefer it. As far as cost, I could care less. The oil came with the machine. By the time I use it up, I might have a new machine. A little goes a long way.

The 830's need regular oiling- only one drop at a time- but frequently. As instructed, I only use the official Bernina oil. The applicator doesn't leak, and for that alone, I would prefer it. As far as cost, I could care less. The oil came with the machine. By the time I use it up, I might have a new machine. A little goes a long way.
Wednesday, July 23, 2014
Mama B and the Bobbin
I broke a needle while trying out Big Mama B's embroidery. While cleaning the
bobbin area of metal fragments, I popped out the spring that helps to
keep the bobbin in place. When I replaced it, I didn't do it right and
the bobbin thread tension was far too tight.
Much frustration ensued. I knew it was something to do with how the bobbin was spinning, or not spinning, and I kept cleaning non-existent metal fragments out, removing, and replacing the bobbin. Sometimes, the spring would pop out again, I'd put it back, and the problem would not go away.
 This is the (slightly dusty) spring. It is not in the bobbin case where it should be.
 In this picture, the tip of the stylus is touching the spring. The spring is in place and works correctly.
It all ended when I finally popped the spring into the correct place by accident, as I was cleaning. Thank goodness, I was paying attention and noticed that my finger nudged it 'just so' and it popped into place. I then removed and replaced it a couple times more, to learn exactly what it was that I'd done. It must be lined up correctly, pointing in the right direction, and it doesn't take a lot of pressure to put it in place. It really just pops right in if you know the trick. Tension problem solved!
FWIW, checking how the bobbin is threaded in an 830 is, how shall I say it? Annoying. That's it, I'll call it annoying. After lots and lots of practice, several you-tube videos, one-on-one training from a Bernina tech, and a minor hissy fit I got it down to a mirror in one hand and the thread in the other. Why Bernina didn't attach a mirror to the inside of the door, I'll never know.

Much frustration ensued. I knew it was something to do with how the bobbin was spinning, or not spinning, and I kept cleaning non-existent metal fragments out, removing, and replacing the bobbin. Sometimes, the spring would pop out again, I'd put it back, and the problem would not go away.
It all ended when I finally popped the spring into the correct place by accident, as I was cleaning. Thank goodness, I was paying attention and noticed that my finger nudged it 'just so' and it popped into place. I then removed and replaced it a couple times more, to learn exactly what it was that I'd done. It must be lined up correctly, pointing in the right direction, and it doesn't take a lot of pressure to put it in place. It really just pops right in if you know the trick. Tension problem solved!
FWIW, checking how the bobbin is threaded in an 830 is, how shall I say it? Annoying. That's it, I'll call it annoying. After lots and lots of practice, several you-tube videos, one-on-one training from a Bernina tech, and a minor hissy fit I got it down to a mirror in one hand and the thread in the other. Why Bernina didn't attach a mirror to the inside of the door, I'll never know.
The arrow is pointing to the white thread from the bobbin. It's coming out from under the spring that applies the right tension that is to the right of the thread. Even getting down on the floor under the machine, there is no view of the bobbin. Trust me on that, OK? If you have exceptional hearing and/or sensitive fingertips, you can hear and/or feel the thread pop into place. Then the mirror is not needed.
Tuesday, July 22, 2014
Big Mama Bernina
That's what I named my Bernina 830LE. I even programmed it into the start up screen.
When I brought Big Mama home, I put her on top of my sewing table. I raised my sewing chair to the highest position and it worked. But I prefer to have my sewing machines recessed in the table, to give me a huge, flat working surface. (My son and his girlfriend gave me the "Frozen" poster. It makes us smile, and that is a very valuable thing.)
 When I took off the embroidery attachment and tried to lower Mama B into the table, I
discovered that she is so heavy, the lift won't support her.
She slid right down, out of sight. Rather like the wicked witch melting
in 'The Wizard of Oz'. So, Mama B stayed up top. I wanted to sew, not solve engineering issues.
When I took off the embroidery attachment and tried to lower Mama B into the table, I
discovered that she is so heavy, the lift won't support her.
She slid right down, out of sight. Rather like the wicked witch melting
in 'The Wizard of Oz'. So, Mama B stayed up top. I wanted to sew, not solve engineering issues.
Using the slide on table, I was able to get a lot of progress made on the free motion quilting project I had going. I tried the BSR (Bernina Stitch Regulator), but it blocks my view while sewing in one direction. Sigh. If I can't see where I'm going, I can't get there.

I went to my tried and true #15 foot. I have used that foot for other quilts and I'm familiar with it. I use the sides of the foot to help me make lines that are evenly spaced.

I know, it doesn't look like there's a lot of difference compared to the BSR foot, but it makes a difference to me.
When I brought Big Mama home, I put her on top of my sewing table. I raised my sewing chair to the highest position and it worked. But I prefer to have my sewing machines recessed in the table, to give me a huge, flat working surface. (My son and his girlfriend gave me the "Frozen" poster. It makes us smile, and that is a very valuable thing.)
Using the slide on table, I was able to get a lot of progress made on the free motion quilting project I had going. I tried the BSR (Bernina Stitch Regulator), but it blocks my view while sewing in one direction. Sigh. If I can't see where I'm going, I can't get there.
I went to my tried and true #15 foot. I have used that foot for other quilts and I'm familiar with it. I use the sides of the foot to help me make lines that are evenly spaced.
I know, it doesn't look like there's a lot of difference compared to the BSR foot, but it makes a difference to me.
Subscribe to:
Posts (Atom)


