Showing posts with label needlework. Show all posts

Monday, November 14, 2016

Basketweave Stitching

The basketweave stitch is one of the three tent stitches. They all look almost the same on the front, but they don't look the same on the back. It is good for filling in large areas of all shapes, though stitch diagrams often show this stitch as a neat square or a triangle.  It distorts the canvas very little and is just as easy to work in hand as in a frame.  You do not have to turn the canvas for each row.  The front of the work is a tent stitch, with each stitch covering a single intersection of the canvas from lower left to upper right.  On the back of the work, the basketweave looks like a woven fabric, with horizontal and vertical threads.  At the edges of the work and at the edges of areas of each color, the basketweave looks like a single row of the continental stitch.  You have to look very closely to see this, and it is not visible on all edges.

As you work the basketweave stitch, you bring your needle up at the lower left and go down at the top right of each stitch.  You will come up in an open hole and go down either in an open or shared hole.  On the back your threads are either over two horizontal or two vertical threads.  The exception is at the edges, where it looks like a single row of continental stitches.


This stitch diagram has each pass of the needle marked.  To make things more clear, I will mark an identical diagram, but just number each stitch in the order you should place them.


In this diagram, each stitch is numbered.  Bring your needle up at the number and go down to complete a tent stitch over a single intersection.


When you are working a row from the bottom to the top, this is the stitching order.  If you look at the back of the canvas, your threads are horizontal, crossing two threads of the canvas.  Most of the time a row like this is referred to an "up" row.  Up rows are more fun and easier for me to work.  I have to be careful to not pull my thread too tightly when working in this direction.


In this diagram, a "down" row has been indicated. The overall stitching direction is from the top to the bottom.  Your thread on the back will be vertical over two threads of the canvas.  Because of the angle of the needle, I find this row to be less fun to work.  It isn't any harder than going in the other direction and I don't have tension problems with this row.  Win some, lose some, I suppose.


Please remember that these up and down rows of stitches usually share canvas holes with other rows, leaving no empty intersections.   You bring your needle up in an empty hole and go down in a hole that is either empty or shared with another stitch.

When ending threads using the basketweave, the first impulse is to run the needle under the work at a diagonal on the back.  Please don't do this. It will leave a line you can see on the front.  Either go along the horizontal or the vertical when burying your ends on the back.  This will be much less visible on the front.  When you bury your thread on the diagonal, you are using a single row of stitching and disturbing that row.  When you go along the horizontal or vertical, you will be using a single stitch out of several rows each. I know that if you use the "other" diagonal, you won't be disturbing a single row of stitches, but it is easy to become confused or grow careless.

If you stop stitching at the end of a row, it is possible to do two up rows or two down rows one next to the other.  This is not a good idea as you will find a diagonal line becomes visible on the front of your stitching.  If you stop stitching in the middle of a row, you will find that it is easier to start up again in the correct direction.  It is also easier for me to end my threads neatly.

This was plenty for me to keep sorted out as a beginning basketweave stitcher and if you have grasped this much, you will be producing some good work.  For the ultimate in basketweave, you should be paying attention to whether or not the top thread of the canvas intersection is horizontal or vertical.  If the top canvas thread is crossing in the vertical direction, you should be in the midst of stitching a down row.  Your thread on the back will be vertical.  If the top thread is crossing horizontally, you should be stitching an up row with horizontal threads on the back.  Fortunately, you establish this pattern with your first stitch and every other stitch should fall correctly,  without you having to check every single stitch.  This is also a useful way to keep track of where you are when jumping from one area to another and when starting and stopping rows.

If you need to make a shape other than a square or triangle in basketweave, you simply don't turn and go back for the next diagonal on the same row or column of the canvas threads.  On a doodle canvas, try filling in some circles.  You should not be placing your first stitch at the very top, but more to the right and slightly down.  Your first stitch will then not be a singleton, but will be one of a row, going up or down, depending on where you started.  Remember to avoid long tails of thread on the back when you move from row to row.

If your shape has very long, skinny areas, you may find yourself trying to stitch a single row or line in basketweave.  You will immediately see that you produce the continental stitch.  That's correct.  You cannot stitch a line of single stitches traveling horizontally or vertically using basketweave.  If you are working on the diagonal for lines that are a single stitch wide, you may want to use the basketweave for the \ rows and a backstitch for the / rows.  Do not turn your canvas sideways for diagonal rows of a single stitch.  Try to always work in a right to left and top to bottom pattern similar to writing a page of text.

I find it is better to work both background and pattern together, rather than filling in all of the pattern first and then doing the background.  Hold your canvas up to a strong light and try to look through it to check for missing stitches.  Basketweave and continental each use up about the same amount of thread.  The general rule is one and one half yards for each square inch of stitching.

Sunday, January 18, 2015

New Career!

I have started a business. Studio PALS, LLC. I bought an Avance commercial, 15 needle embroidery machine. I've gone through many hours of training on it. I got digitizing software to create designs to use. I've had many hours of training on that, too. While I don't feel cocky, I am confident that I can produce a quality product. Go me!

Tuesday, October 7, 2014

Trimming for Applique

I have one favorite tip that I use for creating cleaner edges when doing machine applique in the hoop. I use a lint brush. Not one of the ones with adhesive, one that has velvet with a nap on it.

After I attach and trim, I brush in all directions.

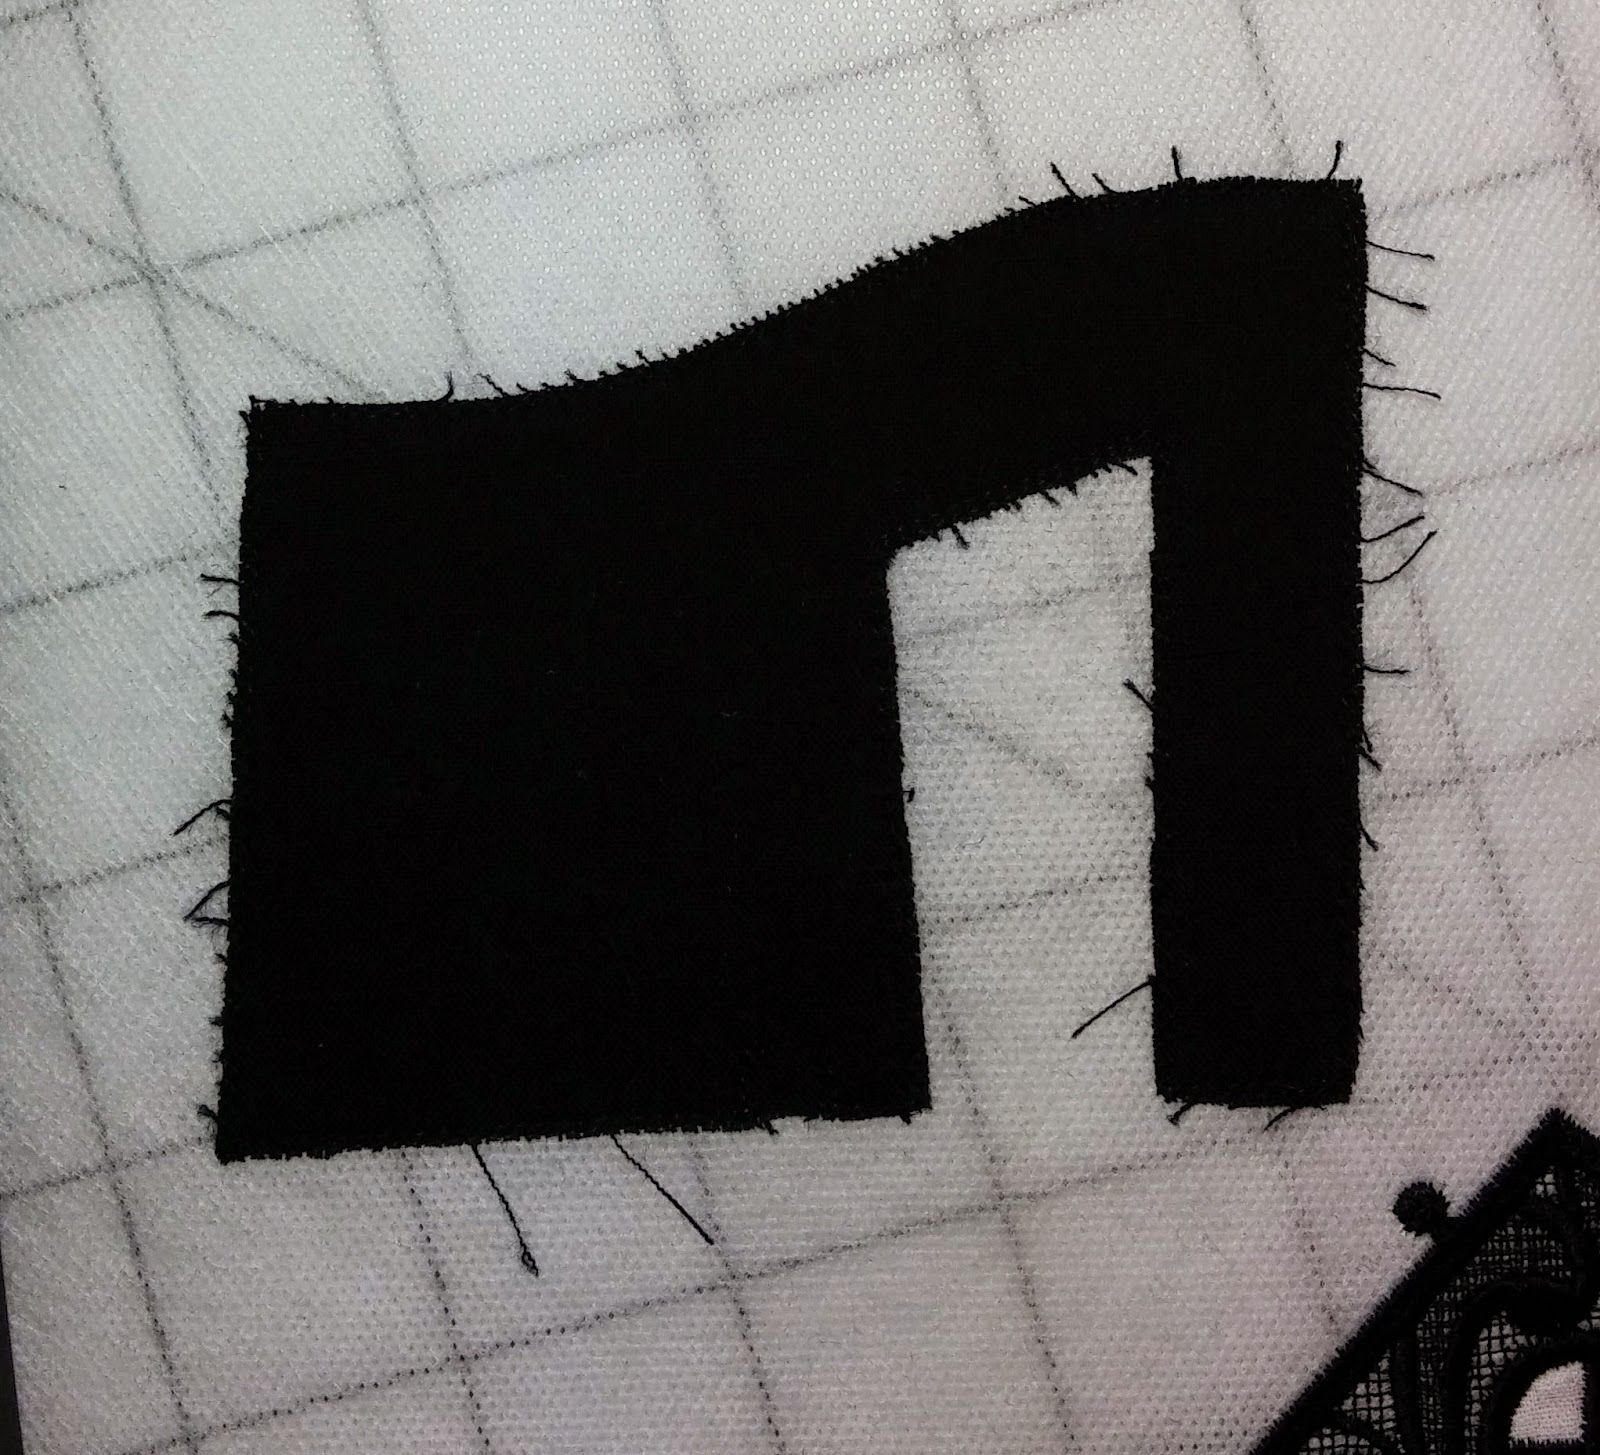
Here's what a piece looks like after trimming and before the lint brush.


And here's what it looks like after I go over it with the lint brush. 

I can easily trim those threads now that I can see them.

I keep brushing and trimming until there are no more threads that stick out to be trimmed off. Even then, I'll still have the occasional thread that pokes out where I don't want it. For those, I suggest a permanent marker.

Friday, June 20, 2014

Speed Piecing

Quality takes time. I mentioned to one of the instructors that I know that I don't actually care for any 'speed piecing' techniques. She agreed that she didn't care for them either. I gave myself a mental high five. When it gets right down to it, most of the speed techniques are either a variation of chain sewing, or they are a stack and whack technique for cutting a whole lot of fabric just a bit crooked in one pass.

Chain sewing is supposed to save time and thread. I use up about 3-4" of thread each time I stop and start a seam. 4" of thread out of an 875 yard spool? That I got on sale for 40% off? Even the best quality cotton thread degrades when stored and should not be kept for years and years. I use it or toss it out.  Save time?  I'm not running my sewing machine any faster. In theory, I'm saving time by not stopping to clip threads. They don't clip themselves. I just spend time after I sew, clipping threads.

And 'stack and whack' cutting? I've never done it. The name alone made me shudder and stay away. What part of 'whack' leads anyone to think about accuracy? 'Nuff said.

There is the final, Zen consideration. If I like to sew and enjoy spending my time sewing, why would I want to seek out ways to spend less time sewing?

Sunday, May 25, 2014

Where is the Reward?

The Mariner's Compass quilt that I'm making is going well. I'm being reminded of why I enjoy sewing.

The method of cutting fabric that is taught in this pattern wastes fabric, but saves time. I cut yards of fabric into strips, then cut the strips into shapes, then trim away fabric from the shapes. The strips are larger than the shapes, so I cut fabric away to create my shapes. And the shapes are larger than they need to be. Why? Because when you are working quickly,  you can't be accurate.

If I enjoy what I'm doing, I don't want to rush through it. Saving time means that I don't spend as much time doing the things that I like. I'm finished quickly.  I don't want things done in a hurry. I'm not being rewarded by the finished item alone. I'm also rewarded by the task itself. For me, working quickly takes away some of my reward.

If you love what you are doing, you don't need patience, you need more time to do it.


Thursday, March 13, 2014

Marking and Quilting

I've been using the chalk pencil and the air erasable marker to mark small sections of my quilt before I start a session of machine quilting. The air erasable marker lasts for more than one session before it fades off into no marks at all. The chalk pencil will brush off as I work and I have several times had to refresh the marks right before I stitch an particular area. Annoying as that might be, I'd rather the marks be too transient than permanent.

There is a huge fatigue factor. I'm a beginner, and I'm more tense than I wish I were. I don't have the muscle memory yet, though I can tell it is improving. I work very slowly, so I spend more time tensed up per pattern repeat than when working faster. Do I want to speed up? Certainly! I'm just in no rush to do so. I'd rather practice accuracy slowly than disaster at high speed. 

  • Repositioning my hands very frequently helps.
  • Making sure that the quilt is not falling off the table helps.
  • Planning ahead so I don't have to sew accurately 'backwards' helps.
  • Working in short sessions with significant breaks between them helps.
There are 244 pattern repeats on the quilt. The first day I tried, I completed three. I stopped after I got two of the scrolls upside down. Yesterday, I managed to complete 6. Today I did 10, and they look better than the first 9. By the time this quilt is completed, I should have the pattern stitch perfect.

Thursday, March 6, 2014

Practice Makes Better

I am practicing free motion quilting. I'm putting in multiple short sessions each day. I was trying designs that were beyond my skills and getting frustrated. I went backwards down the skill ladder to the basics. Instead of trying to put together sets of small squiggles to create leaves, I just worked on squiggles in different sizes and directions.

The tutorial blogs are not useful for an absolute beginner.  They assume a pre-existing skill set. The ease of each design is not correctly rated as a result of this assumption. There are some things that are difficult, like restitching on top of an already stitched line or precise angular changes of direction. Some designs are easier when larger, some are easier when smaller. All designs are easier with guide lines chalked on the surface fabric.

Today, I was practicing spirals. First, I practiced drawing them on paper. Then I drew them on my fabric and stitched over my guide lines. The most difficult part is changing directions smoothly from spiraling inwards to spiraling out. When I got it right, it felt easier than it was when I got it wrong. The positive reward for success was a reinforcement. After many failures, the frequency of success increased quickly.

Do I find it embarrassing that I have had to drop to such simple designs? Nope. I understand that if I can't do these, I won't be able to ever do a more complex design. Mastering the building blocks first will create a skill set that will allow me to manage the more difficult patterns later. The simple designs, well executed, will be effective on a quilt. They are certain to look better than a more complex design poorly executed. 

Monday, February 10, 2014

Racing to Finish?

Not. I'm having a good time working on this quilt slowly and steadily. I'm working in small sections. And I really do mean small. I trim my blocks down to be the correct size before I sew them together, so there are no wobbly edges. I'm sewing together groups of five geese blocks at 6.5" by 3.5" to create something that is 6.5" by 15.5".  It is only four seams.

For those that are doing mental math and not coming up with the correct finished size, I am working with a .25" seam allowance. All the missing .5" sections are used up in the seams.

Because I don't need to sew a lot to hit my defined target for success, I am allowing myself to be picky and precise. I check and double check, and I pin my blocks together before I sew them.  This is gaining me accurate results for what I am spending in time. It is not costing me in frustration for slow progress.

Accuracy is not always in skill; a great deal of it is in time, double checking each measurement, and not skipping steps for basic construction.

At the rate I'm currently putting this quilt together, it will be completed some time in June.

Saturday, January 18, 2014

My Studio

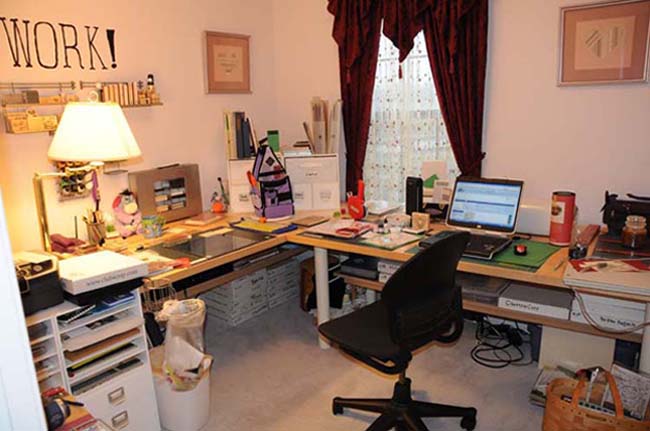
The image for this blog heading is my old studio in Virginia. My studio space in Florida doesn't photograph as well. I took over the living and dining room of this house and laid out my studio to have space for paper, computer, sewing, and embroidery. I ended up putting in a space for my grandson to work on his projects. Paper is the northeast corner, embroidery is the southeast corner, sewing is southwest, and reading/grandson space is the northwest corner. He gets the square coffee table and can sit on the floor.
There are five bookcases. There are crates, boxes, and tubs. There is storage under the paper crafting tables and under the cutting table. I have my grandmother's sewing cabinet, my mother's sewing cabinet, and my grandfather's curio cabinet. Storage, as they say, is non-trivial. There are also six tables for workspace, not counting the ironing board.

While ten people could not all work in here at once, there are ten separate work zones. Cutting, sewing, ironing, reading, kid, computer, embroidery, diecuts, paper and stamping/beading. I use lots of local lamps as the living room has no ceiling light. The dining room has the chandelier, that I got Bud to loop up high enough to walk under. Neither window gets a lot of direct sunlight. That's a Good Thing down here. Direct sunlight = hot. 

I put up a folding screen to block access from the butler's pantry and a dog gate to block access from the front hall. There are toxic things in my studio that would kill Jack if she were to get her teeth into them. Jack would not still live Some of them are stored well within her reach. Even my grandson is not allowed in if I am not in here with him.

Even with this incredible workspace, before I quit working, I didn't feel like making stuff very often. Now, I'm getting back to work in a big way. Each day I either make significant progress on a project or I finish something off. With all that, I have only  started my attack on three years of round tuits.

Wednesday, April 18, 2012

Bernina Stitch Regulator

I do free motion quilting. I'd like a Bernina Stitch Regulator, but I am not willing to pay $12,000 for a Bernina 8 Series. I might think about trading in my Artista for a more recent model, but frankly, the price of the upgrade would not be worth it for me. I just don't quilt that much.

Thursday, August 26, 2010

Patternmaking

I've created a few custom garments, making patterns from a set of measurements and a roll of brown craft paper. One of my favorites would be this dress.

It's actually an under dress and the over dress, but the two together were a lot of fun. Unfortunately, I made the under dress before I started an aggressive fitness program and I developed so much muscle that it never fit again and I had to get rid of it. I couldn't put my arms into the sleeves.

There was also a set of dresses made from this pattern.
There aren't any pictures of me in it full length that I have ever seen. But it is based on a 13th century garment, and I added a side lacing, because I was not the shape of those 13th century women. They were much more solid than I will ever be. To make the garment small enough, I just gathered it at the sides with lacing. Unlaced, it was a pullover. Laced, it would never pull over my shoulders. But the skirt swirled beautifully and the belts I wore with it were so flattering. I miss those dresses.

None of my custom dresses fit the new shape I built through diet and exercise and they went the way of the recycle bin. The old me was so small, through both frame and muscle that there was no way I could even hand my old clothing down to a child.

Wednesday, July 7, 2010

Bed Evening Gowns

I bought several different, coordinating fabrics to make a bed skirt and hangings years ago, when I got a canopy bed. The bed skirt was to be a celery green moire cotton and have an over layer of a green-purple flip flop sheer. I got enough to do box pleats, for triple fullness, and even debated having the skirt puddle on the floor slightly. The hangings were to be in royal purple cotton velvet with matching bobble trim. I showed Bud the velvet for the hangings and he touched it and sort of smiled. He's a guy. Anything purple, even royal purple, is not macho. It can only be excused as making the wife happy.

I'm finally using the fabric. I'm working on the bed skirt first. I've only finished the part that goes at the foot so far, but I like it. Bud was strongly anti-puddle, so it just touches the floor. When I tucked the partly finished bed skirt at the foot of the bed, Bud declared that we were not going to have a bed skirt. We were going to have a bed formal gown. It is a very lush look and exactly what I wanted.


Last night, I teased Bud by draping the bobble trim all around the canopy of the bed. Then we watched "Revenge of the Nerds" on cable, and climbed into a bed draped with purple bobbles. Rather nerd-like. Bobble trim makes me smile each time I look at it. I couldn't help it, I found it to be so funny it was difficult for me to stop laughing.

Bud then mentioned that with the hangings and the formal gown, we were going to need a bedspread next. And that it would be almost impossible to purchase one that matched. I'd probably have buy fabric and make it. Killjoy.

Thursday, May 27, 2010

And More Curtains

I finished the studio curtains in no time flat and have been plugging away at pinch pleats for the great room sliding glass door. These are the largest curtains I'm willing to tackle and they are not small. I spent a lot of time working on the math for these windows and it's paying off. They are coming out well.

Sunday, May 23, 2010

Curtains!

Wonderful hubby put up a curtain rod for me weeks ago and I haven't yet created the curtains for my studio. It is time. I'm going to create those curtains today. I've had the fabric and the trim for a while. It shouldn't take too long. They will be simple sheers with purple bobble trim on the edge. I can't look at bobble trim without smiling. And because my girly soul wants it, a ruffle at the top, too. Fluff!

Monday, May 17, 2010

Why Knit?

I can't understand why anyone in Florida would want to knit a sweater. I stopped into a yarn store and spotted a whole lot of models on the walls getting dusty. They couldn't sell them, they couldn't sell the yarn to make them. I'm amazed that the yarn store was open at all. Selling yarn for making socks? Yeah, that's going to bring in incredible profit. Two balls of yarn at a time.

Saturday, January 9, 2010

Threaded Needle Works

I used to do a lot of embroidery. I gave it a rest when my eyes went wonky, but they've calmed down quite a lot and I have pulled out a piece of canvaswork that I'd started a few years back. As I was working on it, I decided that I hadn't chosen the correct red for a ribbon that twines through the pattern and I have been frogging it out.

The frogging is going well. There are five separate areas I must frog, and I have completed three and am over half done with the fourth.