Showing posts with label tips. Show all posts

Monday, November 14, 2016

Basketweave Stitching

The basketweave stitch is one of the three tent stitches. They all look almost the same on the front, but they don't look the same on the back. It is good for filling in large areas of all shapes, though stitch diagrams often show this stitch as a neat square or a triangle.  It distorts the canvas very little and is just as easy to work in hand as in a frame.  You do not have to turn the canvas for each row.  The front of the work is a tent stitch, with each stitch covering a single intersection of the canvas from lower left to upper right.  On the back of the work, the basketweave looks like a woven fabric, with horizontal and vertical threads.  At the edges of the work and at the edges of areas of each color, the basketweave looks like a single row of the continental stitch.  You have to look very closely to see this, and it is not visible on all edges.

As you work the basketweave stitch, you bring your needle up at the lower left and go down at the top right of each stitch.  You will come up in an open hole and go down either in an open or shared hole.  On the back your threads are either over two horizontal or two vertical threads.  The exception is at the edges, where it looks like a single row of continental stitches.


This stitch diagram has each pass of the needle marked.  To make things more clear, I will mark an identical diagram, but just number each stitch in the order you should place them.


In this diagram, each stitch is numbered.  Bring your needle up at the number and go down to complete a tent stitch over a single intersection.


When you are working a row from the bottom to the top, this is the stitching order.  If you look at the back of the canvas, your threads are horizontal, crossing two threads of the canvas.  Most of the time a row like this is referred to an "up" row.  Up rows are more fun and easier for me to work.  I have to be careful to not pull my thread too tightly when working in this direction.


In this diagram, a "down" row has been indicated. The overall stitching direction is from the top to the bottom.  Your thread on the back will be vertical over two threads of the canvas.  Because of the angle of the needle, I find this row to be less fun to work.  It isn't any harder than going in the other direction and I don't have tension problems with this row.  Win some, lose some, I suppose.


Please remember that these up and down rows of stitches usually share canvas holes with other rows, leaving no empty intersections.   You bring your needle up in an empty hole and go down in a hole that is either empty or shared with another stitch.

When ending threads using the basketweave, the first impulse is to run the needle under the work at a diagonal on the back.  Please don't do this. It will leave a line you can see on the front.  Either go along the horizontal or the vertical when burying your ends on the back.  This will be much less visible on the front.  When you bury your thread on the diagonal, you are using a single row of stitching and disturbing that row.  When you go along the horizontal or vertical, you will be using a single stitch out of several rows each. I know that if you use the "other" diagonal, you won't be disturbing a single row of stitches, but it is easy to become confused or grow careless.

If you stop stitching at the end of a row, it is possible to do two up rows or two down rows one next to the other.  This is not a good idea as you will find a diagonal line becomes visible on the front of your stitching.  If you stop stitching in the middle of a row, you will find that it is easier to start up again in the correct direction.  It is also easier for me to end my threads neatly.

This was plenty for me to keep sorted out as a beginning basketweave stitcher and if you have grasped this much, you will be producing some good work.  For the ultimate in basketweave, you should be paying attention to whether or not the top thread of the canvas intersection is horizontal or vertical.  If the top canvas thread is crossing in the vertical direction, you should be in the midst of stitching a down row.  Your thread on the back will be vertical.  If the top thread is crossing horizontally, you should be stitching an up row with horizontal threads on the back.  Fortunately, you establish this pattern with your first stitch and every other stitch should fall correctly,  without you having to check every single stitch.  This is also a useful way to keep track of where you are when jumping from one area to another and when starting and stopping rows.

If you need to make a shape other than a square or triangle in basketweave, you simply don't turn and go back for the next diagonal on the same row or column of the canvas threads.  On a doodle canvas, try filling in some circles.  You should not be placing your first stitch at the very top, but more to the right and slightly down.  Your first stitch will then not be a singleton, but will be one of a row, going up or down, depending on where you started.  Remember to avoid long tails of thread on the back when you move from row to row.

If your shape has very long, skinny areas, you may find yourself trying to stitch a single row or line in basketweave.  You will immediately see that you produce the continental stitch.  That's correct.  You cannot stitch a line of single stitches traveling horizontally or vertically using basketweave.  If you are working on the diagonal for lines that are a single stitch wide, you may want to use the basketweave for the \ rows and a backstitch for the / rows.  Do not turn your canvas sideways for diagonal rows of a single stitch.  Try to always work in a right to left and top to bottom pattern similar to writing a page of text.

I find it is better to work both background and pattern together, rather than filling in all of the pattern first and then doing the background.  Hold your canvas up to a strong light and try to look through it to check for missing stitches.  Basketweave and continental each use up about the same amount of thread.  The general rule is one and one half yards for each square inch of stitching.


Wednesday, October 8, 2014

Today's New Thing

Each day, I learn another thing about Mama Bernina. Today, I learned that using up whatever I have left in my studio is not a good idea. I was using several different brands of bobbin thread. One of them acted badly when I tried to use it and I had no idea what was wrong. Fortunately, it was not a large spool and I was able to toss out what I had left of it. I ran around in circles and pulled out my hair before I figured out it was the bobbin thread.

Today what I learned is to use standard materials and always use the same stuff when you are learning. Do not try six different things when you don't know what you are doing. You have no idea what the results are going to be and even worse, you don't know why you got those results, either! If it turns out great or turns out crappy, you don't know why. You haven't learned anything useful because you can't do it again, or do it differently on purpose the next time.

Tuesday, October 7, 2014

Trimming for Applique

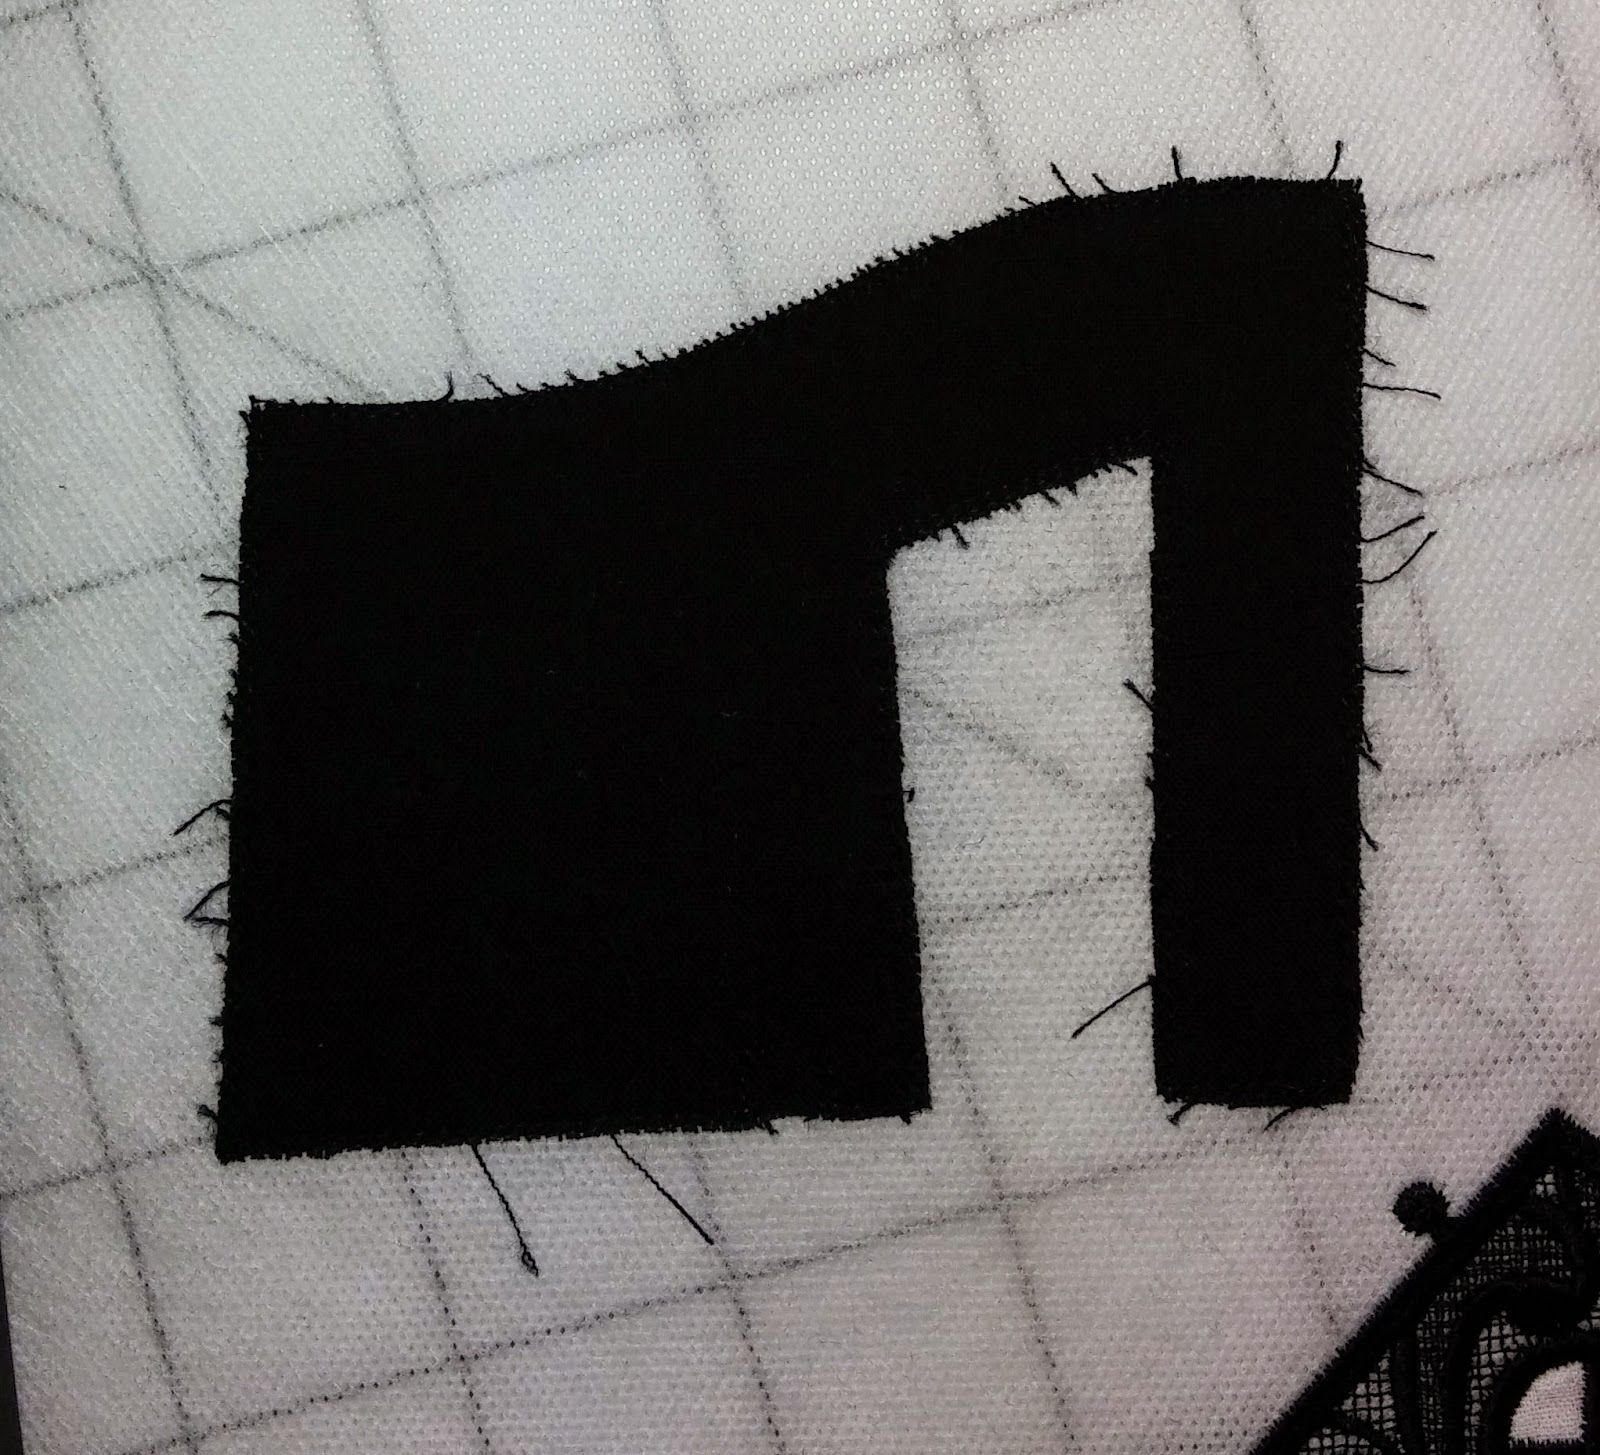
I have one favorite tip that I use for creating cleaner edges when doing machine applique in the hoop. I use a lint brush. Not one of the ones with adhesive, one that has velvet with a nap on it.

After I attach and trim, I brush in all directions.

Here's what a piece looks like after trimming and before the lint brush.


And here's what it looks like after I go over it with the lint brush. 

I can easily trim those threads now that I can see them.

I keep brushing and trimming until there are no more threads that stick out to be trimmed off. Even then, I'll still have the occasional thread that pokes out where I don't want it. For those, I suggest a permanent marker.

Sunday, September 28, 2014

Up and Running!

Mama Bernina is back in her usual spot and has been running steadily since I got her back and got home from the quilt show. At first, she was clattering a bit, but I threw oil at her and she quieted down. Project comments later.

While Mama was in the shop, I went through my embroidery designs, both in digital and physical form. In digital form, I have a master directory that contains ALL of my digital versions. The key is that there is only ONE master directory. I copy only the version of the designs that I will use into my master directory, into a folder with a descriptive name. "Collection #12513" tells me nothing. "Halloween Couture" tells me a lot more. Into that folder, I also copy the digital version of the directions, if there were any included. 

When I buy a CD of designs, I put the printed directions and the CD together into a plastic organizer sheet that goes into a 3 ring notebook. I don't keep the bulky plastic cases that the CDs come in.

My stuff is easy for me to find, and the system isn't complicated and time consuming to use. Win!

Sunday, August 10, 2014

The Backlash Spring

Aha! I adore YouTube in small doses. I was looking for information on Endless Embroidery and I found an incredible video from Bernina Tampa on how to manage that spring in the bobbin case that gave me so much trouble.

The trick isn't just to pop it into place. I'd been lucky with that. When I removed it to photograph the darned thing, I found that I also had to press the spring into place all around the edge of the spring. I used the tip of my Purple Thang and it worked perfectly. It still didn't take lots of pressure. About what I'd use when writing with a pencil was good. The test is to pull on the thread and feel that the tension is steady and doesn't get tight and then loose again or that it isn't horribly tight and doesn't get loose at all. If the spring is really out of place, you can't load the bobbin into the case in the first place.

If you look through the videos that are listed off to the right, you can find quite a few videos on Bernina mechanical and digital functions. I am NOT suggesting that you follow the directions and attempt to become your own Bernina tech. But knowing what's going on inside your machine never hurts.

I continue to learn, a little bit at a time, about this machine. Later today, I'm off to another class on Embroidery with Big Mama B. Details to follow!

Tuesday, March 25, 2014

Adjustments and the Learning Curve

I was trying to switch from embroidery to decorative stitching. I forgot to swap out a piece of hardware and broke a needle. Not just broke, shattered into many pieces. Sigh. I wasn't able to get all of the bits of needle out of the bobbin area right away. I ended up pulling out the vacuum cleaner attachments after many attempts with the lint brush. I'd clean, try sewing, discover the tension was incorrect, then go back to cleaning. In all the testing, a metal fragment knocked the tension for the bobbin thread out of whack. It was too tight. Gaahh. Normally, having the bobbin tension out of whack is a significant problem. It is not at all easy to adjust the tension on the bobbin. Well, on all of my other machines, it was difficult. However, on the 830, I was provided with a special tool and the bobbin case has a ratchet style tension adjustment. I moved the tension one notch/click and tested, moved it a second notch/click and tested and poof! The tension was again correct. While many might say that the 830 tension is twitchy and difficult, I think that adjusting the bobbin tension on this machine is much easier than on any other machine I've owned. On the other hand, I also have learned that I need to use the software on the 830 that will prevent the error that caused the broken needle in the first place. I neglected to tell the machine that I had changed hardware. If I had done that, the machine would have prevented me from stitching with hardware that didn't work with the decorative stitch I had chosen.

Saturday, March 15, 2014

Waste Fabric!

I was digging through the instructions for the Mariner's Compass quilt to figure out how many yards of fabric I needed to buy. I was dutifully reading through the directions, making notes and adding up inches when I looked at the actual layout of the pieces. Instead of looking at a tiny diagram, I took out the pattern and unfolded it.

Wow. I can tell the fabric manufacturers LOVE this woman. The layouts are for speed during construction, not efficient use of fabric. Not by a long shot. In some cases, I'll use her suggested amounts of fabric. In others, I'm going to take apart her pattern and put it back together in a much more fabric efficient way. There is no way I can allow myself to waste that much fabric. Not at $13.00 a yard for batik cotton. I'm not the kind of person who saves every scrap for use in some other project. I hate scrappy projects.

Thursday, March 13, 2014

Marking and Quilting

I've been using the chalk pencil and the air erasable marker to mark small sections of my quilt before I start a session of machine quilting. The air erasable marker lasts for more than one session before it fades off into no marks at all. The chalk pencil will brush off as I work and I have several times had to refresh the marks right before I stitch an particular area. Annoying as that might be, I'd rather the marks be too transient than permanent.

There is a huge fatigue factor. I'm a beginner, and I'm more tense than I wish I were. I don't have the muscle memory yet, though I can tell it is improving. I work very slowly, so I spend more time tensed up per pattern repeat than when working faster. Do I want to speed up? Certainly! I'm just in no rush to do so. I'd rather practice accuracy slowly than disaster at high speed. 

  • Repositioning my hands very frequently helps.
  • Making sure that the quilt is not falling off the table helps.
  • Planning ahead so I don't have to sew accurately 'backwards' helps.
  • Working in short sessions with significant breaks between them helps.
There are 244 pattern repeats on the quilt. The first day I tried, I completed three. I stopped after I got two of the scrolls upside down. Yesterday, I managed to complete 6. Today I did 10, and they look better than the first 9. By the time this quilt is completed, I should have the pattern stitch perfect.

Tuesday, February 18, 2014

Everything Works, if You Let It


I had some polyester satin to line a garment. I knew it was going to ravel and that I should take the pieces directly from my cutting table to the sewing machine, to finish the edges as quickly as possible. But I foolishly thought that if I simply did not touch the cut pieces, I'd be good for a while.

I cut the pieces using a rotary cutter, for the least possible jostling and movement. I removed the waste fabric, the pattern, and the pattern weights and left my lining pieces as little touched as possible on my cutting table. Glancing up from working on some other task, I watched as threads unraveled and fell from the edge of the piece to my cutting table without me even getting near them. No drafts, no movement. The threads were simply falling off with no outside interference.

I got those pieces to my sewing machine immediately, but still ended up having to re-cut some of them, as so much fabric had unraveled that they were no longer the correct size. Lesson learned.

Saturday, February 15, 2014

Not That Way Again

I followed directions like these on how to put together the flying geese for the quilt that I'm in the throes of. It wasn't this specific set of directions, but the whole assembly process is the same.

I will NEVER again use this process.

There is an overlap in the first phase of stitching that creates an incredibly lumpy seam allowance at the point of the big triangle. That lumpy seam allowance is pure torture to sew over accurately. Agony. Painful. Annoying to the Nth degree. Pinning carefully does NOT help.

And only now am I realizing this, as I created all of the pieces before I started sewing them together. And even then, I had to sew lots of them together before I could define the problem.

I've long said that there are prices to be paid for short cuts. Some of them are worth it, some are not.

Tuesday, January 21, 2014

Cricut Flower Shoppe

I have this cart for my Cricut and I kept fighting with it. I'd look up instructions and get something to almost turn out, but I wasn't ever really happy.

I have had an epiphany! The flowers are put onto the cartridge display in pieces sorted into columns. If you start at the top of the column, you will have the center of the flower. Then, you simply cut each pattern down the column and you will have the middle and outer petals of the flower. Last, at the bottom of the column, you have leaves that match the flower.

For an initial test, cut everything at the same size. 2.75" is a good start. after you play with your flowers a bit, you'll find which pieces you want to cut smaller or larger. I like to cut the centers up to two times larger because I like they way they look. 

To roll up the center of the flower, start at the outside of the spiral. Roll around a toothpick or needle to start. I use a paper piercer, because it has a nice handle on it. I don't roll around the paper piercer for long, only an inch or two. I remove it and keep rolling. The ruffled edge can do whatever it wants, but the goal is to keep the smooth edge even, to create a flat piece that will glue down to the tab that's left at the end. The angle of the spiral will cause the petals to fan themselves out. Then allow the spiral to spin loose to be just a smidge larger than the center tab. Don't worry that you aren't gluing down the entire spiral. It won't came apart if you glue enough of the first length that you rolled up to create the center.

Once the glue has dried, I bend the petals out with my fingers, one petal at a time. If I try to do too many or bend too far, they will rip or crush and the center of my flower looks a bit worse for the wear. I've found that warm, barely damp fingers also help. Cheap paper is frustrating to work with.

It is dark in my studio at the moment and a picture will be a fail. When I have sun, I'll add photos.

Sunday, January 12, 2014

Metallic Rubber Bands

Huh. Metallic or 'pearlized' rubber bands don't have the ability to slide as easily as regular rubber bands do. This means they are not a good choice for patterns that are high tension, like the Small Basketweave. How do I know this? I tried to make a Small Basketweave with three different colors of metallic rubber bands. Before I finished, five rubber bands had broken. And further deponent sayeth not.

Saturday, January 4, 2014

Rainbow Tips

Well! I have discovered that needing to buy a second loom is simply an early stage in the addiction. I now own six looms. Yes, that's correct, SIX. Since I own some knock-off looms, I am shopping for more of the Rainbow ones.

On to the tips.

When loom shopping, don't go anywhere near the knock offs, no matter how close to the original they might appear. It isn't worth the aggravation. (Trust me on this, been there, done that.)

Flipping the rubber bands into a figure eight is a bother. I just loop the rubber bands onto the pin that is farther away from me, then turn my hand over and loop them onto the closer pin and get my figure eight much faster.

To avoid bending or breaking hooks, remember to slide the rubber bands to the thicker part of the shaft when doing things that require pulling and tugging.

Rainbow Loom C clips are better than the S clips that are found in off-brand rubber band packs.

The more complex patterns that create wide, dense bracelets use up an astonishing number of rubber bands. Getting extra of black and white is a good idea.

Learn how to attach a button closure. It's worth a few failures.

Expect failures when learning a new pattern. Take your failures apart and try again.

Stretched out rubber bands from failures are fragile and break more easily.

Not all rubber bands from failures will be stretched out and fragile.

Friday, November 22, 2013

Rainbow Addiction!

OK, I've gotten addicted to playing with the Rainbow Loom. But the average sized bracelet this thing creates is 1/2 the standard adult bracelet length. It's all of 4", when an adult bracelet is 8". The solution? Get a second loom, hook the things together and make an 8" bracelet instead.Gradually, I'm getting my co-workers addicted to these silly things as well.

A word to the wise. I first got a knock-off loom. You can't hook it together with a real Rainbow Loom and it doesn't hook solidly to other knock-off looms. The hook isn't as nice and the pegs are not as well shaped. Don't settle for a fake.

Have I noticed a difference in the latex-free rubber bands between the real and the knock-offs?  The knock-offs require that you purchase 'S' clips separately. The original Rainbow Loom bands include 'C' clips with each bag of bands. No additional purchase necessary.  FWIW, no craft store accepts coupons for the loom or the bands, whether knock-off or the real thing.

The basic bracelet that can be made with the Rainbow loom is kinda wimpy. It is a single chain. Doesn't look like much. But a popular bracelet is called a Fishtail. Still, not so much. The Double Fishtail is pretty neat, though. I started there.

Since that first Fishtail, I've made Double Cross, Hexafish, Ladder, and the Starburst. There are more than a few websites that have links to YouTube videos that teach you how to use the Rainbow Loom, including the Rainbow Loom website itself.

As an unrelated topic, I'm amazed at how little research parents are doing to learn how to help their kids work with this contraption. And it isn't difficult research, either. You watch the video, you follow along. Duh!

Saturday, July 23, 2011

PTotD

Tip # 130. The process for saving presets of different types, meaning shadows, styles, Brushes and so on, is functionally the same process. If you can save a style, you can save a Brush and so on. If you aren't paying attention, you'll save things that you didn't want to save included with the things that you did want to save.

I'm thinking of a kit that went up for sale and the designer had included a set of styles in her kit. But since she hadn't been paying attention, she'd saved a set of styles that included ones that were not for sale. She bought them from a different designer and hadn't meant to include them.

The trick is to select only the objects that you want to save in the Preset Manager. The lines around the different styles or Brushes or whatnot will be heavy if the item is selected. Use your Command or control click to select more than one. Shift click will work as well. Only the do you want to click on the save set button.

Don't forget to give your set a descriptive name when you save it!

Monday, June 27, 2011

Photoshop Tip of the Day

An old joke in my family ran like this:

A man is lost in New York City. He can't find Carnegie Hall. He stops and asks a wino, "How do you get to Carnegie Hall?" The wino paused a moment and answered, "Practice, man practice!"

That's pretty much what I heard from an airbrush expert this past weekend. He spends time doing drills, thousands of them. He can create strokes that look identical because he's done it thousands of times. I'm not saying you need to press the keyboard shortcut for the Brush tool a thousand times. You do need to continually practice what you learn. Use it or lose it.

Sunday, June 26, 2011

Organization

A large part of using Photoshop is being able to find the graphics you are going to work with. This means organizing your photos and organizing the kits, templates, overlays and so on that you have bought. Spending time learning shortcuts to work faster will do you no good if you are wasting time searching for your files.

Organize in a way that works for you. Using a system that someone else created won't help if your brain doesn't work that way. If you think in dates, working best chronologically, a system that uses names in alphabetical order won't work for you. The one thing that will help any system is to use complete words. If you are labeling something from a trip to Orlando, "Orl" is not the best choice. "Orl" could also stand for "New Orleans" or "Oriole."

Don't think you must purchase fancy software to organize your images. I managed for many years simply using the directory structure of files, folders and sub-folders present in Windows. Now that I own the fancy software, I still use that structure as the base of the system.

Monday, May 9, 2011

PTotD

Tip #129. Those Swatches that are available in the Color/Styles/Swatches panel by default are a fast and easy way to select a color. The cursor will turn into an eyedropper when it is over the swatches panel and a fist will let you know that you have successfully clicked to grab a color. Glance over at the background/foreground icon to make sure that you got the right one. Hover your cursor over a swatch to see what it is named. If you right or option-click in the panel, you can save a color you like as a swatch. Make sure you give it a descriptive name. You use the Preset Manager to save your swatches as an .aco file. They aren’t saved unless they are in a file you can back up. Photoshop will remember them if you close down the application, but that doesn’t mean they are saved!

Sunday, May 8, 2011

PTotD

Tip# 128. Gradients are a great way to put a little more interest into a background. Give this a try. Open a document and put in a ho-hum kind of background. Create a new layer above it. Select black or some dark color from your swatches and then select the Gradient tool. The Keyboard shortcut is the letter G. You might get the paint bucket first, but you want the Gradient tool. Then go to the options bar and select from the second drop-down from the left to set the kind of gradient. The first choice is from a foreground color to white, and the second one is from the foreground color to transparent. You want to use the transparent option. Then look at the icons.to the right of that. The first one is a horizontal gradient, the second is a radial gradient, the third is Angle, the next is reflected and the last one is diamond. If you hover your cursor over the icons, you’ll see a name pop up. The one you want for this is the radial gradient. Next, click inside your layout somewhere around 10:00 and drag down towards 4:30. A line will appear, indicating the direction of the gradient. When you release the drag, a layer of color will appear that fades from your start color and start point down to transparent at the end point. Whee!!! If you want it to be darker or lighter, select a different color, change the opacity of the layer, or make the drag line start and end in different places.

Saturday, May 7, 2011

Photoshop Tip of the Day

Tip # 127. When making a tricky selection, there isn’t anything wrong with making adjustments to your image to make the selection tools work better. Your goal is a good selection. You can add an adjustment layer, and tweak the contrast to be incredibly wrong, for example. Just ditch the adjustment layer after the selection is made. Or, if you are using Smart Objects, you can revert back to the original. Wow. What a concept.